Spider Mites on Indoor Plants – Signs and Treatment

 Covers why indoor plants attract spider mites, the first visible symptoms, and how dry air fuels outbreaks. Explains how to check leaves for early detection, safe indoor treatment methods, how to clean plants after treatment, and how to prevent reinfestation.
Tiny sap-sucking mites can quietly overrun houseplants, leaving leaves speckled, dull, and sometimes webby before you notice. Spotting early warning signs and using proven treatments lets you act quickly and protect your favorite plants. This guide explains what symptoms to watch for, how to confirm an infestation, and simple steps to control mites and prevent them from returning.
Why indoor plants attract spider mites
Indoor conditions can quietly stack the deck in favor of these tiny sap-suckers. Many homes provide steady warmth, low humidity, and a lack of natural predators, which makes it easier for mites to feed, reproduce, and spread from one houseplant to the next before you notice anything is wrong.
- Dry air speeds them up. Spider mites thrive when humidity is low, which is common during winter heating or in air-conditioned rooms. In drier air, plants also transpire more and can become slightly stressed, making leaf tissue easier for pests to exploit.
- Consistent warmth helps them reproduce. Unlike outdoors, indoor temperatures don’t swing much between day and night. That stable “always comfortable” range can shorten their life cycle, so populations build quickly. Even a small change, like keeping plants at 24°C (75°F) instead of 20°C (68°F), can make outbreaks feel sudden.
- Dusty leaves give them cover. A film of dust can reduce photosynthesis and weaken the plant over time, and it also creates a sheltered surface where mites can settle and webbing can go unnoticed, especially on the undersides of leaves.
- Stressed plants are easier targets. Underwatering, irregular watering, low light, or root-bound pots can all reduce a plant’s defenses. The pest isn’t “attracted” to suffering plants in a magical way, but stressed foliage is often less able to tolerate feeding and shows damage sooner.
- Tight plant groupings make spread easy. When leaves touch, mites can crawl from plant to plant. They can also hitch a ride on hands, sleeves, watering cans, or pruning tools after you handle an infested plant.
- New plants can bring them in. A fresh purchase or a plant brought indoors for the season may carry a small, hard-to-spot population. Because early infestations can look like minor stippling or dullness, they may blend in until conditions indoors let them multiply.
- Predators are mostly missing indoors. Outside, beneficial insects and natural weather events help keep mites in check. Indoors, that balancing pressure is usually absent, so a few mites can turn into a bigger problem without competition.
If you’re dealing with recurring spider mite problems on indoor plants, it’s often less about a single “cause” and more about a combination: warm room, dry air, and a plant that’s slightly stressed. Adjusting those basics can make treatments work better and reduce the chances of another flare-up.
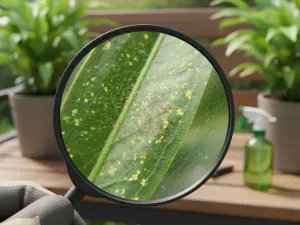
First visible symptoms on houseplants
Early mite damage usually shows up as subtle “stress” rather than obvious bugs. You’ll often notice the plant’s color and texture changing first, especially on the newest growth and the undersides of leaves where these pests feed.
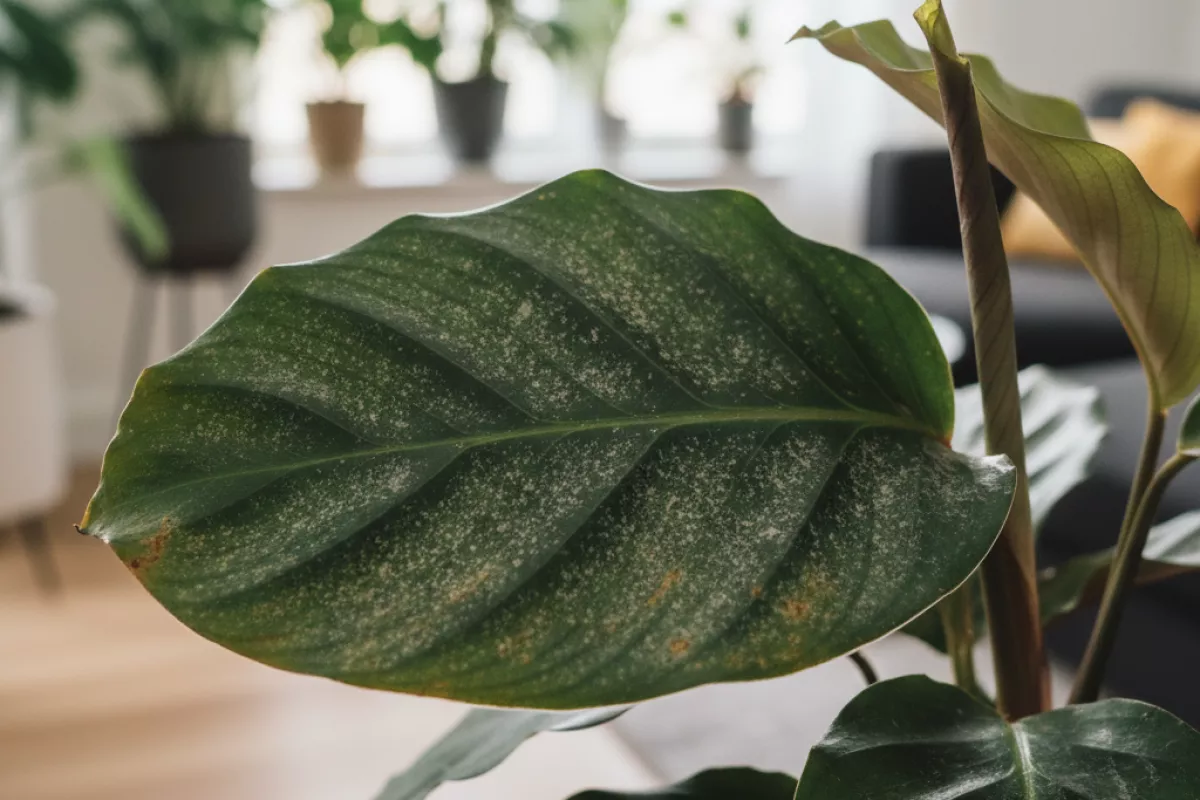
- Fine speckling (stippling): tiny pale dots scattered across the leaf surface, giving foliage a faded, sandblasted look.
- Leaves losing their rich color: greens look dull or grayish; variegated plants can look washed out instead of crisp.
- Bronzing or rusty patches: areas turn tan, coppery, or brown as feeding damage builds.
- Dry, papery texture: leaves feel less supple and may curl at the edges, especially in warm, dry rooms.
- Distorted new growth: fresh leaves emerge smaller, wrinkled, or slightly twisted because mites target tender tissue.
- Premature leaf drop: older leaves yellow and fall sooner than expected, even when watering seems normal.
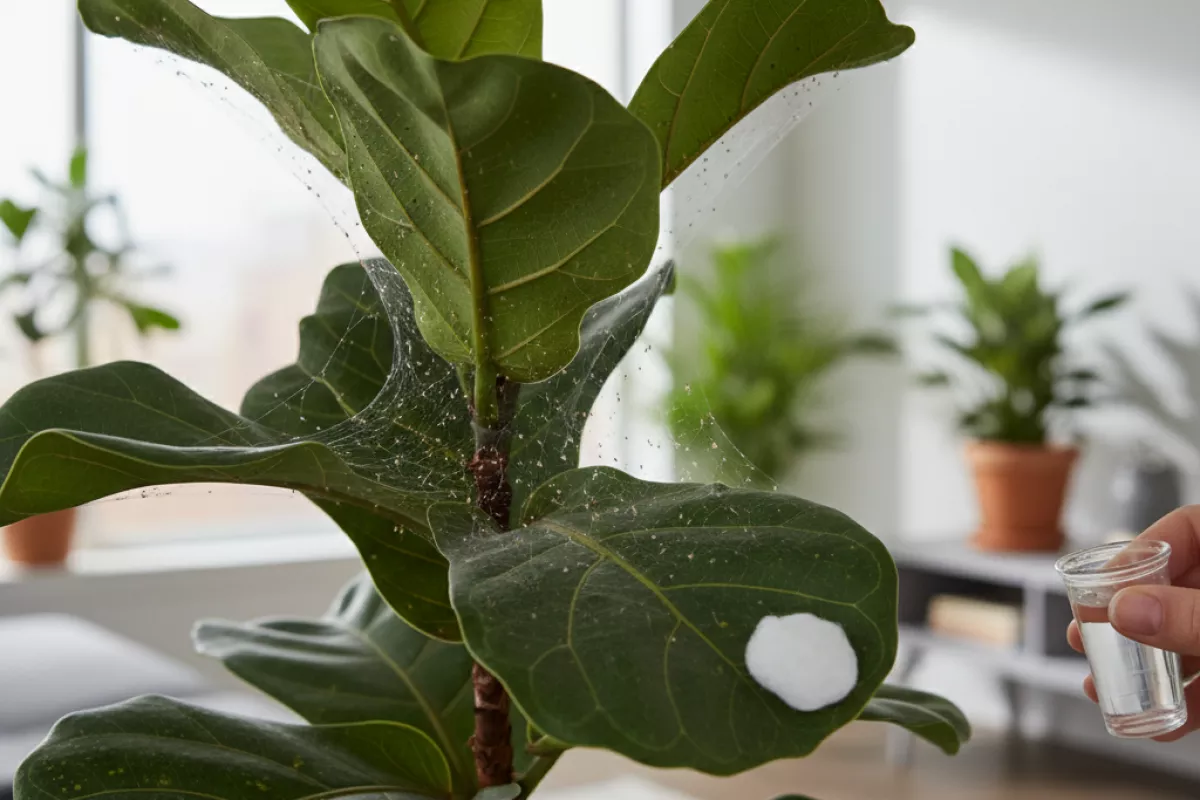
- Fine webbing: delicate threads between leaf stems, along veins, or at leaf tips; this is often a later sign and easiest to spot in bright light.
- Dusty look that returns quickly: foliage seems to “get dusty” again soon after wiping, because webbing and cast skins catch particles.
If you suspect an infestation but can’t see anything moving, check the leaf undersides with a bright light and gently tap a leaf over white paper. Tiny moving dots (often red, tan, or dark) are a strong clue. If instead you find clusters of visible insects or sticky residue, review the signs of aphids on plants to rule out a different pest.
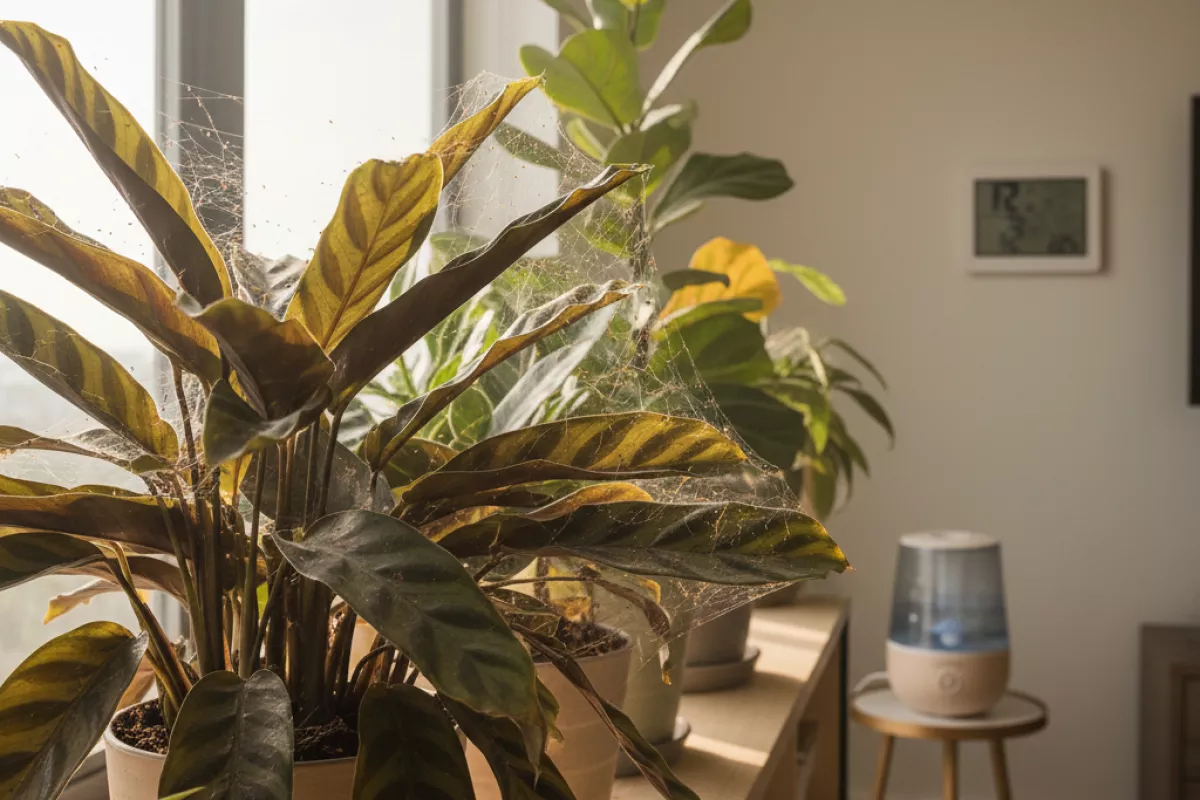
How dry air encourages outbreaks

Low indoor humidity tilts the playing field in favor of spider mites. In dry conditions, the plant loses moisture faster through its leaves, while mites reproduce quickly and feed more aggressively on stressed tissue. The result is often a small, easy-to-miss population that suddenly becomes an obvious infestation, sometimes alongside secondary damage that looks like leaf disease and requires fixing brown leaf spots.
- Plants get stressed and easier to feed on. Dry air increases transpiration, so leaves dehydrate faster than roots can replace water. Stressed plants tend to have weaker defenses, and mite feeding causes more visible stippling, yellowing, and leaf drop.
- Mites thrive in warm, arid microclimates. Many indoor “hot spots” are also the driest: above radiators, near heating vents, on sunny windowsills, and under grow lights. Even if the room feels fine, the air right around the foliage can be much drier.
- Natural controls work less well. Higher humidity can slow mite activity and helps some beneficial predators perform better. In very dry rooms, predators may struggle to establish, and mites can outpace them.
- Dust builds up and hides early signs. Dry homes often have more airborne dust. Dusty leaves reduce photosynthesis and can mask the first pale speckles, letting the problem grow unnoticed.
A practical target for many houseplants is around 40–60% relative humidity. If your home sits closer to 20–30%, consider grouping plants, running a humidifier, or moving susceptible plants away from heat sources. Avoid misting as a “humidity fix” on its own; it’s brief and can create wet leaf surfaces without meaningfully raising ambient moisture.
When you adjust humidity, keep airflow in mind. Gentle circulation helps prevent stagnant pockets while still avoiding the overly dry blast from vents that spider mites love.
Checking leaves for early detection
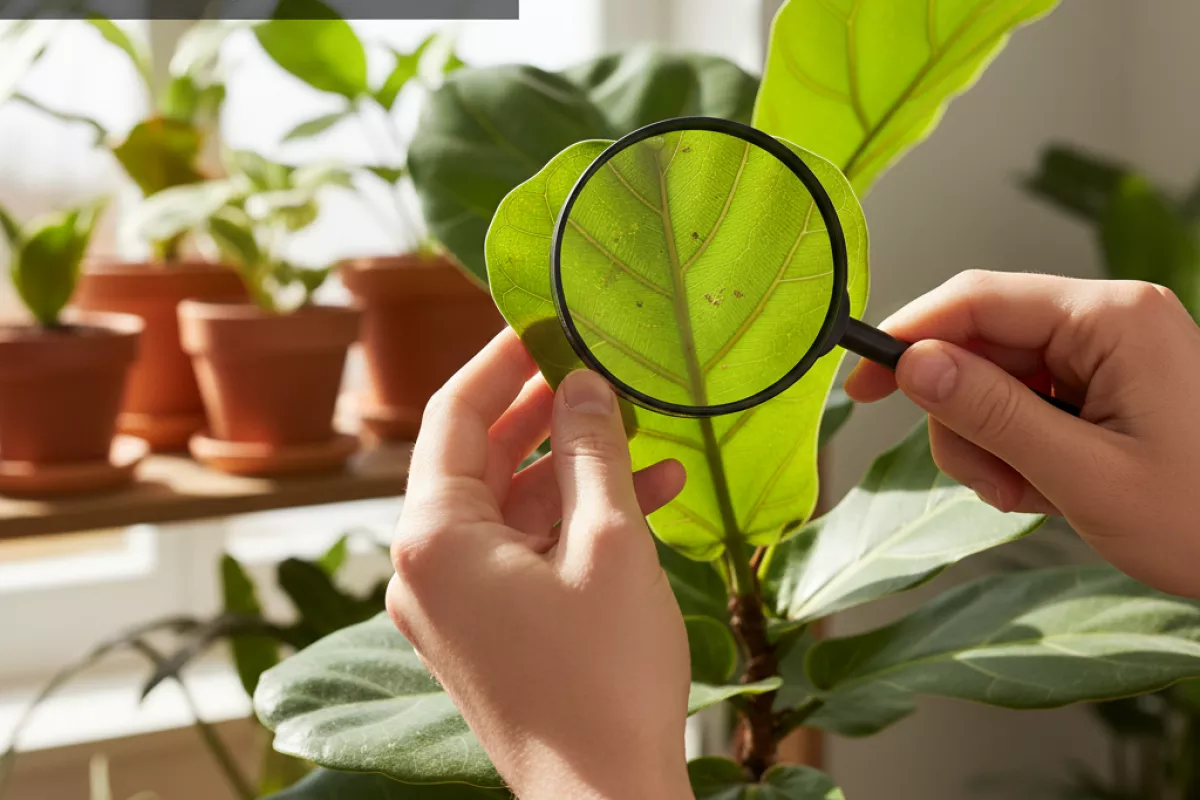
Spotting spider mites early is mostly about building a quick, repeatable leaf-check routine. These pests are tiny and often hide on the undersides, so a casual glance from above usually misses the first signs. A 30–60 second scan every few days (especially in warm, dry rooms) can catch an issue before leaves start dropping.
- Start with the newest growth. Mites often move to tender leaves first. Look for faint speckling (tiny pale dots) and a slightly dull, “dusty” look.
- Flip leaves and inspect the underside. Focus along the midrib and where veins branch—common hiding spots for adults and eggs.
- Use bright light at an angle. Raking light makes stippling, silvery patches, and fine webbing easier to see than overhead lighting.
- Do the white-paper tap test. Hold a sheet of white paper under a leaf and tap the leaf firmly. If you see moving pepper-like dots, that’s a strong clue. (A phone camera zoom can help confirm movement.)
- Check “problem plants” more often. Palms, ivy, dracaena, croton, and many flowering houseplants tend to show spider mite damage quickly, especially near heaters or sunny windows.
- Inspect leaf joints and stems. Look where the leaf meets the petiole and at tight creases—webbing can start there before it spreads across the leaf surface.
- Compare against normal dust. Dust wipes off evenly; mite stippling stays put because it’s actual cell damage. If you wipe and the leaf still looks mottled, investigate further.
| What you notice on leaves | What it suggests | What to do next |
|---|---|---|
| Fine pale speckles (stippling), mostly on upper surface | Early feeding damage; mites likely on undersides | Flip leaves, inspect veins; isolate the plant and begin treatment if mites are confirmed |
| Silvery/bronzed patches, leaf looks dull or “sandblasted” | Growing population and repeated feeding | Rinse foliage thoroughly; treat undersides; repeat on a schedule to catch new hatchlings |
| Fine webbing between petioles, leaf edges, or along veins | Heavier infestation (webbing protects colonies) | Prune worst leaves; wash and treat more aggressively; keep isolated until new growth is clean |
| Leaves yellowing, crisping at edges, or dropping | Stress from sustained damage (often paired with dry air) | Confirm mites; treat; adjust care (avoid drought stress) while the plant recovers |
| Sticky residue or obvious large insects | More likely aphids, scale, or mealybugs than spider mites | Identify the pest correctly; choose a targeted approach rather than assuming mites |
If you’re unsure, re-check the same leaves 2–3 days later. Spider mite symptoms tend to expand in clusters, while random mechanical damage usually doesn’t “spread” in a pattern. Keeping a quick photo log of one or two suspect leaves can make changes easier to spot.
Safe treatment methods indoors
Start with the least risky options and scale up only if the infestation keeps spreading. Indoors, the main goal is to knock numbers down without filling your living space with harsh residues or stressing the plant more than necessary. Long-term success also depends on moisture balance, including how pot size and soil type affect moisture.
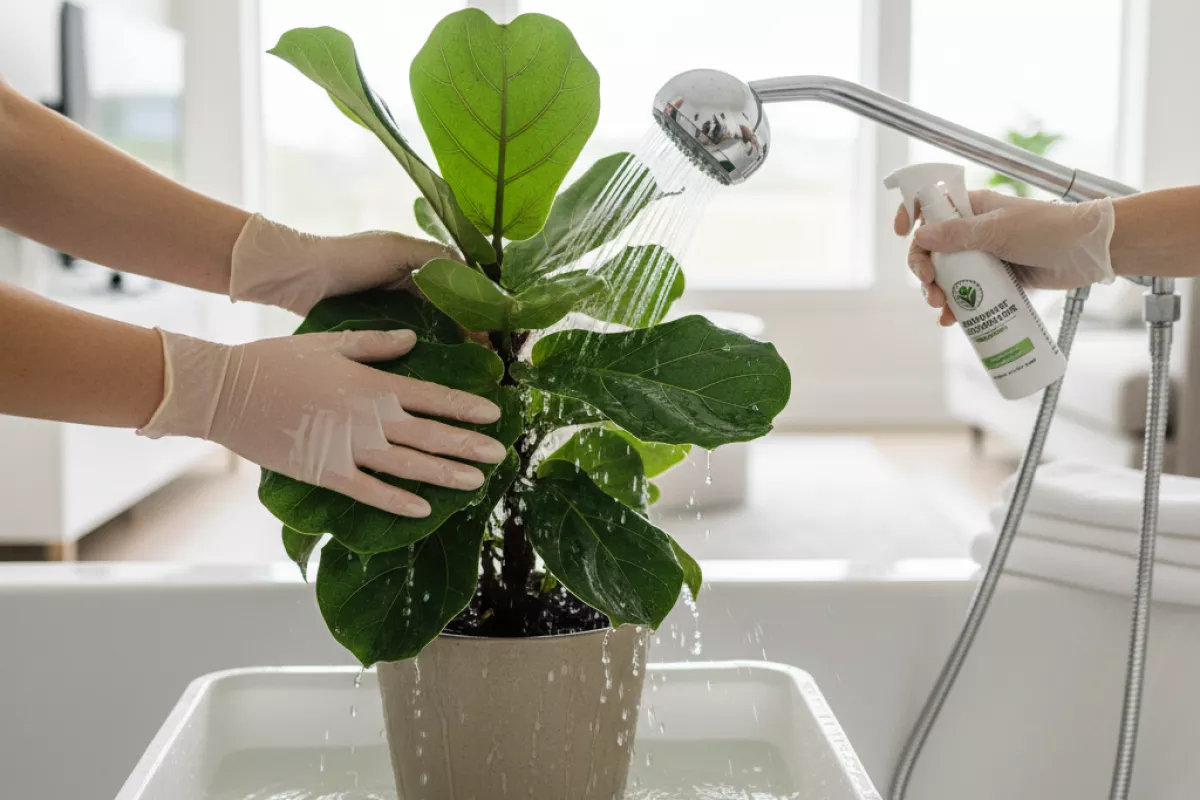
- Isolate and protect the area. Move the plant away from others by at least 1–2 m (3–6 ft) if you can. Put it on a washable surface (tray, sink, or bathtub) so runoff doesn’t drip onto floors or nearby pots.
- Rinse thoroughly (the fastest “reset”). Use a firm, lukewarm shower to wash both sides of leaves, especially the undersides. Aim for 30–60 seconds per plant (or longer for dense foliage). Repeat every 2–3 days for 1–2 weeks; spider mites hatch in cycles, so one rinse rarely finishes the job.
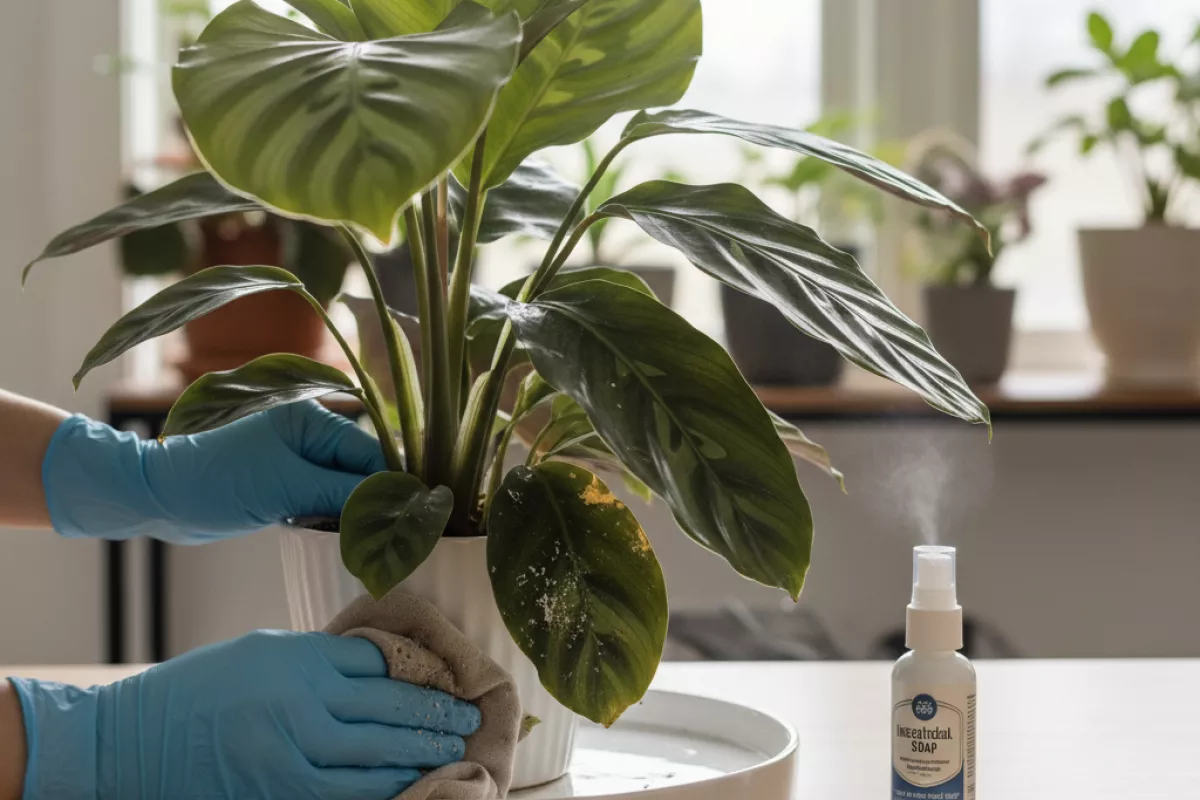
- Wipe and prune strategically. For sturdy leaves, wipe undersides with a damp cloth to physically remove mites and webbing. Clip off heavily damaged tips or the worst leaves and seal them in a bag before trashing to avoid spreading pests.
- Use insecticidal soap (good first spray). Apply to fully wet leaf surfaces, including stems and undersides, until just before dripping. Keep it off delicate blooms if possible. Test on a small section first and wait 24 hours; some plants (ferns, certain succulents) can be sensitive.
- Try horticultural oil or neem (careful indoors). Oils can smother mites and eggs, but they also increase the risk of leaf burn. Spray in the evening or out of direct sun, and ensure the room stays well ventilated. Avoid using oil on heat-stressed plants or within 7–14 days of a sulfur product.
- Increase humidity without inviting mold. Many mites thrive in dry air. If your home is very dry, aim for moderate humidity and better airflow rather than constant dampness. A humidifier can help; keep leaves from staying wet for hours, especially in cooler rooms.
- Repeat on a schedule. Most treatments need multiple rounds. A practical cadence is every 4–7 days for 3–4 cycles, adjusting based on how quickly you see new stippling or webbing.
| Method | Best for | How to use indoors | Watch-outs |
|---|---|---|---|
| Shower/rinse | Quick knockdown; light to moderate outbreaks | Rinse leaf undersides in sink/tub; repeat every 2–3 days for 1–2 weeks | Doesn’t leave residual control; misses eggs if not repeated |
| Leaf wiping | Thick, wipeable foliage; spot infestations | Wipe both sides with damp cloth; bag and discard debris | Time-consuming; can damage delicate leaves if rubbed hard |
| Insecticidal soap | Most common houseplants; ongoing control | Spray to full coverage; reapply every 4–7 days for 3–4 rounds | Phytotoxicity on sensitive plants; must contact mites to work |
| Horticultural oil/neem | Stubborn cases; egg suppression | Apply in low light; ventilate room; reapply every 7 days as needed | Leaf burn risk; avoid on stressed plants and near sulfur treatments |
| Predatory mites (biological control) | Large collections; recurring problems | Release per package guidance; keep moderate humidity and avoid broad sprays | Slower results; won’t thrive if air is very dry or pesticides are used |
If you’re treating multiple plants, work from the least affected to the most affected, and wash your hands and tools between pots. A simple routine like “rinse, then soap spray 24 hours later” can reduce leaf stress while still hitting mites at different stages.
Cleaning plants after treatment
Remove the leftovers so mites don’t get a second chance. After you’ve sprayed, wiped, or rinsed a plant, there’s usually residue (dead mites, webbing, dust, and product film) sitting in leaf joints and along stems. Clearing that out helps new growth stay clean and makes it easier to spot any stragglers early.
- Wait for the product to do its job. If you used insecticidal soap, horticultural oil, or a miticide, let it sit for the label’s contact time (often 10–20 minutes) before rinsing. If the label says “do not rinse,” skip rinsing and focus on wiping off visible debris instead.
- Rinse gently but thoroughly. Use lukewarm water around 20–25°C (68–77°F). A handheld sprayer or shower works well; aim under the leaves where mites hide. Keep the stream soft so you don’t tear leaves or knock off buds.
- Wipe the undersides. For broad-leaf plants, use a soft microfiber cloth or cotton pads dampened with clean water. Support the leaf with your other hand and wipe from the base to the tip to lift webbing and eggshells without bruising tissue.
- Clean tight spots. Use a cotton swab for petioles, leaf axils, and new growth. If residue is sticky, a second pass with water plus a tiny drop of mild, unscented dish soap in 500 ml (17 fl oz) can help, followed by a plain-water wipe.
- Remove the worst leaves. If a leaf is heavily stippled, bronzed, or webbed over, prune it off with clean scissors. Bag the clippings so debris doesn’t fall onto nearby plants.
- Wash the pot and saucer. Mites mostly live on foliage, but runoff can leave grime on rims and trays. Scrub with warm soapy water, then rinse. Don’t forget the outside of the pot where webbing can cling.
- Refresh the top layer of soil if it’s messy. If sprays or dust have built up, remove the top 1–2 cm (0.4–0.8 in) of potting mix and replace with fresh. Avoid digging deep; you don’t want to damage roots.
- Sanitize tools and your hands. Wipe pruners and stakes with 70% isopropyl alcohol after use, and wash hands between plants to prevent hitchhiking mites from spreading.
- Let the plant dry in good airflow. Place it in bright, indirect light and ensure gentle circulation. Avoid hot sun right after oil-based products; leaves can scorch while still coated.
For the next 1–2 weeks (7–14 days), check the underside of a few leaves every couple of days. If you see fresh stippling or new webbing, repeat the rinse-and-wipe step before your next scheduled treatment so each round starts on a clean surface.
How to prevent reinfestation
Stopping spider mites from coming back is mostly about breaking their routine: they spread easily, prefer dry air, and hitchhike on new plants and tools. A few consistent habits do more than any one “big” treatment. Be careful not to overcorrect with excess watering, as common signs and symptoms of overwatering can weaken plants and make them more vulnerable to pests.
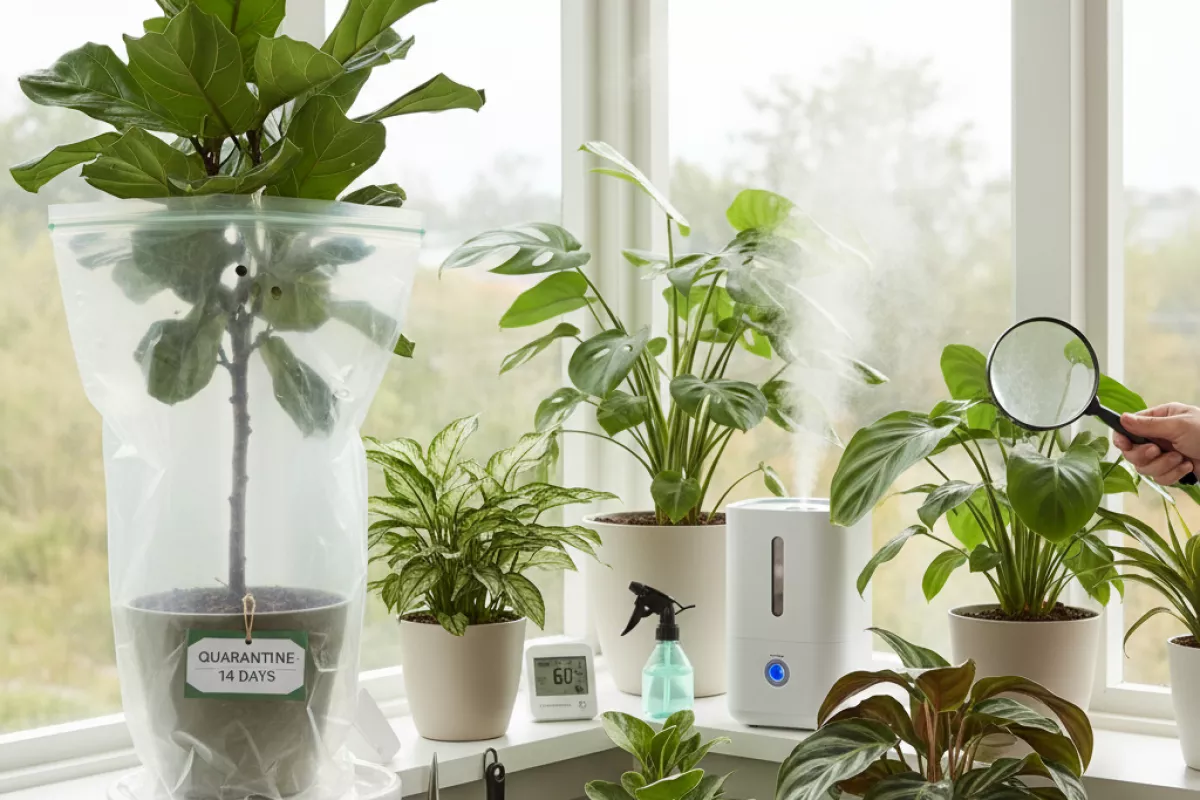
- Quarantine new plants. Keep new arrivals separate for 14 days (2 weeks). During that time, inspect the undersides of leaves and along leaf stems every 3–4 days, since early webbing can be hard to spot.
- Keep humidity in a mite-unfriendly range. Many indoor outbreaks start when air is very dry. Aim for roughly 45–60% relative humidity. Use a humidifier or group plants; avoid misting as your only strategy because it’s inconsistent and can encourage leaf spot on some species.
- Rinse foliage regularly (especially undersides). A gentle shower dislodges stragglers and dust that protects them. For sturdy plants, rinse weekly; for delicate plants, wipe leaves with a damp cloth. Let pots drain fully so roots don’t sit in water.
- Reduce plant stress. Stressed plants are easier targets. Keep light and watering steady, and avoid extreme heat near vents or radiators. If you fertilize, don’t overdo it—soft, fast growth can be more attractive to pests.
- Sanitize tools, shelves, and nearby surfaces. Wipe pruning shears, plant stakes, and windowsills after an infestation. Even if mites don’t live long off-plant, eggs and debris can move around during handling.
- Isolate and treat “usual suspects” quickly. If one plant repeatedly gets hit (common with ivy, citrus, palms, and some calatheas), keep it a little apart and inspect it more often. At the first sign of stippling or fine webbing, separate it immediately.
- Continue follow-up treatments long enough. Eggs can survive the first round. Whatever method you used (soap, horticultural oil, or another control), repeat on a schedule that matches the product directions, typically every 5–7 days for at least 3 cycles.
- Consider beneficial predators for recurring problems. In a plant room or cabinet, predatory mites can help keep populations from rebuilding. They work best when you avoid broad-spectrum sprays that would also kill the helpers.
| Routine | What it prevents (and how often) |
|---|---|
| Quarantine new plants | Catches hitchhikers before they spread; 14 days (2 weeks) with checks every 3–4 days |
| Leaf inspections (undersides) | Finds early stippling/webbing; weekly, or twice weekly in winter heating season |
| Rinse or wipe leaves | Knocks off mites/eggs and removes dust; weekly for sturdy plants |
| Humidity management | Makes conditions less favorable; keep around 45–60% RH, check daily if using a humidifier |
| Tool and surface cleaning | Reduces accidental transfer during care; after pruning and after any outbreak |
If you’re unsure whether the problem is gone, do a simple “white paper test”: tap a leaf over a sheet and look for tiny moving specks. No movement for a couple of weeks, plus no new stippling, usually means you’ve broken the cycle.