Aphids on Plants – How to Identify and Control

 Learn what aphids look like and how to recognize them, plus early warning signs and where they hide on plants. It explains feeding damage symptoms, a quick inspection to confirm, fast control options, what to do in severe infestations, and prevention to stop reinfestation.
Aphid infestations on houseplants and garden crops can build quickly, curling tender new growth and leaving sticky residue before you spot the culprit. This guide shows how to identify aphids early, check stems and leaf undersides, and choose plant-safe controls. Learn when to rinse with water, prune damaged tips, encourage beneficial insects, or use targeted sprays to help plants recover fast and stay healthy.
What aphids look like and how to recognize them
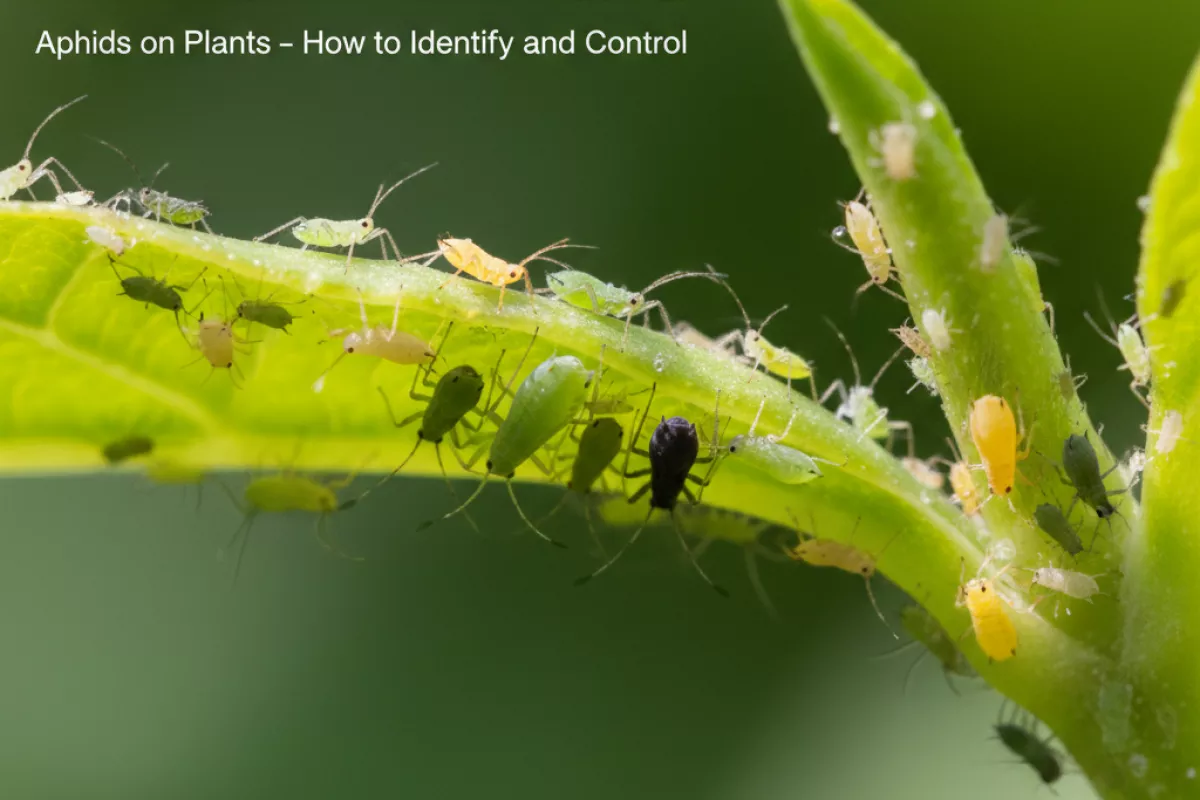
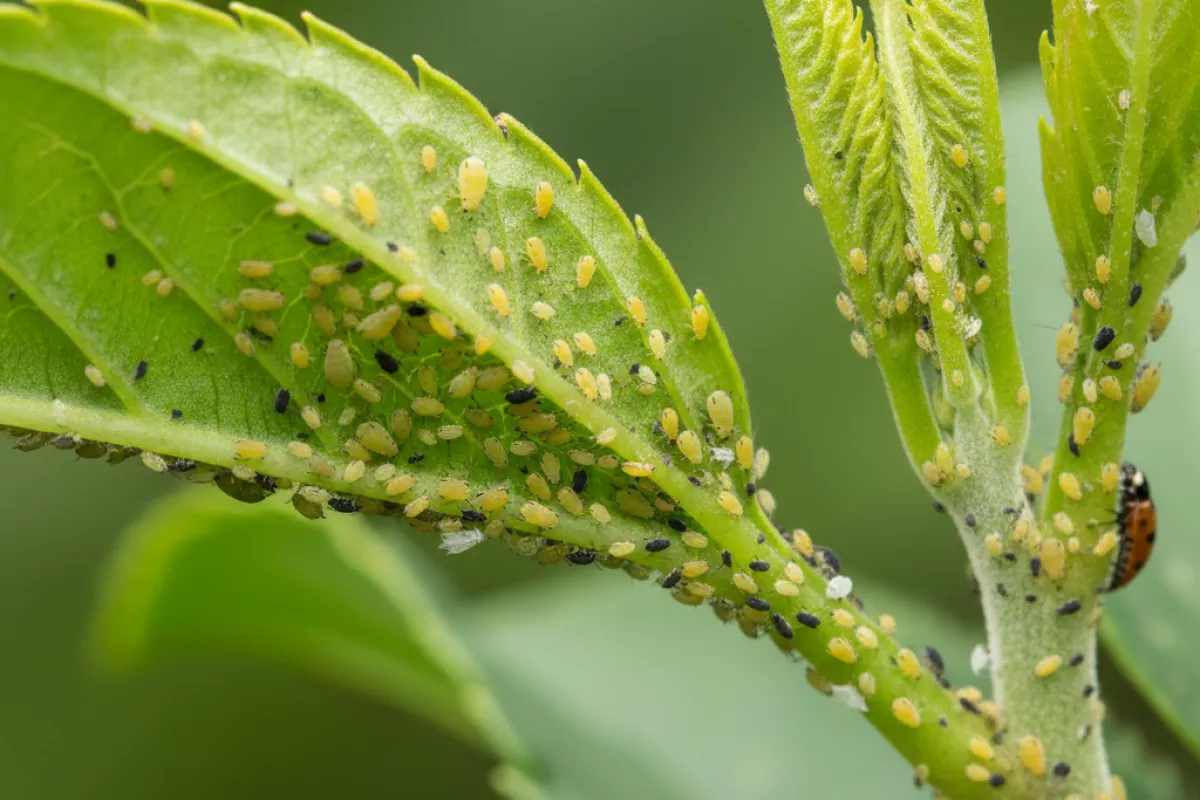
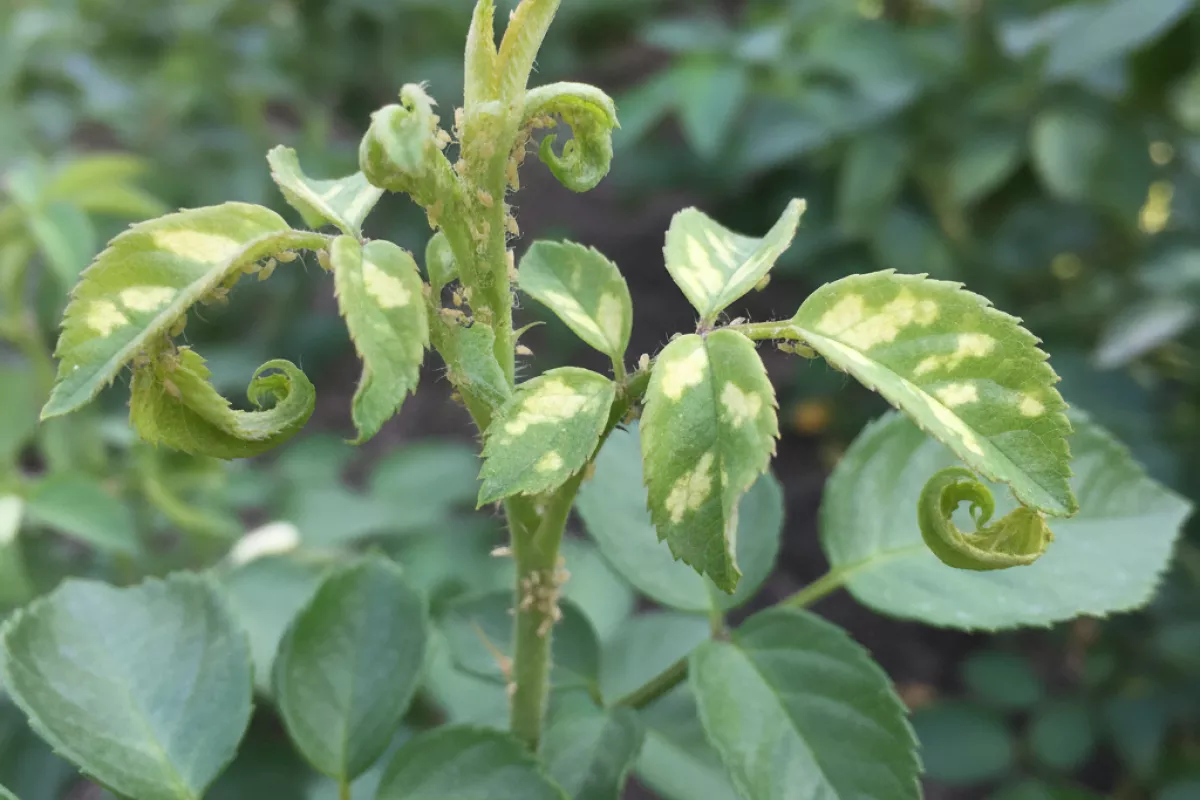
These sap-feeding insects are small enough to miss at first glance, but they leave a pretty consistent set of clues. Most are soft-bodied, pear-shaped, and cluster tightly on new growth, buds, and the undersides of leaves. Adults are typically about 1–4 mm (0.04–0.16 in) long, and colors range from light green to black, brown, yellow, pink, or even pale gray depending on the species and host plant.
- Body shape and size: Look for tiny, rounded-to-pear-shaped bodies with long legs and antennae. They often appear “plump” compared with gnats or thrips.
- Where they gather: Colonies commonly form on tender tips, flower stalks, and the underside of young leaves. You’ll often see them lined up along veins or packed around buds.
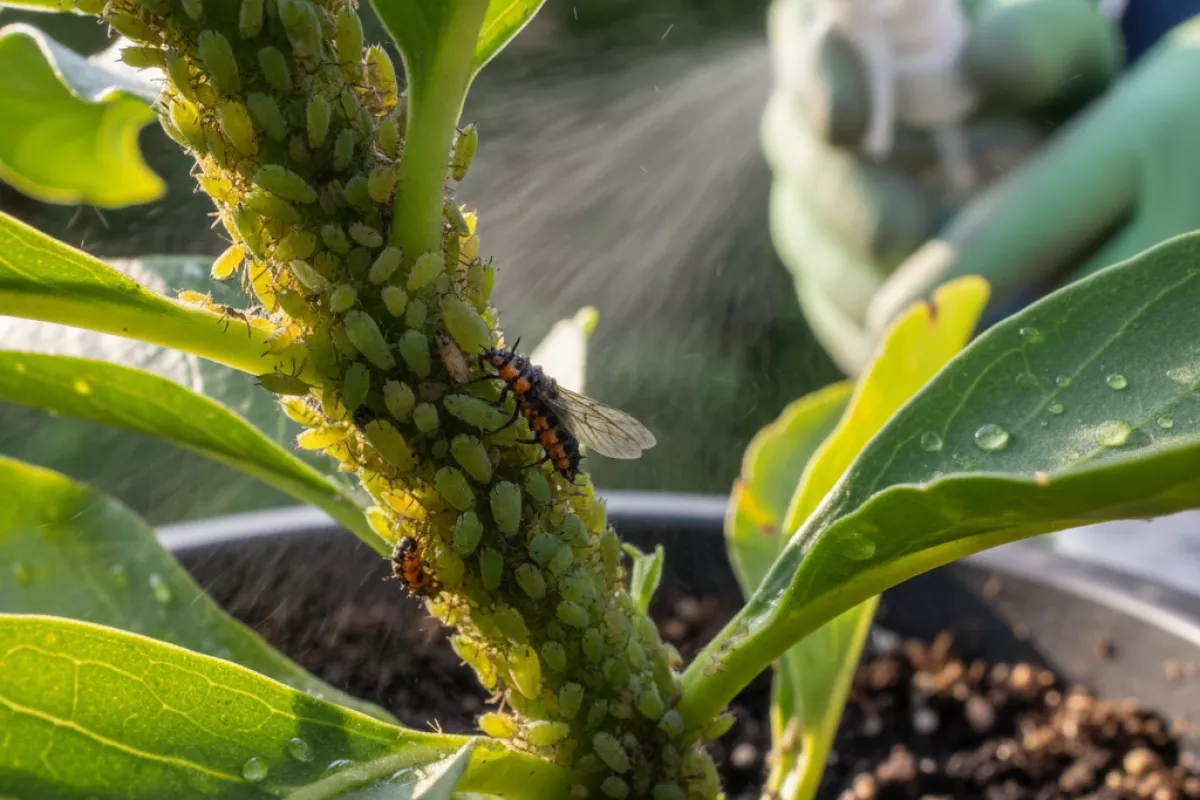
- Cornicles (“tailpipes”): Many species have two small tube-like bumps near the rear end. They can look like tiny exhaust pipes and are one of the easiest visual tells.
- Winged vs. wingless forms: When populations build or plants get stressed, some develop wings and move to new plants. Winged individuals still keep the same small body and cornicle features.
- Sticky residue (honeydew): A shiny, tacky film on leaves or nearby surfaces is common. It can lead to sooty mold, a dark coating that grows on the sugar-rich residue.
- Leaf distortion: Curling, puckering, and twisted new growth are typical because feeding disrupts tender tissues. Buds may fail to open or produce misshapen flowers.
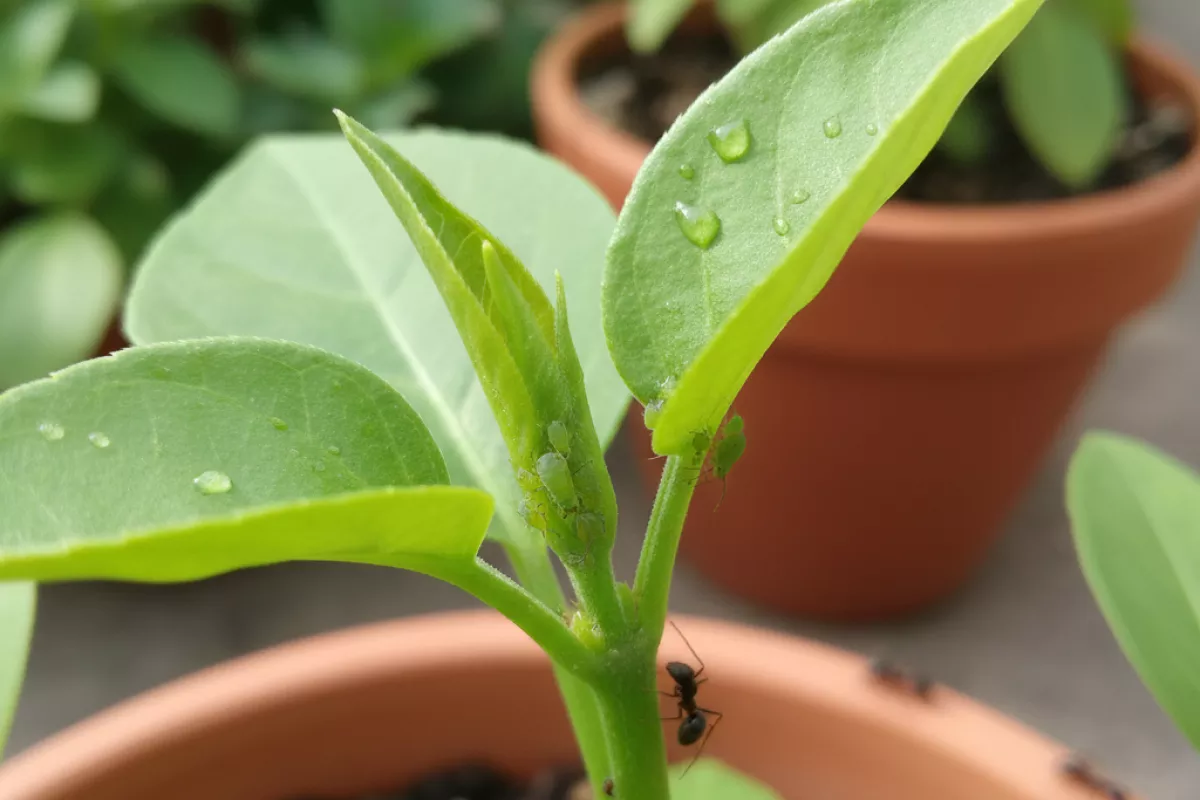
- Ant activity: Ants “farm” these insects for honeydew, so increased ant traffic on stems can be a strong hint even before you spot the colony.
- Shed skins: White, papery flakes stuck to leaves are often cast skins from growing nymphs and can make an infestation look worse than it is.
| What you notice | What it usually suggests | Quick check to confirm |
|---|---|---|
| Clusters of tiny soft-bodied insects on new tips | A colony feeding on sap | Flip leaves and inspect stems near buds; look for pear-shaped bodies |
| Sticky leaves or shiny spots on foliage | Honeydew buildup from feeding | Touch the surface; check above for insects on stems/leaf undersides |
| Black smudgy coating on leaves | Sooty mold growing on honeydew | Wipe with a damp cloth; then search for the source insect nearby |
| Curled, puckered, or distorted new growth | Damage to tender tissue from sap removal | Uncurl a leaf gently and inspect inside folds where they hide |
| Lots of ants traveling up and down stems | Ants protecting honeydew producers | Follow the ant trail to the feeding site and inspect closely |
| White flakes that look like dandruff on leaves | Shed skins from molting nymphs | Look for live insects nearby; skins alone don’t move when disturbed |
If you’re unsure, do a simple disturbance test: tap the stem over a white sheet of paper. These insects tend to drop or shuffle slowly, while look-alikes behave differently (thrips often dart quickly; spider mites leave fine webbing and are much smaller). If webbing is present, follow treatment for severe spider mite. A hand lens helps, but even without one, the combination of tight clustering, honeydew, and distorted new growth usually makes the diagnosis clear.
Early warning signs of infestation
Small colonies can build up fast, so it helps to spot the subtle changes before leaves curl and growth stalls. Check the newest, softest plant parts first—fresh tips, buds, and the undersides of young leaves—because that’s where these sap-feeders usually start.
- Sticky residue (honeydew) on leaves, stems, pots, or nearby surfaces. It can feel tacky and may show up before you notice the insects themselves.
- Ant activity on the plant, especially lines of ants moving up stems. Ants often “farm” aphids for honeydew, so a sudden ant presence is a useful clue.
- Shiny leaves or dark, dusty-looking patches that wipe off. The sticky coating can lead to sooty mold, which blocks light and makes foliage look dull or dirty.
- Distorted new growth, including puckering, curling, or crinkled leaves. Damage is usually most obvious on the newest leaves because feeding targets tender tissue.
- Stunted shoots and smaller leaves even when watering and light are consistent. When sap is diverted, plants often slow down and look “stuck.”
- Yellow speckling or uneven chlorosis (patchy yellowing) that doesn’t match a nutrient pattern. This can appear as faint stippling that gradually spreads. See why plant leaves turn yellow for comparison.
- Deformed buds or poor flowering, such as buds that drop, fail to open, or produce misshapen blooms.
- Clusters of tiny shed skins (white flakes) around leaf joints or along stems. As aphids grow, they molt, leaving papery cast skins behind.
- Presence of soft-bodied insects on stems or leaf undersides—green, black, brown, pink, or pale gray. Look for groups rather than single bugs, and check where leaves attach to the stem.
If you’re unsure, do a quick inspection with a hand lens and gently tap a stem over white paper—small insects will drop and become easier to see. Catching aphids on plants at this stage usually means you can manage them with simple steps (like a firm water spray or targeted pruning) instead of escalating to stronger controls.
Where aphids hide on plants
These insects don’t spread out evenly across a plant. They cluster where tissue is soft, sap flow is high, and they’re sheltered from wind, rain, and predators. If you only glance at the top of the plant, it’s easy to miss an early infestation.
- Undersides of leaves: A classic hiding spot. Flip leaves over and look along the midrib and veins, where they can feed while staying out of direct sun and sight.
- New growth and shoot tips: Tender tips, unfurling leaves, and fresh stems are prime targets because the plant’s juices are easiest to tap and the tissue is easiest to pierce.
- Inside curled or distorted leaves: Once feeding causes leaves to cup or roll, colonies can sit protected inside the fold. This is common on peppers, citrus, and many ornamentals.
- Flower buds and blooms: Check around buds, sepals, and the base of flowers. Feeding here can lead to misshapen blooms or buds that fail to open.
- Leaf axils and stem joints: The “elbows” where leaves meet stems create little pockets that stay humid and sheltered—ideal for hidden clusters.
- Along soft stems and petioles: Look where leaf stalks attach and along green, non-woody stems; you’ll often find lines of aphids spaced along the sap-rich tissue.
- Near the base of the plant: On dense plants, colonies may form low down where airflow is poor and predators are less active.
- Roots (root aphids): Some species live below the soil surface, especially in pots. Clues include stunting, yellowing, and ants moving in and out of the potting mix rather than just on stems.
- On nearby weeds and “trap” plants: They often build up on tender weeds or volunteer seedlings first, then move onto your crop or houseplant when conditions change.
A quick way to spot their preferred hangouts is to follow the signs: sticky honeydew on leaves below, sooty mold on that residue, or a trail of ants farming them for sugars. Start your inspection where those clues appear, then work inward to the newest growth and the leaf undersides.
Damage symptoms caused by feeding
Look for changes in new growth first; sap-sucking insects tend to target tender tips, buds, and the undersides of young leaves. Because they pierce plant tissue and remove sugars, the earliest clues are often subtle: foliage loses its crisp look, growth slows, and shoots may start to twist.
- Leaf curling and puckering: New leaves may roll inward, cup, or crinkle as cells are damaged and growth becomes uneven. This distortion can hide colonies on the underside.
- Yellowing (chlorosis) and pale stippling: Leaves can turn light green to yellow in patches, especially along veins or on the newest foliage where feeding is concentrated.
- Stunted growth and small leaves: Tips may stop elongating, internodes shorten, and plants look “tight” or rosetted. On vegetables and ornamentals, buds may fail to open or drop early.
- Sticky honeydew: A shiny, tacky film on leaves, stems, pots, or nearby surfaces is common. It can drip onto lower leaves or anything beneath the plant.
- Sooty mold on sugary deposits: Black, dusty-looking fungus may grow on honeydew. The mold itself doesn’t invade the plant, but it can block light and reduce photosynthesis.
- Ant activity: Trails of ants moving up stems often signal honeydew production; ants may “guard” the pests and interfere with natural predators.
- Deformed flowers and fruit: Blossoms may be misshapen, petals can stick together, and developing fruit may show scarring or uneven sizing when feeding occurs early.
- Virus-like symptoms: Some species transmit plant viruses, leading to mottled patterns, ring spots, or unusual color breaks. These symptoms can persist even after the insects are gone.
| What you see on the plant | What it usually suggests | Where to check next |
|---|---|---|
| Curled, distorted new leaves | Active feeding on tender growth; colonies may be sheltered inside curls | Unfurl leaf edges and inspect undersides and shoot tips |
| Sticky sheen or droplets on leaves/pots | Honeydew from sap-feeders; often builds up quickly on houseplants | Look above the sticky area on stems and leaf undersides |
| Black “soot” coating on foliage | Sooty mold growing on honeydew; photosynthesis can be reduced | Check for insects on nearby leaves and along midribs |
| Yellowing patches and slowed growth | Ongoing sap loss and plant stress; can mimic nutrient issues | Inspect newest growth and the underside of leaves near the top |
If you’re unsure whether the issue is nutrient-related or insect-related, wipe a leaf with a damp cloth: honeydew smears slightly and feels tacky, while most nutrient problems won’t leave residue. Also check the newest growth with a hand lens; the insects are often clustered where stems branch or where leaves attach.
Quick inspection method for confirmation
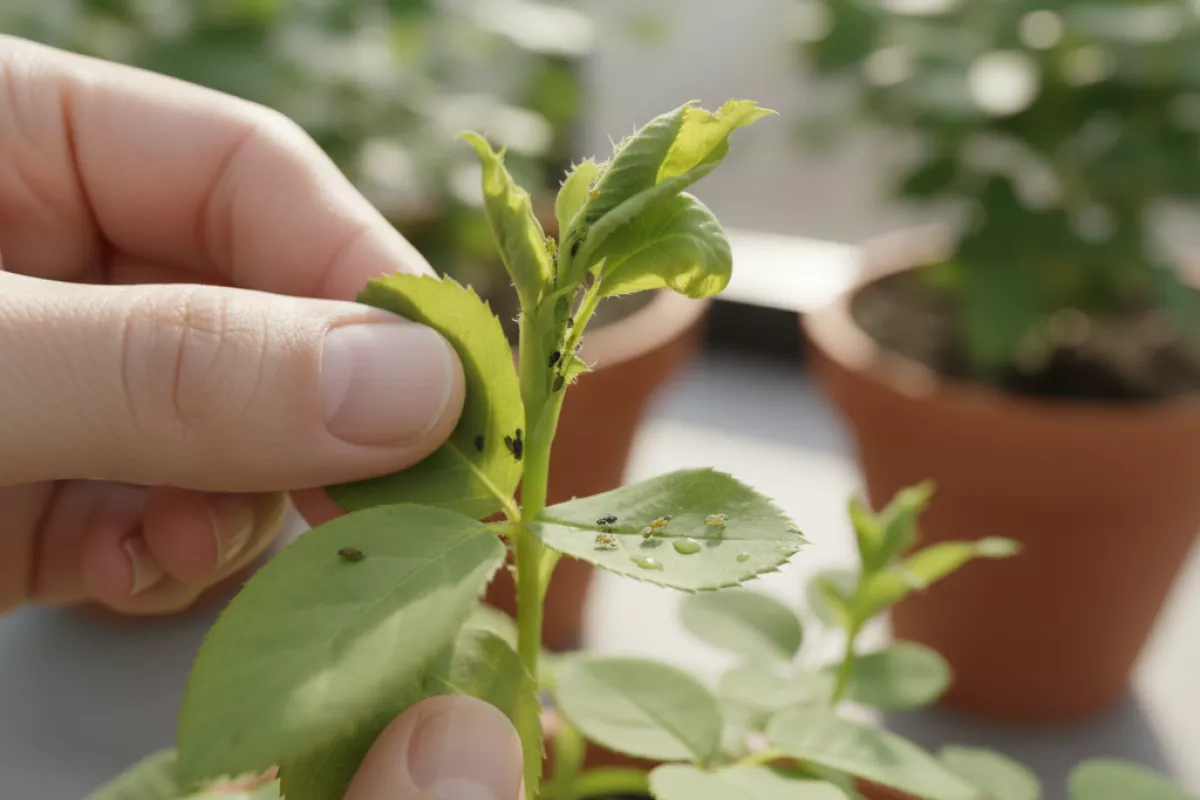
Confirming an aphid problem is mostly about looking in the right places, at the right time. These insects cluster where growth is soft and sap is easiest to access, so a fast check can usually tell you whether you’re dealing with aphids or a different pest.
- Start with the newest growth. Check shoot tips, curled leaves, and flower buds first. Aphids often hide along the midrib and in tight folds where leaves are puckering.
- Flip leaves and scan the undersides. Use your fingers to gently turn leaves over and look along veins. If you see groups of tiny pear-shaped insects (often green, black, yellow, or pink), that’s a strong sign.
- Do the “tap test” over a white surface. Hold a sheet of white paper or a white plate under a stem and tap the plant. Aphids will drop and crawl, making them easier to spot than stationary blemishes.
- Check for sticky residue. Run a fingertip along leaves below the suspected area. A tacky feel suggests honeydew, which aphids produce while feeding. You may also notice a shiny film or black sooty mold developing on the sugary residue.
- Look for cast skins and ants. Pale, papery “shells” stuck to leaves are shed skins from growing colonies. Ants frequently patrol stems because they feed on honeydew, so steady ant traffic can be a clue even before you see the insects.
- Confirm with a close-up view. A hand lens helps, but a phone camera zoom works too. Aphids typically have two small tube-like structures near the rear (cornicles). Seeing those can separate them from look-alikes like thrips.
| What you notice during inspection | What it usually points to |
|---|---|
| Clusters of soft-bodied insects on tips, buds, or undersides of leaves | Active aphid colony feeding on new growth |
| Leaves curled or distorted, especially at the top of the plant | Feeding damage from sap-sucking pests; aphids are a common cause |
| Sticky honeydew on leaves or nearby surfaces; possible black sooty mold | Aphids (or other honeydew producers) present above the sticky area |
| Ants moving up and down stems repeatedly | Ants “tending” aphids for honeydew; inspect nearby nodes and leaf joints |
| Pale, flaky skins stuck to leaves | Colony has been established long enough to molt and expand |
If you’re still unsure, repeat the check in the cooler part of the day (early morning or evening). Aphids tend to stay more clustered and less active then, which makes them easier to confirm before you choose a control method.
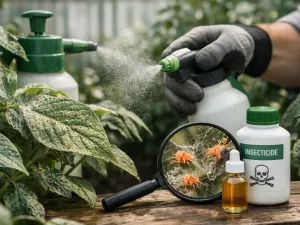
Fast control options that work
When a colony is building fast, focus on methods that remove insects immediately and then follow up 3–7 days later to catch any survivors. Start with the least disruptive option that fits the plant and the infestation level, and escalate only if you need to.
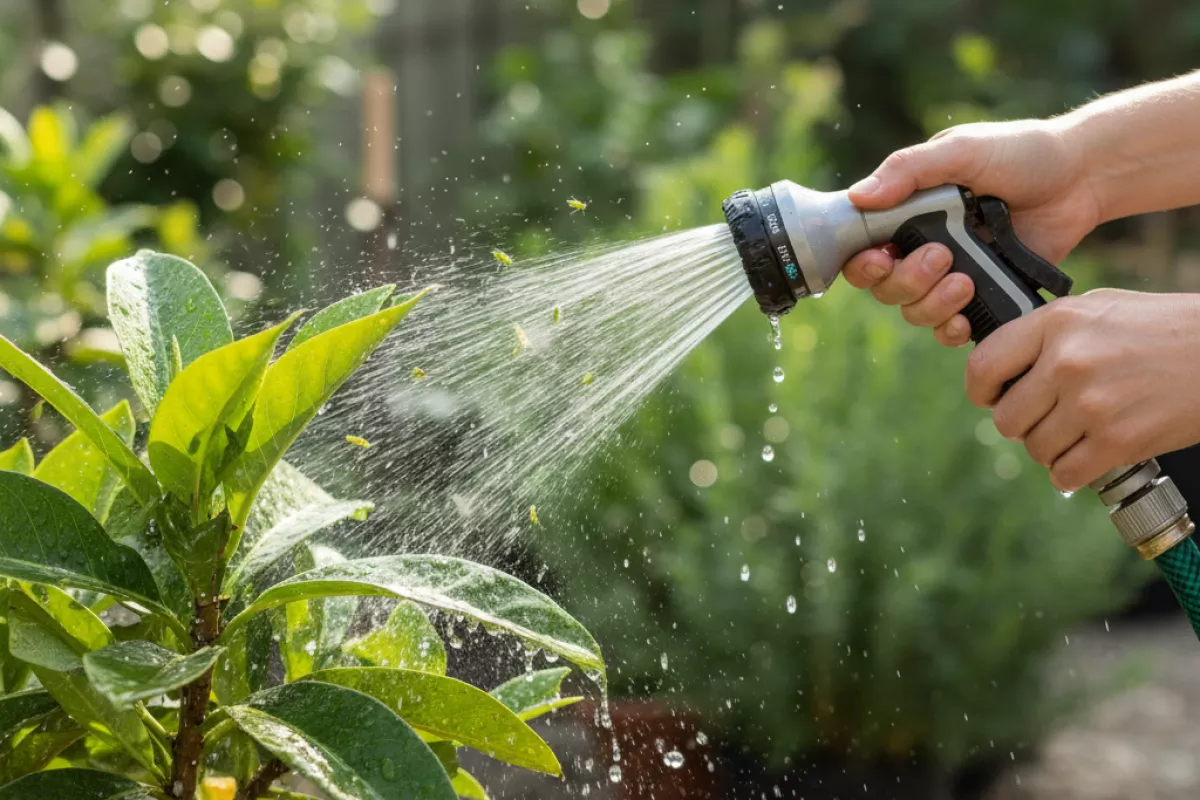
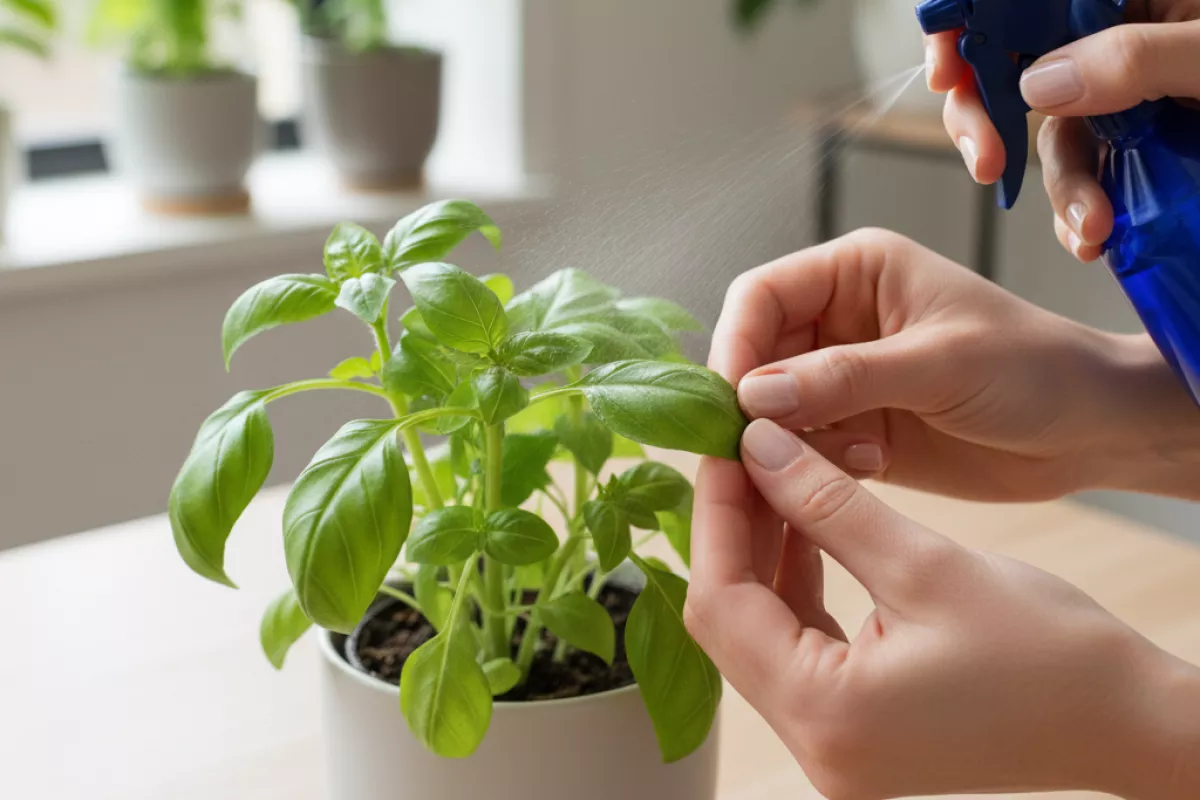
- Blast them off with water. A firm spray from a hose knocks most soft-bodied pests off stems and leaf undersides. Aim upward under leaves, repeat every 1–3 days, and check new growth where they regroup. This is especially useful on sturdy ornamentals and many vegetables.
- Pinch or prune the worst tips. If they’re clustered on a few curled shoots, remove those sections and discard them in the trash (not compost). This is quick, reduces numbers immediately, and improves spray coverage for any follow-up treatment.
- Wipe small outbreaks by hand. On houseplants and a few stems outdoors, wipe leaves and stems with a damp cloth or a cotton swab. It’s slow, but it avoids spraying and works well when you catch the problem early.
- Use insecticidal soap (ready-to-use or concentrate). Soap works on contact by disrupting the insect’s outer coating, so coverage matters. Spray tops and undersides of leaves until evenly wet, then reapply in 4–7 days. Avoid spraying in strong sun or heat; test a few leaves first if the plant is sensitive.
- Try horticultural oil or neem oil for contact control. Oils can smother insects and help with repeated flare-ups, but they can also stress plants if used in hot weather. Apply in the cooler part of the day and avoid using on drought-stressed plants. As with soap, thorough coverage is the difference between “some improvement” and real control.
- Spot-treat with isopropyl alcohol on tough houseplants. For plants like pothos or rubber plant, dab pests with 70% isopropyl alcohol (or dilute 90% to about 70% by mixing 7 parts alcohol with 2 parts water). Keep it as a targeted wipe, not a full-plant drench, and test a small area first to avoid leaf damage.
- Set up yellow sticky cards to reduce flying adults. These won’t solve a heavy infestation alone, but they help catch winged individuals and make it easier to monitor whether numbers are dropping after treatment.
| Option | Best use case | Speed | Key caution |
|---|---|---|---|
| Water spray | Outdoor plants; early to moderate clusters | Immediate knockdown | May need repeats every 1–3 days |
| Pruning/pinching tips | Infested new growth; curled leaves | Immediate reduction | Don’t over-prune stressed plants |
| Insecticidal soap | Most ornamentals/edibles; contact control | Hours to 1 day | Must hit insects directly; avoid hot sun |
| Horticultural/neem oil | Repeat flare-ups; when soap isn’t enough | Hours to 1 day | Risk of leaf burn in heat; don’t use on drought-stressed plants |
| Alcohol spot-wipe (70%) | Houseplants; small, localized outbreaks | Immediate | Test first; can damage tender foliage |
| Sticky cards | Monitoring; reducing winged spread | Gradual | Doesn’t address insects already feeding on stems/leaves |
If you’re choosing just one approach, combine a physical knockdown (water or pruning) with a contact spray (soap or oil). That pairing removes a lot right away and helps prevent the “they’re back tomorrow” cycle that happens when a few individuals are left tucked into new growth.
When infestations become severe
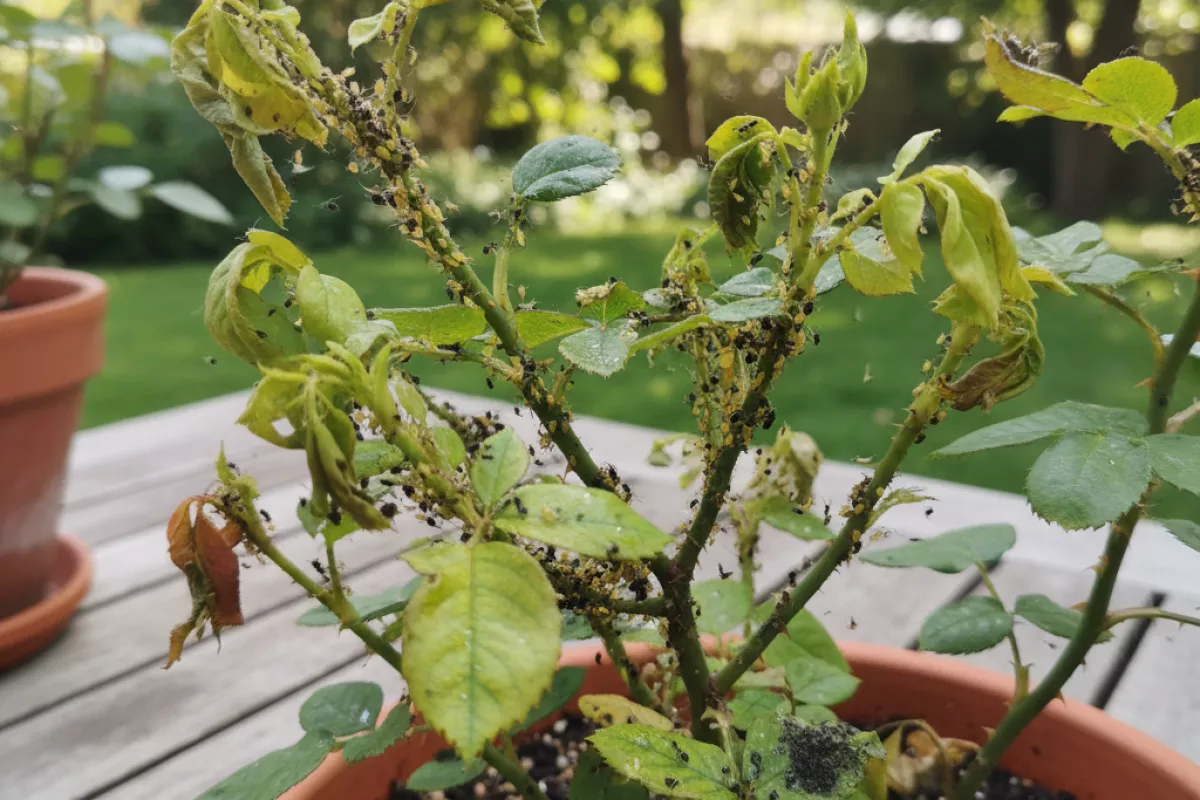
At a certain point, a light aphid presence turns into a plant health problem: new growth twists, buds stall, leaves yellow, and sticky honeydew starts attracting ants and sooty mold. If you’re seeing clusters on multiple stems or the insects return within a few days of treatment, it’s time to switch from “spot control” to a more deliberate plan.
- Confirm it’s truly widespread. Check the undersides of leaves, tender tips, and flower buds. Also look for shed white skins and shiny honeydew on lower leaves or nearby surfaces.
- Isolate and triage. Move potted plants away from others, or create space between garden plants if possible. Prioritize saving the healthiest specimens first; heavily stunted plants can act as reservoirs.
- Prune the worst hotspots. Remove the most infested tips and buds and discard them in a sealed bag. This is often faster and more effective than trying to spray every crevice on dense growth.
- Use a strong water rinse, then repeat. Blast colonies off with a firm spray, aiming especially at new shoots. Recheck and rinse again after 2–3 days (48–72 hours) because survivors and newly hatched nymphs can rebuild quickly.
- Escalate to a targeted spray if needed. Insecticidal soap or horticultural oil works by contact, so coverage matters. Spray until surfaces are evenly wet (not dripping), including leaf undersides, and repeat every 5–7 days until numbers stay down. Avoid applying in hot sun or when temperatures are above about 29°C (85°F) to reduce leaf burn risk.
- Manage ants or you’ll fight a losing battle. Ants protect aphids for honeydew. Use barriers or baits near the base of plants and remove bridges (stakes, touching foliage) so natural predators can do their job.
- Support beneficial insects instead of wiping everything out. Broad-spectrum insecticides can knock back lady beetles, lacewings, and hoverfly larvae that naturally suppress outbreaks. If you must treat, choose the least disruptive option and spray in the evening when pollinators are less active.
- Reduce the “soft growth” that fuels outbreaks. Overfertilizing with nitrogen creates tender shoots that aphids prefer. If you fertilize, use lighter doses and water consistently so plants aren’t stressed and then pushed into a flush of vulnerable new growth.
If the plant is still declining after two full treatment cycles (roughly 10–14 days), consider more aggressive steps: hard pruning back to healthy tissue, repotting (for container plants) with fresh mix, or replacing a severely infested annual. For edible plants, focus on mechanical removal and low-residue options; wash produce thoroughly, and avoid spraying anything not labeled for food crops.
Preventive care to stop reinfestation
Keep new outbreaks from starting by making your plants less inviting and by catching the first few insects early. Maintaining proper soil moisture balance helps plants resist repeated infestations.
- Inspect often, especially new growth. Look under leaves and along soft stems where colonies begin. If you see a few, pinch them off or rinse with a firm stream of water before they spread.
- Quarantine new plants. Hold new purchases or gifted cuttings away from the rest for 7–14 days. This simple pause prevents “mystery” infestations from moving through your collection.
- Avoid excess nitrogen. Heavy feeding pushes tender, sappy growth that aphids prefer. Use a balanced fertilizer at the label rate, and don’t “top up” more often than recommended.
- Water consistently and reduce stress. Stressed plants signal pests and recover slowly. Understanding what makes soil healthy for roots reduces long-term vulnerability. Water deeply, then let the top 2–5 cm (1–2 in) of soil dry (as appropriate for the species) rather than frequent shallow watering. If soil stays wet, review how to fix overwatering.
- Manage ants. Ants protect aphids in exchange for honeydew. Use sticky barriers on trunks or pot rims and remove ant trails so natural predators can do their job.
- Encourage beneficial insects. Lady beetles, lacewings, hoverfly larvae, and parasitic wasps help keep numbers low. Plant small-flowered herbs nearby (or let a few bolt) and avoid broad-spectrum insecticides that wipe out helpers.
- Prune and thin crowded growth. Better airflow and light make it harder for colonies to build unnoticed. Remove heavily infested tips and dispose of them in the trash, not the compost.
- Control weeds and volunteer seedlings. Many weeds host aphids and act as a bridge to your ornamentals and vegetables. Keep the area around beds and containers tidy.
- Clean tools and pots. Wipe pruners between plants and wash reused containers with soapy water, then rinse well. This doesn’t kill flying adults, but it reduces hitchhikers and sticky honeydew buildup.
- Use gentle “maintenance” rinses when risk is high. During warm, calm periods, a weekly hose-down can knock off early arrivals. If you use soap or oil products, apply in the cool part of the day and test a few leaves first to avoid leaf burn.
| Situation | What to do | Why it helps |
|---|---|---|
| New plant arrives | Isolate for 7–14 days; inspect leaf undersides; rinse once | Stops hidden colonies from spreading |
| First aphids spotted | Blast with water; remove infested tips; recheck in 2–3 days | Breaks the population before it explodes |
| Ants present on stems | Add sticky barrier; disrupt trails; address nearby nests if needed | Removes “bodyguards” that protect sap-suckers |
| Repeated flare-ups after feeding | Reduce nitrogen; switch to slower, balanced feeding | Less tender growth means fewer easy meals |
| Dense, shaded canopy | Thin/prune for airflow; space pots; remove weeds | Makes colonies easier to spot and less sheltered |
If you’ve had aphids before, plan on a short “follow-up window.” Recheck plants every 2–3 days for about 2 weeks after control, because surviving nymphs can rebuild a colony quickly. Staying consistent with small actions is what keeps the problem from cycling back.