When to Use Miticide for Spider Mites

 This article explains what miticides are, how they work, and when natural controls are no longer enough. It covers choosing the right product, applying it safely, understanding chemical risks, preventing mite resistance, and combining miticides with other control methods.
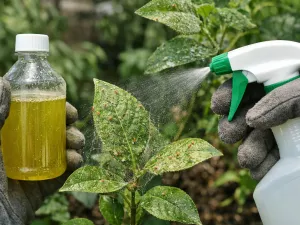
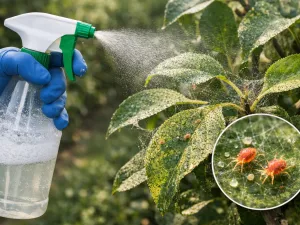
Applying mite-control treatment for spider mites at the right time can prevent a minor issue from turning into serious leaf damage. Because these pests reproduce fast, it is best to respond as soon as you notice early warning signs such as stippling, webbing, or leaf discoloration. Before treating, confirm that spider mites are active and present in numbers high enough to warrant action, so you avoid unnecessary use of products on healthy or unaffected plants.
What miticides are and how they work

Miticides are products designed to control mites rather than general chewing or sucking insects. That distinction matters because spider mites are not true insects, and many broad-spectrum insect sprays do little to stop them. Gardeners often reach for whatever pest bottle is on hand, then wonder why stippling, webbing, and leaf drop continue. A proper miticide targets mite biology more directly.
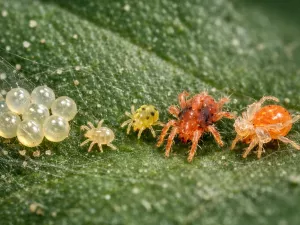
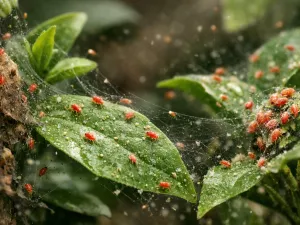
Spider mites feed by piercing plant tissue and removing cell contents, which leaves foliage looking dusty, speckled, bronzed, or faded. On houseplants and greenhouse crops, damage can build quickly in warm, dry conditions. Outdoors, infestations often surge during hot spells, especially on stressed plants that are not getting even moisture.
Different products act in different ways
Not all miticides kill mites the same way. Some work on contact and must hit the pest directly. Others affect eggs, immature stages, or molting. A few have translaminar action, meaning they move into the leaf surface after spraying and can reach mites feeding on the undersides of leaves. Understanding that difference helps explain why one treatment may seem weak while another gives a much cleaner result.
- Contact miticides: These kill when the spray reaches the mites. Coverage is critical, especially on leaf undersides and in dense growth.
- Ovicides: These target eggs, which is useful when a plant is covered in fine webbing and multiple generations are present.
- Growth regulators: These interfere with development, so they may not give an instant knockdown but can reduce the next wave.
- Translaminar products: These move into leaf tissue and can be more dependable when perfect spray coverage is hard to achieve.
Why timing matters
Miticides are usually most effective when populations are still manageable. Once leaves are heavily webbed and curled, the plant has already lost vigor and spray penetration becomes harder. Early action gives better control and reduces the number of repeat applications needed.
Because spider mites reproduce quickly, often completing a generation in about 5 to 20 days depending on temperature, follow-up timing matters. At around 27°C (81°F), populations can build much faster than they do at 18°C (64°F). That is why label intervals should be followed closely rather than guessed.
Editor’s note: If a product label says it controls mites but does not specify spider mites or ornamental use, do not assume it is the right fit. Labels are often more precise than marketing language on the front of the bottle.
When natural methods are not enough

Many mild infestations can be slowed with non-chemical methods first. A strong rinse, pruning badly damaged shoots, improving humidity around indoor plants, and isolating affected specimens often work well when the problem is caught early. But there is a point where these steps only buy time rather than solve the issue.
If you are washing leaves every few days and still seeing fresh stippling, active mites, and new webbing, the population is likely reproducing faster than your manual control routine can suppress it. That is the point where a miticide becomes a practical tool rather than an overreaction.
Signs that basic control has stopped working
Natural approaches tend to fail when coverage is incomplete, plants are large or densely leafed, or environmental conditions strongly favor mites. Indoor collections are especially vulnerable because mites can move from one plant to another before symptoms become obvious.
- Repeated rebound: You rinse or wipe the plant, but symptoms return within 7 to 10 days.
- Visible webbing: Fine silk between leaves, stems, or leaf joints usually means the infestation is established.
- Multiple plants affected: Once mites spread through a shelf, greenhouse bench, or border, spot cleaning alone becomes unrealistic.
- High-value or slow-growing plants: Rare houseplants, fruiting crops, and woody ornamentals may not recover well if damage continues.
- Stress factors are present: Heat, dry air, underwatering, and dusty foliage all make outbreaks harder to reverse without stronger intervention.
Situations where faster control is justified
There are cases where waiting for natural methods to work can cost more than acting promptly. Seedlings, cuttings, and flowering plants are less forgiving than mature, vigorous specimens. A mite outbreak on a small propagation area can spread in days, and on edibles close to harvest, your product options may narrow quickly.
Outdoor shrubs and perennials can sometimes tolerate low populations, especially if beneficial predators are present. Indoor plants usually have less natural balance. In a dry room at 24°C (75°F) or above, mites can outpace hand-cleaning quickly, particularly on thin-leaved plants such as calatheas, ivy, and many beans.
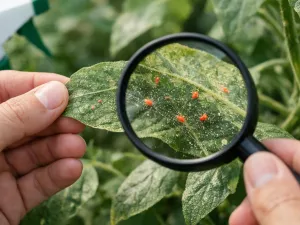
Practical recommendation: Before moving to chemical control, check two or three leaves with a hand lens. Fine pale stippling can also come from thrips, and treating the wrong pest wastes time while damage continues.
How to choose the right miticide

The best product depends on where the plant is growing, how severe the infestation is, and which life stages are present. A miticide that works well in a greenhouse may not be suitable for a living room, and a product safe for ornamentals may not be labeled for edible crops. Start with the label, not the shelf description.
It also helps to think beyond whether a product “kills mites.” You need to know whether it is appropriate for indoor use, whether it can be used on tender foliage, how long to wait before reapplying, and whether it affects eggs or only active stages.
Key selection criteria
A careful choice reduces plant damage, missed life stages, and unnecessary repeat spraying. Consider the following points before buying or mixing anything.
- Plant type: Confirm the product is labeled for houseplants, ornamentals, vegetables, fruit trees, or whichever crop you are treating.
- Site of use: Some products are for outdoor use only, while others are suitable in greenhouses or indoor growing spaces with ventilation.
- Life stage control: If eggs are present, choose a product that addresses eggs or plan a follow-up schedule that catches hatchlings.
- Residual activity: Short-residual products may require more frequent applications but can be easier to fit into a mixed control plan.
- Leaf sensitivity: Soft, hairy, blue-green, or waxy foliage can react badly to some oils and soaps, especially in strong light.
- Harvest interval: On edible plants, check how many days must pass before harvest after treatment.
Comparing common options
Some gardeners start with lower-impact products such as horticultural oils or insecticidal soaps, then move to dedicated miticides if control remains poor. That progression makes sense, but only if the first step is still realistic for the level of infestation.
| Product type | Best use case | Main limitation | Practical note |
|---|---|---|---|
| Horticultural oil | Light to moderate infestations on many ornamentals | Can burn foliage in heat or strong sun | Apply when temperatures are below about 29°C (85°F) unless the label states otherwise |
| Insecticidal soap | Early outbreaks and indoor plants with accessible foliage | Needs direct contact and repeat coverage | Test a few leaves first on sensitive plants |
| Dedicated miticide | Persistent or heavy infestations, larger collections, greenhouse use | May target only certain mite stages | Follow the exact reapplication interval on the label |
| Biological control release | Greenhouses, grow tents, and stable indoor environments | Less effective if chemical residues are present | Works best before populations explode |
For houseplants, always test any spray on a small area and wait 24 hours before treating the whole plant. Tender leaves can react differently from mature foliage, and some plants show damage only after the spray dries.
Safe application practices

Even the right miticide can disappoint if it is applied carelessly. Spider mites usually gather on the undersides of leaves, along midribs, and in tight growth where spray misses easily. Good technique often matters as much as product choice.
Before spraying, move the plant out of direct sun and make sure it is not drought-stressed. A wilted plant is more likely to suffer spray injury. If the potting mix is dry, water first and allow excess moisture to drain. For outdoor plants, choose a calm period so the spray stays on target.
How to prepare the plant and area
A little preparation improves coverage and reduces mess. This is especially useful for indoor plants and greenhouse benches where drift can settle on nearby surfaces.
- Isolate the affected plant from healthy ones.
- Remove badly damaged leaves that are already crisp, yellow, or heavily webbed.
- Rinse dust from foliage if needed and let the plant dry before treatment, unless the label says otherwise.
- Cover nearby surfaces or move the plant to a place with easy cleanup and good airflow.
- Mix only the amount you need, such as 500 ml (17 fl oz) or 1 L (34 fl oz), rather than storing diluted spray for later unless the label permits it.
Application details that make a difference
Coverage should be thorough but not wasteful. Fine misting from above is rarely enough. Turn leaves gently and spray until surfaces are evenly coated, paying special attention to the lower leaf surface and stem joints. Avoid spraying to the point of heavy runoff unless the product instructions call for that level of wetness.
- Spray in cooler conditions: Early morning or evening outdoors is usually safer than midday heat.
- Use the correct dilution: Stronger is not better and often increases the risk of leaf burn.
- Repeat on schedule: If the label says reapply in 5 to 7 days, do not stretch it to 10 days and expect the same result.
- Ventilate indoor spaces: Open windows or use fans where appropriate after treatment.
Practical recommendation: A cheap hand lens is one of the best spray tools you can own. Check leaves 3 to 5 days after treatment to see whether mites are still active instead of waiting for visible damage to tell you the result.
Risks and precautions when using chemicals

Chemical control can be effective, but it is never completely risk-free. The main concerns are plant injury, user exposure, harm to beneficial organisms, and poor results caused by misuse. Most problems come from ignoring label directions, spraying in unsuitable conditions, or combining products that should not be mixed.
Some plants are naturally more sensitive than others. Ferns, thin-leaved tropicals, newly rooted cuttings, and plants under heat stress can react badly even to products considered relatively gentle. That is why a test spray on a small section is worth the extra day.
Possible plant and environmental risks
Different active ingredients carry different concerns, but a few patterns are common across many products.
- Phytotoxicity: Leaves may develop spotting, edge burn, greasy patches, or bronzing after treatment.
- Residue issues: Some sprays leave visible marks on glossy foliage or flowers, which matters on display plants.
- Beneficial insect harm: Predatory mites and other helpful species can be reduced along with the pest population.
- Drift and runoff: Outdoor spraying in wind can move product onto non-target plants or hard surfaces.
- User exposure: Skin, eyes, and lungs can be irritated if protective directions are ignored.
Precautions worth taking every time
Good habits lower risk without making the job complicated. Keep products in original containers, measure accurately, and never improvise tank mixes unless the label specifically allows them. Avoid treatment when children, pets, or pollinators may be exposed.
It is also wise to avoid spraying oils close to sulfur-based products unless the label gives a safe interval. On many plants, that combination can increase leaf damage. If temperatures are expected to exceed 30°C (86°F), postpone treatment unless the product is clearly labeled for hot-weather use.
For edible plants, pay close attention to pre-harvest intervals and re-entry intervals. A product may be legal on tomatoes, cucumbers, or strawberries, but only if enough time passes before picking and handling.
How to avoid resistance in mites
Spider mites are notorious for developing resistance. If the same active ingredient is used repeatedly, especially at low rates or with delayed follow-up, survivors can pass along tolerance to the next generation. That is one reason a product may seem to “stop working” after a season of frequent use.
Resistance management is not just for commercial growers. Home gardeners can create the same problem on a smaller scale when they spray the same bottle every time symptoms appear. A better plan is to rotate modes of action and avoid unnecessary treatments.
Rotation matters more than brand names
Two products with different labels may still rely on the same mode of action. The useful information is usually on the label or technical sheet, not the front branding. Rotating means changing the way the product affects the mite, not simply changing manufacturers.
- Alternate modes of action: Do not make back-to-back cycles with the same chemistry unless the label specifically recommends it.
- Use full labeled rates: Under-dosing can leave behind the toughest individuals.
- Treat only when needed: Routine calendar spraying increases selection pressure.
- Hit the population early: Lower mite numbers are easier to eliminate completely.
Why incomplete coverage encourages failure
Resistance is often blamed when the real issue is poor application. If undersides are missed, eggs are left untouched, or the second treatment is skipped, the surviving mites repopulate the plant. That can look like resistance even when the chemistry still works.
Keep records if mites are a recurring problem. Note the product used, date, temperature, and visible result after 3 to 7 days. Over time, patterns become clearer, and you can tell whether you need a rotation change, better coverage, or stronger support from non-chemical methods.
Combining miticides with other control methods
The most reliable spider mite control rarely comes from chemicals alone. Miticides reduce the immediate population, but plants remain vulnerable if dry air, water stress, dust, and overcrowding continue. A combined approach gives longer-lasting control and often reduces how often you need to spray.
Think of miticides as one part of a broader plant-care response. Healthy, evenly watered plants tolerate minor feeding better and are less likely to spiral into severe decline. Cleaning leaves, improving spacing, and correcting environmental stress can make the difference between a one-time treatment and a repeating problem.
Supportive care that improves results
After treatment, focus on the conditions that helped mites build up in the first place. For indoor plants, this often means raising humidity modestly, improving airflow, and keeping foliage clean. For outdoor plants, even watering and reduced drought stress are often more important than feeding.
- Water consistently: Avoid repeated dry-downs that leave plants stressed and more attractive to mites.
- Rinse foliage when appropriate: Periodic washing can remove dust and reduce small populations before they rebound.
- Prune wisely: Remove heavily infested tips, but do not strip so much growth that the plant becomes weaker.
- Check nearby plants: Treating one plant while ignoring the ones touching it often leads to reinfestation.
- Delay heavy feeding: Pushing soft new growth with fertilizer immediately after damage can sometimes create more vulnerable tissue.
Using biological and cultural controls alongside sprays
In greenhouses and controlled indoor growing areas, predatory mites can be very effective when introduced early or after a chemical knockdown period. They are less useful if broad residual sprays are still active, so compatibility matters. Outdoors, preserving natural enemies by avoiding unnecessary broad-spectrum insecticides can help keep flare-ups smaller.
Cultural control also includes plant placement. Crowded shelves, touching leaves, and stagnant corners make it easier for mites to spread. Giving plants a little more space, even 5 to 10 cm (2 to 4 in), can improve airflow and make inspections easier.
Editor’s note: If a plant has lost most of its leaves, is covered in webbing, and sits next to healthy specimens, disposal is sometimes the smartest form of control. Saving one badly infested plant is not always worth risking the rest of the collection.
When miticides are used as part of a wider plan, they become more effective and less frequent. The goal is not just to kill the mites you can see today, but to make the plant and its environment less favorable to the next outbreak.