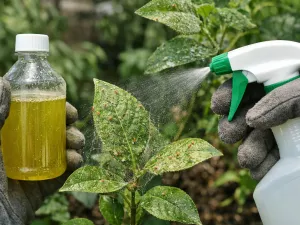
Spider Mite Eggs and Life Cycle Explained

 This article explains the spider mite life cycle, including what eggs and larvae look like on plants and how quickly mites reproduce indoors. It also covers why infestations grow fast, when to treat each stage, and how to break the cycle for better results.
Understanding how spider mite eggs develop and how these pests progress through each life stage can help you detect an infestation before leaves become stippled, dry, and weakened. For gardeners and houseplant owners, knowing this cycle makes it easier to schedule inspections, notice early warning signs, and choose control methods that target mites at the right time, before their population grows rapidly and becomes much harder to manage.
Stages of the spider mite life cycle

Spider mites pass through several distinct stages, and understanding that sequence is the foundation for controlling them. Although they are often treated like insects in casual gardening advice, they are actually tiny arachnids. Their life cycle is short, especially in warm indoor spaces, which is why a small unnoticed population can become a serious plant problem within days rather than weeks.
Most common plant-feeding spider mites begin as eggs, hatch into larvae, then move through two nymph stages before becoming adults. Each stage feeds differently and responds differently to treatment. On houseplants, the two-spotted spider mite is the species most growers run into, but the overall pattern is similar across related mites.
From egg to adult
The full cycle is compact, but each phase matters. Eggs are often attached to the underside of leaves, especially near veins or in fine webbing. After hatching, the larva starts feeding quickly, then molts into protonymph and deutonymph stages before reaching adulthood.
- Egg: A resting but vulnerable starting stage, usually laid in clusters on leaf undersides.
- Larva: Newly hatched and very small, with only six legs instead of the eight seen in later stages.
- Protonymph: The first eight-legged juvenile stage, actively feeding and growing.
- Deutonymph: A larger nymph stage that continues feeding heavily before the final molt.
- Adult: Fully reproductive mites that feed, mate, and lay the next generation of eggs.
How long each stage lasts
Timing depends heavily on temperature and humidity. In a warm room kept around 24–29°C (75–84°F), development can move very quickly. Cooler conditions slow them down, but they rarely stop entirely unless temperatures drop well below normal indoor growing ranges.
A typical indoor cycle may run from about 5 to 20 days, with the shortest times seen in warm, dry rooms near radiators, heating vents, or bright grow lights. That is one reason spider mites are so common on stressed houseplants sitting in dry winter air.
Editor’s note: If you are checking a plant only once a week, you can easily miss an entire generation. A plant that looked merely dusty on Sunday can be carrying adults, eggs, and fresh webbing by the following weekend.
Why gardeners should care about the stage sequence
Different products and physical control methods do not affect every phase equally. Many sprays kill mobile mites well but leave eggs untouched. That means a treatment can appear successful for a few days, then fail as the next hatch begins. Knowing the life cycle helps you plan repeated treatments at the right interval instead of assuming one application should solve everything.
What eggs and larvae look like on plants

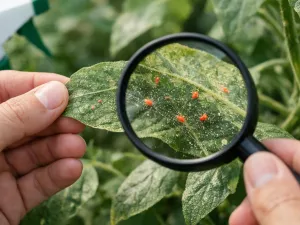
Spider mite eggs and larvae are easy to miss because they are extremely small and usually hidden on the undersides of leaves. Most growers first notice the plant damage rather than the mites themselves. By the time webbing is obvious, the population is usually well established.
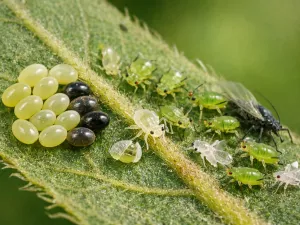
Eggs look like tiny round beads, often translucent, cream-colored, or pale yellow depending on age and species. They may appear glossy under magnification. Larvae are even harder to spot at a glance, but they are slightly more mobile and often gather near feeding sites where leaf tissue is already being damaged.
Where to look first
Spider mites prefer protected areas with steady access to sap-rich tissue. On indoor plants, that usually means the lower leaf surface, especially on tender new growth or older leaves that are beginning to dry slightly at the edges.
- Leaf undersides: Check along the midrib and side veins.
- Leaf axils: Mites often shelter where leaves meet stems.
- New growth: Fresh, soft tissue is easy for them to pierce and feed on.
- Webbed areas: Eggs are commonly tucked into fine silk.
- Dusty-looking foliage: Speckling and dullness often appear before obvious webbing.
Visual clues that separate eggs from plant debris
Plant dust, dried mineral spots, and pollen can all be mistaken for eggs. The difference is usually in placement and consistency. Spider mite eggs tend to be evenly rounded and attached close to the leaf surface. Debris is more irregular and usually wipes away more easily.
Larvae are tiny, pale, and slow-moving compared with adult mites. If you tap a leaf over white paper and look closely, moving specks suggest active mites rather than residue. A hand lens is often enough to confirm what you are seeing.
Damage patterns linked to early stages
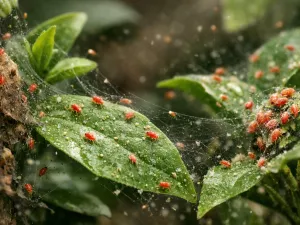
Eggs themselves do not damage leaves, but larvae begin feeding almost immediately after hatching. Early feeding creates fine stippling: tiny pale dots that make green leaves look faded, silvery, or sandblasted. On broad-leaved houseplants such as calathea, alocasia, ivy, and citrus, this can show up before any webbing is visible.
If the infestation continues, leaves may curl, yellow, dry at the margins, and eventually drop. Plants under water stress, inconsistent watering, or very low humidity often show damage faster because the tissue is already under strain.
How fast spider mites reproduce indoors

Indoors, spider mites reproduce at a pace that surprises many plant owners. A warm, stable environment without rain, wind, or natural predators gives them an advantage. Unlike outdoor infestations, indoor populations are not regularly knocked back by weather, beneficial insects, or heavy washing from rainfall.
Under favorable conditions, a female can lay dozens of eggs over her lifespan. Because those eggs hatch quickly and the offspring mature fast, several overlapping generations can exist on the same plant at once. That overlap is what makes indoor outbreaks feel sudden.
Conditions that speed reproduction
The fastest reproduction usually happens in warm, dry rooms. Temperatures around 26–30°C (79–86°F) combined with low humidity can shorten the time from egg to egg-laying adult dramatically. Plants placed under strong grow lights for 12 to 16 hours a day may also create warm leaf surfaces that favor mite development.
- Warm temperatures: Faster metabolism means faster hatching and molting.
- Dry air: Many spider mite species thrive when humidity stays low.
- Plant stress: Underwatered or nutrient-stressed plants are easier targets.
- Crowded foliage: Dense canopies create sheltered feeding zones.
- No disturbance: Leaves that are never rinsed or wiped allow colonies to build quietly.
Typical indoor timeline
The exact timing varies by species and room conditions, but the pattern is consistent enough to guide treatment planning. The table below shows a practical range for indoor growing spaces rather than a single fixed number.
| Condition | Egg hatch time | Time to adult | What it means for growers |
|---|---|---|---|
| Cool room, 18–21°C (64–70°F) | About 5–10 days | About 14–20 days | Population growth is slower, but weekly checks are still necessary. |
| Average indoor room, 21–24°C (70–75°F) | About 3–7 days | About 10–14 days | Two treatment rounds are rarely enough if eggs are present. |
| Warm dry room, 24–29°C (75–84°F) | About 2–5 days | About 5–10 days | Infestations can double very quickly and need tight treatment intervals. |
| Hot plant shelf, above 29°C (84°F) | Often very rapid | Sometimes under 1 week | Leaf stress and mite pressure can escalate together. |
Because generations overlap, you may have eggs, larvae, nymphs, and adults present at the same time. That is why a single inspection can reveal both fresh stippling and mature webbing on one plant.
Practical recommendation: If you keep plants in a cabinet or on a shelf above a radiator, check the warmest plants first. Spider mites often establish there before spreading to cooler parts of the room.
Why infestations grow rapidly

Spider mite outbreaks accelerate for a few simple reasons: they are tiny, they reproduce quickly, and they often go unnoticed until the plant is already under pressure. By the time leaves show bronzing or webbing, the colony has usually been feeding for long enough to produce multiple age groups.
Another reason infestations seem to explode is that indoor plant care can unintentionally favor them. Dry air, inconsistent watering, dusty leaves, and crowded plant groupings all make it easier for mites to settle in and spread from one host to the next.
Plant stress makes colonization easier
Healthy plants are not immune, but stressed plants are more vulnerable. A plant that is repeatedly allowed to dry out, scorched by harsh afternoon sun, or weakened by poor root health often has less resilience. Mites can feed on those leaves with less resistance, and the plant may show visible decline sooner.
- Water stress: Repeated dry-downs can leave foliage thinner and more prone to damage.
- Excess fertilizer: Soft, lush growth can attract sap-feeding pests.
- Poor airflow: Still air around dense foliage creates protected feeding zones.
- Dust buildup: Dirty leaves are harder to inspect and easier for mites to occupy unnoticed.
They spread before you notice them
Spider mites can move from leaf to leaf on webbing, on your hands, on pruning tools, or by brushing against neighboring plants. Indoors, even a gap of 20 cm (8 in) between pots may not be enough if leaves touch or if you rotate plants in the same workspace. Infestations often begin on one stressed specimen and then migrate to others nearby.
Because eggs are so small and adults are nearly invisible without close inspection, many people mistake the first symptoms for nutrient deficiency, sun stress, or natural aging. That delay gives the mites more time to multiply.
Why the damage compounds
Each feeding mite punctures plant cells and removes contents from the leaf tissue. A few mites create scattered stippling, but a large colony reduces photosynthetic area across the whole leaf. As leaves weaken, the plant has less energy for new growth, root maintenance, and recovery. On fruiting or flowering plants, buds may abort and blooms may fail to open properly.
This compounding effect is especially noticeable on thin-leaved houseplants and herbs. Mint, ivy, maranta, and indoor peppers can go from mildly speckled to badly distorted in a short period, particularly in rooms below 40% relative humidity.
Best timing to target mites at each stage

Good control depends less on finding a miracle product and more on matching your method to the stage you are trying to hit. Mobile mites are easier to kill than eggs, so timing repeated treatments matters. If you spray once, kill active mites, and stop, the eggs often hatch and restart the problem.
The most effective approach is usually layered: physical removal, repeated contact treatment, and environmental correction. That combination reduces the number of active mites while making the plant less favorable for the next generation.
Targeting eggs, larvae, nymphs, and adults
Eggs are the hardest stage to eliminate because many common soaps and oils do not fully penetrate them. Larvae and nymphs are more vulnerable, especially when they are newly active and have not yet spread across the plant. Adults are easier to hit than eggs, but they are also the stage laying more eggs every day.
- Egg stage: Remove heavily infested leaves, wipe webbed areas, and plan follow-up treatments before hatch begins.
- Larval stage: This is a strong window for insecticidal soap or horticultural oil because the mites are small and exposed.
- Nymph stages: Continue treatment at close intervals to catch survivors before they mature.
- Adult stage: Knock down numbers fast with thorough coverage, especially on leaf undersides and stem joints.
Practical treatment intervals indoors
For most indoor situations, repeating treatment every 3 to 5 days is more reliable than waiting a full week in warm conditions. In cooler rooms, every 5 to 7 days may be enough. The goal is to interrupt hatching before new adults begin laying again.
When rinsing plants, use lukewarm water and support the leaves with your hand so delicate foliage does not tear. A sink sprayer or shower can physically remove many mites, but it must be followed by continued monitoring. On plants with fuzzy leaves, avoid heavy rubbing because that can damage the surface and create more stress.
Editor’s note: Coverage matters more than volume. A quick mist over the top of the plant rarely reaches the underside of leaves, where most mites, eggs, and webbing are concentrated.
Timing around light and watering
If you use oils or soaps, apply them when the plant is out of direct intense light. Leaves under strong sun or close grow lights can scorch if wet treatment residues remain on the surface. Water the plant appropriately before treatment if it is dry, because a dehydrated plant is more likely to react badly to sprays.
It also helps to prune the worst-damaged leaves first. That reduces the number of eggs and adults at once, improves airflow, and makes later treatments more effective because the spray can reach the remaining foliage.
How life cycle affects treatment success
The reason many spider mite treatments fail is not always the product itself. More often, the treatment schedule ignores the biology of the pest. If eggs survive and hatch between applications, the infestation rebounds. If adults are reduced but the room remains hot, dry, and crowded, the next generation develops under the same favorable conditions.
Successful control comes from treating the infestation as a moving cycle rather than a single event. Every decision, from pruning to rinsing to adjusting humidity, should be aimed at reducing survival from one stage to the next.
Why one-and-done treatments disappoint
A plant may look much better 48 hours after treatment because webbing is gone and active mites are reduced. But if eggs were untouched, the visible improvement is temporary. Within several days, fresh larvae begin feeding again. Growers often assume the product “stopped working,” when the real issue is that the treatment did not cover the full hatch window.
This is especially common with plants that have tight leaf clusters, curled foliage, or rough leaf surfaces. Those structures give eggs and juveniles places to hide from sprays and wiping.
Environmental conditions change the outcome
Life cycle speed is tied closely to the growing environment, so treatment success is too. A plant in a room at 27°C (81°F) with very dry air may need closer follow-up than the same plant in a cooler room at 20°C (68°F). Likewise, a plant recovering from root rot, poor drainage, or chronic underwatering is less able to outgrow damage.
- Humidity support: Moderately improving humidity can reduce plant stress, though it should not replace direct treatment.
- Watering consistency: Even moisture helps the plant maintain stronger foliage and recover faster.
- Light balance: Bright indirect light supports recovery without adding heat stress.
- Leaf hygiene: Regular wiping or rinsing helps detect and disrupt early colonies.
When treatment should be adjusted
If you still see fresh stippling, moving mites, or new webbing after two or three rounds, reassess the method rather than simply repeating it indefinitely. You may need better underside coverage, shorter intervals, more pruning, or isolation from nearby plants. In severe cases, sacrificing one heavily infested plant can protect a larger collection.
It is also worth checking the potting setup. Plants sitting in compacted soil, old peat that swings from soggy to bone dry, or containers without proper drainage often remain stressed and become repeat targets. Treatment works best when basic care is corrected at the same time.
Breaking the reproduction cycle effectively
To stop spider mites for good, the goal is not just killing what you see today. The goal is preventing eggs from becoming adults and preventing adults from laying the next round. That requires a short-term cleanup phase followed by a brief period of disciplined follow-up, even after the plant appears improved.
The most reliable results come from combining sanitation, repeated treatment, isolation, and stronger plant care. This integrated approach is more dependable than relying on one spray alone.
A practical step-by-step approach
Start by separating the affected plant from healthy ones. Even moving it 1–2 m (3–6.5 ft) away reduces accidental spread during handling. Then remove the worst leaves, especially those covered in webbing or badly bronzed. That immediately lowers the number of eggs and feeding mites.
- Isolate the plant and inspect nearby plants that were touching it or standing close by.
- Prune the most infested leaves and dispose of them away from the growing area.
- Rinse the plant thoroughly, focusing on the underside of leaves and stem joints.
- Apply a suitable contact treatment with complete coverage.
- Repeat at intervals matched to room temperature, usually every 3–5 days indoors.
- Continue checks for at least 2 weeks after the last visible sign of mites.
Support the plant while you interrupt the cycle
Recovery is easier when the plant is not fighting multiple stresses at once. Keep watering even and avoid letting the root ball swing from very dry to saturated. Place the plant in bright indirect light rather than harsh direct sun while damaged leaves are still vulnerable. Hold off on heavy feeding until active mite pressure is under control, because stressed roots do not always use fertilizer efficiently.
If the soil is exhausted or compacted, repotting may help later, but do not combine too many stressful interventions at once. First stabilize the infestation, then improve the root environment once the plant is growing again.
How to know the cycle is truly broken
Real success shows up as an absence of new stippling, no fresh webbing, and healthy new leaves emerging without distortion. Old damage will not disappear, so judge progress by new growth rather than expecting marked leaves to turn green again. Continue checking the undersides of leaves with a lens for at least 14 days after the last active mites are seen.
If no new eggs, larvae, or webbing appear during that period, the cycle is likely broken. At that point, regular leaf cleaning, better airflow, and consistent watering become your best preventive tools against reinfestation.