Why Spider Mites Keep Coming Back

 This article explains why spider mite infestations come back after treatment, including hidden colonies, missed spots, favorable warm dry conditions, and common mistakes. It also covers complete elimination, when to repeat treatments, and long-term prevention.
Spider mites often come back just as plants begin to recover, which can be discouraging for gardeners. In most cases, the return is not caused by one failed treatment but by several factors working together, including rapid reproduction, eggs hidden on leaf undersides, warm dry air, and untreated nearby plants that serve as hosts. Knowing why infestations rebound helps gardeners interrupt the cycle and better protect both indoor plants and outdoor beds.
Common reasons infestations return after treatment

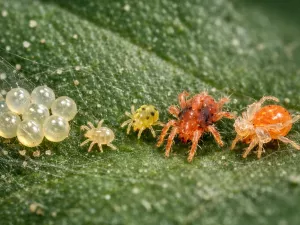
Spider mites are persistent because treatment often removes the visible population without breaking the full life cycle. A plant can look cleaner for a week, then show fresh stippling and webbing as eggs hatch or surviving mites move back from nearby foliage. What feels like a new outbreak is often the same infestation resurfacing.
Another reason they return is that they rarely stay on just one leaf or one plant. They spread to pots sitting shoulder to shoulder, hide under rims and saucers, and settle into dry, protected spots where sprays do not reach well. If only the worst-looking plant is treated, the surrounding area can act as a reservoir.
Why one-and-done treatments fail
Most products kill active mites better than they kill eggs. That means the first application may reduce numbers dramatically, but it does not necessarily end the problem. Within several days, depending on temperature, a new generation can emerge and begin feeding before the grower notices.
- Egg survival: Many contact sprays do not penetrate eggs, so hatchlings appear after treatment.
- Incomplete coverage: Mites cluster along midribs, leaf undersides, petioles, and tight nodes that are easy to miss.
- Untreated neighbors: Adjacent houseplants, cuttings, and even weeds in a greenhouse can harbor survivors.
- Resistance pressure: Repeating the same miticide or insecticidal approach can leave behind the most tolerant individuals.
Reinfestation from the surrounding space
Spider mites do not need much help to move. Indoors, they can travel on hands, sleeves, pruning snips, and plant stakes. Outdoors or in a greenhouse, air movement can carry them from one bench to another. A cleaned plant placed back into the same dusty, crowded spot may be exposed all over again.
It also matters how the plant recovers after treatment. A stressed plant with dry roots, poor light, or nutrient imbalance produces weaker growth that mites readily exploit. Treatment is only part of the solution; the plant’s growing conditions influence whether the pest pressure stays low or rebounds.
If a plant improves for 7 to 10 days and then declines again, do not assume the product “stopped working.” In many cases, you are seeing a hatch cycle that was already in motion before the first spray.
Hidden colonies and missed areas

Spider mites are small enough to avoid casual inspection, especially early on. By the time webbing is obvious, colonies may already be established in several protected zones. Missing even a few of these pockets can be enough to restart the infestation, particularly in warm rooms where development is fast.
The classic mistake is checking only the top surface of leaves. Mites strongly prefer the undersides, where they feed along veins and stay sheltered from direct water, sun, and handling. Dense plants such as ivy, palms, peppers, and many vining houseplants are especially easy to under-treat.
Where mites commonly hide
A careful search should go beyond the leaf blade. Colonies often settle where plant structure creates shade and still air.
- Leaf undersides: The most common feeding site, especially near the midrib and secondary veins.
- Leaf axils: Tight junctions where leaves meet stems can hold both mites and eggs.
- New growth folds: Soft emerging leaves may shelter small colonies before damage is visible.
- Petioles and stems: Fine webbing can span these areas and protect mites from a light spray.
- Pot rims and saucers: Dusty edges and debris can harbor stragglers during cleanup.
- Support materials: Moss poles, bamboo canes, clips, and ties can all carry survivors.
Inspection habits that miss the problem
Many infestations persist because inspection is rushed. Looking from standing height, checking only damaged leaves, or relying on webbing alone leads to false confidence. A plant may appear clean from the front while the back half remains active.
Good inspection is methodical. Turn leaves over, separate crowded stems, and use bright side lighting. A hand lens helps, but even without one, tapping a suspect leaf over white paper can reveal moving specks. If several plants share a shelf, inspect the entire group rather than the most symptomatic specimen.
| Area to check | Why it gets missed | What to look for |
|---|---|---|
| Undersides of older leaves | Leaves are not turned over during quick checks | Fine stippling, pale patches, tiny moving dots |
| Inner canopy | Dense growth blocks visibility and spray reach | Localized webbing, dusty appearance, leaf drop |
| New shoots and folded leaves | Damage has not yet spread enough to be obvious | Distorted soft growth, clustered mites near veins |
| Plant hardware and pot edges | Focus stays on foliage only | Web strands, debris, stray mites after washing |
Environmental conditions that favor mites

Spider mites thrive when plants are under mild but chronic stress. Warm, dry air speeds their life cycle and makes leaves less resilient. Indoors, this often means a plant is sitting near a heater, in a bright south-facing window, or in a room with low humidity and little air circulation around the leaves.
Dryness matters in two ways. It favors the pest directly, and it weakens the plant indirectly. A root ball that repeatedly dries too far can lead to thinner, more vulnerable foliage. At the same time, dusty leaves and stagnant corners create a comfortable surface for mites to settle and feed undisturbed.
Temperature, humidity, and plant stress
Population growth accelerates in warm conditions, especially around 24 to 30°C (75 to 86°F). In that range, eggs hatch faster and generations overlap more quickly. When relative humidity is low, webbing remains dry and airy, helping colonies spread over leaf surfaces.
- Warm rooms: Faster breeding means small surviving populations rebound quickly.
- Low humidity: Dry air increases plant stress and favors mite activity.
- Inconsistent watering: Repeated drought stress weakens leaves and slows recovery.
- Dust accumulation: Dirty foliage reduces plant efficiency and gives mites a more stable surface.
Growing conditions that quietly contribute
Light and feeding also play a role. Plants kept in too little light often produce weak growth that cannot outgrow damage. On the other hand, heavy nitrogen feeding can push soft, lush growth that some pests exploit easily. The issue is not fertilizer itself, but imbalance: stressed roots plus rapid top growth can create tender tissue that is hard to protect.
Overcrowding is another hidden factor. Leaves pressed together reduce visibility and make complete spray coverage difficult. In a greenhouse or plant room, benches packed tightly can turn one infested specimen into a recurring area-wide problem.
Humidity alone is not a cure. Raising it modestly can make conditions less favorable, but it works best alongside washing, pruning, and repeat treatment. A pebble tray under one pot will not control an active infestation.
Mistakes that allow mites to survive

Most repeat outbreaks are linked to technique rather than lack of effort. Gardeners often treat too lightly, too infrequently, or too narrowly. Because spider mites are tiny, it is easy to underestimate how thoroughly a plant must be cleaned and how consistently follow-up must be handled.
Another common issue is using a product that is not suited to the situation. Contact sprays, horticultural oils, insecticidal soaps, and dedicated miticides all work differently. If the plant is heavily webbed, a gentle misting may never reach the feeding sites. If the room is hot and bright, applying oil at the wrong time can stress foliage and lead the grower to stop treatment early.
Application errors
Coverage is everything with mites. A product cannot control what it does not touch, and many failures come down to missed surfaces and poor timing.
- Spraying only the top of leaves. The underside is usually where the real population is concentrated.
- Stopping after visible improvement. Reduced damage does not mean eggs and hatchlings are gone.
- Using weak dilution or casual mixing. Under-dosed products may suppress rather than eliminate.
- Treating in harsh midday sun. This can stress leaves and reduce the willingness to repeat properly.
- Ignoring the room or bench. Pots, saucers, shelves, and nearby plants can reintroduce mites.
Care mistakes that prolong recovery
Even after mites are knocked back, poor plant care can keep the plant vulnerable. Overwatering a stressed plant after treatment is a frequent reaction, but soggy soil does not help damaged leaves and can create root problems. The better approach is steady moisture: water thoroughly, then allow the appropriate amount of drying for that species before watering again.
Pruning can also be mishandled. Removing the worst leaves is useful, but stripping too much foliage from an already weakened plant can slow recovery. Aim to remove heavily infested or badly bronzed leaves while preserving enough healthy tissue for photosynthesis.
- Sudden overwatering: Compounds stress instead of correcting drought damage.
- Heavy feeding right away: Pushing growth on a weak root system can backfire.
- No isolation period: Returning the plant immediately to a mixed collection invites reinfestation.
- Keeping dead debris in the pot: Fallen leaves and webbing make monitoring harder and harbor strays.
How to eliminate mites completely

Complete control comes from combining physical removal, repeated treatment, and improved growing conditions. There is rarely a single dramatic fix. The goal is to collapse the population, interrupt hatching cycles, and make the plant a less favorable host while it grows fresh, clean foliage.
Start by isolating the affected plant if possible. Move it away from the rest of the collection, ideally by at least 1 to 2 m (3 to 6.5 ft) indoors, or to a separate bench or room. Then remove the worst leaves if they are heavily webbed or badly bronzed. This reduces the number of mites you need to kill and improves access to the remaining foliage.
A practical treatment sequence
The most reliable approach is a staged cleanup rather than a single spray session. Washing first removes webbing and dust, which helps later applications contact the leaf surface more effectively.
- Rinse the plant thoroughly. Use lukewarm water and direct the spray at leaf undersides. A handheld shower or hose with gentle pressure works well.
- Prune strategically. Remove heavily infested leaves and dispose of them away from the growing area.
- Apply the chosen treatment. Coat upper and lower leaf surfaces, stems, petioles, and tight nodes until evenly covered, not just lightly misted.
- Clean the surroundings. Wash saucers, wipe shelves, and inspect neighboring plants.
- Recheck after several days. Look for fresh stippling, moving mites, or new webbing before the next round.
Supporting the plant while it recovers
After treatment, focus on stable care. Keep the plant in bright conditions appropriate for the species, but avoid sudden exposure to intense direct sun if foliage has been recently washed or sprayed. Maintain even watering so the root ball does not swing from bone dry to waterlogged. If the plant is root-bound, delay repotting until the infestation is under control unless the potting mix is clearly failing.
Feeding should be moderate. A half-strength fertilizer application can be useful once new growth resumes, but avoid trying to “boost” recovery with heavy doses. For example, if the label suggests 10 ml per 1 L (2 tsp per 34 fl oz), use 5 ml per 1 L (1 tsp per 34 fl oz) until the plant is actively growing again.
When washing foliage, support the leaf from underneath with your hand. This reduces tearing on thin leaves and lets you direct water exactly where mites gather most densely.
When to repeat treatment cycles
Repeat treatments are essential because spider mite eggs often survive the first pass. The exact interval depends on temperature, the product used, and how active the infestation is, but waiting until damage is obvious again gives the pest too much time. Follow-up should be planned from the beginning, not added only if the first round seems to fail.
In warm indoor conditions, many growers repeat every 4 to 7 days for at least three rounds. Cooler rooms may allow slightly longer gaps, but consistency matters more than speed. If the plant was heavily infested, extending the cycle to a fourth or fifth treatment is often sensible, especially on dense species with many hiding places.
How to judge the interval
Use both the product label and the plant’s environment as guides. Contact products generally require closer repetition than systemic or residual options, though many houseplant-safe treatments are primarily contact based. Faster mite development in warm rooms means shorter intervals are usually safer.
| Situation | Suggested repeat timing | Reason |
|---|---|---|
| Light infestation in a cool room around 18 to 21°C (64 to 70°F) | Every 6 to 7 days | Development is slower, but eggs may still hatch between checks |
| Moderate infestation in average indoor conditions around 21 to 24°C (70 to 75°F) | Every 5 to 6 days | Balances hatch timing with plant-safe follow-up |
| Heavy infestation in warm, dry conditions around 24 to 30°C (75 to 86°F) | Every 4 to 5 days | Rapid life cycle increases rebound risk |
| After apparent control is achieved | One extra treatment 7 days later | Catches late hatchlings and hidden survivors |
Signs you should not stop yet
A plant is not necessarily clear just because webbing is gone. Continue the cycle if you notice any of the following:
- Fresh stippling on newer leaves that were previously clean.
- Fine web strands reappearing between petioles or leaf tips.
- Moving specks on white paper after tapping a leaf.
- Damage spreading inward from leaf edges despite recent treatment.
Once active signs stop, keep monitoring for another 2 to 3 weeks. That observation period is often what separates true control from a temporary lull.
Long-term prevention strategies
Preventing spider mites from returning is mostly about routine plant care and early detection. Healthy plants are not immune, but they tolerate minor pest pressure better and recover faster. The aim is to avoid the dry, dusty, stressed conditions that let a tiny initial population become a visible outbreak.
Regular inspection is the most valuable habit. A quick weekly check of leaf undersides, new growth, and inner stems catches problems before webbing appears. It also helps you distinguish old damage from active feeding, which prevents unnecessary treatments and makes real flare-ups easier to spot.
Daily and weekly habits that make a difference
Prevention works best when it is folded into normal maintenance rather than treated as a separate emergency task.
- Wipe or rinse dusty foliage: Clean leaves are easier to inspect and less inviting to mites.
- Water consistently: Avoid repeated drought stress, especially in fast-draining mixes and small pots.
- Space plants sensibly: Leave enough room for airflow and access to leaf undersides.
- Quarantine new arrivals: Keep new plants separate for 2 to 3 weeks before placing them with the collection.
- Trim weak or crowded growth: Open canopies are easier to monitor and treat.
- Check heater and vent placement: Hot, dry airflow can create a chronic mite hotspot.
Building a more resilient growing setup
Long-term prevention also means matching care to the plant’s needs. Keep light levels appropriate so growth is sturdy rather than weak and stretched. Use a potting mix that drains well but still holds enough moisture for the species, and repot when roots have clearly outgrown the container instead of letting the plant cycle through chronic stress. If you use fertilizers, apply them during active growth and avoid overfeeding during recovery periods.
For collections in very dry homes, modest humidity support can help, especially during winter heating season. A room humidifier is more effective than tiny local fixes, but even then, humidity should support good care rather than replace it. Aim for balance: clean foliage, steady watering, enough light, and regular checks.
Choose one inspection day each week and stick to it. A five-minute routine catches more infestations than occasional deep cleaning after damage is already obvious.
With spider mites, prevention is less about perfection and more about consistency. When plants are monitored closely and treated early, the pest loses the chance to rebuild unnoticed.