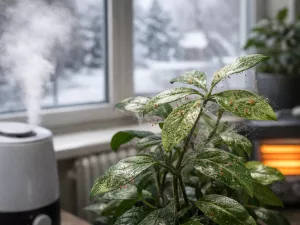
Spider Mite Spread and Prevention

 This article explains how spider mites move between plants, why they spread fast indoors, and the early signs of a growing infestation. It also covers isolating infected plants, containing outbreaks, preventing further spread, and stopping reinfestation long term.
Spider mites can spread through a garden or indoor plant collection surprisingly fast, turning a minor problem into widespread leaf damage before many growers notice. They often travel on infested plants, clothing, tools, or air currents, so prevention matters. Checking plants regularly, isolating new arrivals, cleaning equipment, and removing affected leaves can help protect healthy plants, catch problems early, and stop infestations from taking hold.
How spider mites move between plants

Spider mites do not need much help to travel. These tiny sap-feeding pests are light, mobile, and easily transferred from one plant to another through direct contact, moving air, shared tools, and routine plant care. Because they are so small, growers often spread them without noticing, especially when handling several houseplants in one session.
Most movement happens over short distances at first. A leaf touching a neighboring leaf can be enough for mites to cross over. Once a colony builds up, the chances of spread increase quickly because more adults, juveniles, and eggs are present on stems, leaf undersides, rims of pots, and nearby surfaces.
Common ways mites travel
Understanding the main routes of movement makes prevention much easier. Some pathways are obvious, while others are part of normal plant maintenance.
- Leaf-to-leaf contact: Plants grouped tightly on a shelf or windowsill allow mites to crawl directly across.
- Air currents: Fans, open windows, heating vents, and dry indoor airflow can help very small mites or silk strands move to nearby plants.
- Hands and clothing: Touching an infested plant and then pruning, watering, or rotating another plant can transfer pests.
- Shared equipment: Scissors, stakes, moss poles, trays, and watering cans can all carry mites or eggs if not cleaned.
- New plant introductions: Nursery plants, cuttings, and gifted houseplants often bring in the first population.
Why plant arrangement matters
Dense displays look attractive, but they create easy bridges for pests. Vining plants, broad-leaved tropicals, and plants with overlapping canopies are especially vulnerable because mites can move without exposure. A spacing gap of even 15 to 20 cm (6 to 8 in) between pots can reduce direct transfer, particularly during an active outbreak.
Plants that spend time outdoors in warm weather can also reintroduce mites when brought back inside. Outdoor exposure is not always the cause, but it increases contact with wind, dust, and other host plants that may already carry a low-level population.
If you rotate plants for even growth, make it a habit to inspect the undersides of a few leaves first. That quick check often catches a problem before it spreads across an entire shelf.
Why infestations spread quickly indoors

Indoor conditions often favor spider mites more than the plants they attack. Warm rooms, low humidity, still corners, and a lack of natural predators allow populations to multiply fast. A few mites can become a serious infestation in a short period because their life cycle is rapid, especially when temperatures stay around 24 to 29°C (75 to 84°F).
Houseplants also tend to be clustered together, which creates a convenient network of hosts. Once one plant weakens, mites can move to the next without much interruption. Indoor environments are stable, so there is little rain, wind, or beneficial insect activity to disrupt them.
Indoor conditions that favor outbreaks
Not every home creates the same level of risk, but some conditions repeatedly show up where infestations become severe.
- Dry air: Heated winter rooms and air-conditioned spaces often drop humidity to levels that stress foliage and favor mites.
- Warm temperatures: Consistent warmth speeds egg hatch and development.
- Dusty leaves: Dust gives mites shelter and makes it harder to notice early stippling.
- Plant stress: Underwatering, erratic watering, poor light, and root-bound pots reduce a plant’s ability to tolerate feeding damage.
- No natural checks: Indoors, there are usually no predators to keep numbers low.
How plant stress accelerates the problem
Mites often hit hardest when a plant is already struggling. Dry root balls, compacted soil, and weak light reduce growth and make leaves more susceptible to damage. A thirsty plant may not attract mites in the literal sense, but it is less able to replace damaged tissue and more likely to show rapid decline once feeding starts.
Feeding practices matter too. Heavy nitrogen feeding can push soft, lush growth that some pests exploit. On the other hand, starving a plant does not solve the issue; it simply weakens recovery. The goal is steady, appropriate care rather than extremes.
Why small infestations are often missed
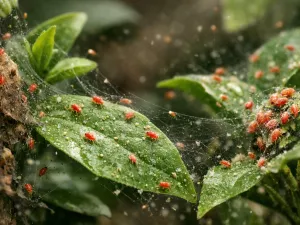
Spider mites usually begin on the undersides of leaves and around inner growth, where they are hard to spot. By the time webbing is visible, the population is already well established. This delay is one reason indoor infestations seem to appear “all at once” when they have actually been building for days or weeks.
Plants with fine foliage, textured leaves, or dense crowns can hide mites especially well. Calatheas, ivies, alocasias, crotons, citrus, and many herbs can show damage before the pests themselves are clearly seen.
Early signs of spreading infestation

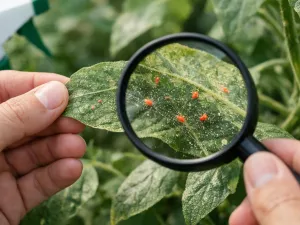
The first clues are usually subtle. Spider mite damage often starts as tiny pale dots, a dulling of leaf color, or a faintly speckled look known as stippling. As feeding continues, leaves may bronze, curl, dry at the edges, or drop earlier than normal. Spotting these early changes is the best chance to stop spread before multiple plants are involved.
It helps to look beyond the original plant. Once mites begin moving, neighboring plants may show lighter, less obvious symptoms first. A regular inspection routine is more useful than waiting for dramatic webbing.
Visual symptoms on leaves and stems
Damage patterns can vary by plant type, but several signs are especially common and worth checking during watering or pruning.
- Fine stippling: Tiny yellow, white, or pale dots scattered across the upper leaf surface.
- Muted color: Leaves lose their healthy gloss and begin to look dusty or faded.
- Bronzing: Green tissue turns tan, coppery, or gray-green over time.
- Leaf distortion: New growth may emerge smaller, twisted, or uneven.
- Fine webbing: Silk appears between leaf joints, along veins, or near growing tips when populations are high.
How to inspect properly
A quick glance is rarely enough. Turn leaves over and check the midrib, petiole junctions, and inner canopy. A plain white tissue or sheet of paper held under a leaf can help: tap the leaf gently, and moving specks may fall onto the surface. This does not identify every pest perfectly, but it is a practical way to confirm that something active is present.
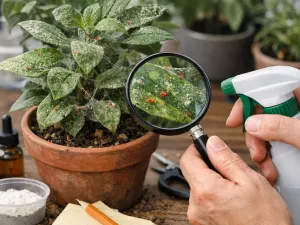
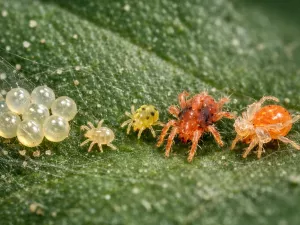
Use bright natural light or a small flashlight. If you have a hand lens, even better. Eggs often look like tiny translucent or pale beads, while active mites may appear as moving dots. The point is not perfect identification under laboratory conditions, but catching the issue before it expands.
| Sign | What it often means | Where to check first |
|---|---|---|
| Light stippling on upper leaf surface | Early feeding is already underway | Undersides of mature leaves |
| Leaves look dull or dusty | Population may be increasing but still hidden | Inner canopy and lower foliage |
| Fine webbing near nodes or tips | Infestation is established and likely spreading | Growing points and crowded stems |
| Leaf drop with no clear watering issue | Plant is under sustained stress from feeding | Nearby plants as well as the original host |
Do not wait for heavy webbing before acting. By that stage, the problem is rarely limited to one plant, even if only one looks badly affected.
How to isolate infected plants effectively

Isolation works best when it is immediate, practical, and strict. Moving an infested plant a short distance away is better than doing nothing, but true isolation means separating it enough that mites cannot easily crawl, drift, or hitchhike back to healthy plants. The aim is to create a treatment zone and break the chain of spread.
Choose a space with manageable light and airflow, such as a separate room, a bathroom with a bright window, or a utility area with supplemental grow lighting. The plant still needs proper care while under quarantine; poor conditions will only increase stress and make recovery slower.
Setting up a quarantine area
A good isolation area should support the plant while limiting contact with the rest of your collection. It does not need to be elaborate, but it should be easy to clean and easy to monitor.
- Move the affected plant away from all others, ideally to another room.
- Place it on a washable surface rather than carpet or fabric.
- Keep at least 1 to 2 m (3 to 6.5 ft) from healthy plants if a separate room is not possible.
- Remove fallen leaves, old mulch, and debris from the pot surface and surrounding area.
- Use dedicated tools, cloths, and watering supplies for that plant until treatment is complete.
What to do before and after moving the plant
Transport itself can spread mites if done carelessly. Before moving the plant, avoid brushing it against curtains, furniture, or neighboring foliage. If webbing is visible, carry it slowly and keep it upright. After relocation, wipe down the original spot, including the shelf, saucer, wall area, and nearby pots.
If the infestation is severe, pruning the worst leaves before treatment can reduce the active population. Do not strip the plant bare unless the species tolerates hard pruning well. Removing too much foliage can set back recovery, especially on slow-growing houseplants.
How long isolation should last
Quarantine should continue until repeated inspections show no active mites or fresh damage. In practice, that usually means several treatment cycles and at least 2 to 4 weeks of close monitoring, depending on room temperature and the severity of the outbreak. Warm rooms shorten mite generation time, so consistency matters more than a single dramatic treatment.
During isolation, keep watering regular and appropriate for the species. Letting the plant become bone dry between checks can worsen stress. Equally, avoid keeping soil constantly wet in an attempt to “help” the plant; root problems will complicate recovery.
Preventing mites from spreading further

Once mites are detected, prevention becomes a matter of discipline. The goal is to reduce mobility, lower population pressure, and avoid transferring pests during normal care. This is where routines matter more than one-off fixes. Small habits, such as cleaning tools and changing the order in which you handle plants, can make a major difference.
Prevention also depends on maintaining plant vigor. Healthy growth does not make a plant immune, but it improves tolerance and recovery. Balanced watering, suitable light, and clean foliage create conditions that are less favorable for a fast-moving outbreak.
Daily and weekly habits that help
These practices are simple, but they are effective because they interrupt the most common spread routes.
- Handle healthy plants first: Work from clean plants to suspect plants, not the other way around.
- Wash hands between plants: This is especially important after pruning or wiping leaves.
- Disinfect tools: Clean blades, stakes, and clips before reuse.
- Increase spacing: Create visible gaps so leaves do not touch.
- Rinse dusty foliage: Clean leaves periodically with lukewarm water to improve inspection and reduce hiding places.
Environmental adjustments that reduce risk
Spider mites thrive where air is dry and foliage is stressed. Raising humidity modestly can help some plants cope better, though humidity alone will not eliminate an infestation. More important is avoiding hot, dry airflow from radiators, vents, and strong fans directed straight at the leaves.
Light should also be corrected if plants are struggling in dim corners. Weak light slows recovery and can lead to poor watering patterns because soil stays wet longer while the plant remains physiologically stressed. Aim for the right light level for the species rather than simply moving everything closer to a bright window.
Grouping plants tightly to raise humidity can backfire during an outbreak. Use trays, room humidification, or better placement instead of letting leaves overlap.
Cleaning surrounding surfaces
Mites spend most of their time on plants, but nearby surfaces should not be ignored. Wipe shelves, windowsills, pot exteriors, and saucers after removing an infested plant. Launder nearby fabric plant ties or decorative covers if they were in contact with foliage. This kind of cleaning supports your treatment plan and reduces the chance of immediate reintroduction.
Best practices to contain outbreaks
Containing an outbreak requires a coordinated response rather than a single spray or rinse. The most reliable approach combines isolation, physical removal, repeated treatment, and close follow-up. Because eggs can survive initial efforts, one treatment is rarely enough. Consistency over time is what brings the population down.
The exact method depends on the plant, the size of the collection, and how severe the infestation is. Delicate foliage may need gentler handling, while tougher plants can tolerate stronger rinsing and more aggressive pruning.
A practical containment sequence
When several plants are involved, a clear order of action prevents confusion and missed steps.
- Identify the most affected plants and isolate them first.
- Inspect all nearby plants, including those that still look healthy.
- Rinse or wipe foliage to remove active mites and webbing.
- Apply your chosen treatment thoroughly, especially to leaf undersides.
- Repeat on schedule based on the product or method used.
- Recheck the whole area every few days for fresh stippling or movement.
Physical removal and treatment support
A firm rinse with lukewarm water can remove large numbers of mites, especially from sturdy plants such as hibiscus, citrus, pothos, or many philodendrons. Support the pot so soil does not spill, and direct water at the undersides of leaves where mites gather. Let foliage dry with good air circulation afterward, but avoid blasting the plant with hot or very dry air.
For plants that dislike heavy washing, wiping leaves with a soft cloth can reduce numbers enough to make follow-up treatment more effective. Whatever product you use, coverage matters more than volume. Missing the undersides, petioles, and crowded growth points is a common reason outbreaks rebound.
When to prune, discard, or protect nearby plants
Prune leaves that are heavily webbed, badly bronzed, or no longer useful to the plant. This lowers the pest load and improves access for treatment. Bag removed material immediately and dispose of it rather than composting indoors. If a small, inexpensive plant is severely infested and surrounded by valuable specimens, discarding it may be the most practical containment decision.
Nearby plants that show no symptoms should still be treated as exposed. Increase monitoring frequency, improve spacing, and consider preventive rinsing or cleaning. Outbreak control often fails because only the worst-looking plant gets attention.
| Situation | Best containment response | Main risk if ignored |
|---|---|---|
| One plant with mild stippling | Immediate isolation, inspection of neighbors, early repeat treatment | Hidden spread before symptoms show elsewhere |
| Several plants touching on one shelf | Separate all pots, clean the area, monitor every plant closely | Continuous leaf-to-leaf transfer |
| Heavy webbing on a weak plant | Prune badly damaged growth or discard the plant if recovery is unlikely | Persistent source population near healthy plants |
| Reappearance after treatment | Review coverage, repeat timing, and quarantine discipline | Eggs hatch and rebuild the colony |
Long-term strategies to stop reinfestation
Once an outbreak is under control, the next challenge is preventing it from returning. Reinfestation usually happens because a few mites survived unnoticed, a new plant introduced them again, or the growing environment continues to favor them. Long-term success comes from combining plant health, routine inspection, and careful introduction of anything new into the collection.
Think of prevention as part of normal plant care rather than an emergency response. A stable watering routine, clean leaves, suitable light, and periodic checks are easier to maintain than repeated rescue treatments.
Build a quarantine habit for new plants
Every new plant, rooted cutting, or plant returning from outdoors should be kept separate before joining the main collection. A quarantine period of 2 to 3 weeks is a practical minimum, with inspections every few days. Check leaf undersides, stem joints, and the soil surface, and clean the plant before placing it near others.
This is especially important for plants bought during warm, dry seasons, when pest pressure is often higher. Even a healthy-looking nursery plant can carry a small population that is easy to miss at first glance.
Maintain strong, steady plant care
Plants under chronic stress are more likely to decline quickly if mites appear again. Keep watering consistent with the species and potting mix rather than following a rigid calendar. If soil has become compacted or hydrophobic, repotting into a fresh, airy mix can improve root function and make future stress less likely.
Feed during active growth at an appropriate rate instead of overcorrecting with heavy fertilizer. Good light is equally important. A plant kept in the right exposure produces stronger growth and is easier to inspect because leaves are not crowded, pale, or weakened.
Create a monitoring routine that is realistic
Long-term prevention works when the routine is simple enough to keep. Tie inspections to tasks you already do, such as weekly watering, rotating pots, or wiping leaves. Focus on high-risk plants first: thin-leaved tropicals, plants near heating vents, and any specimen with a history of mites.
- Weekly: Check a few leaves on each plant, especially the undersides.
- Monthly: Clean shelves, saucers, and pot rims; rinse dusty foliage where suitable.
- Seasonally: Reassess spacing, airflow, and humidity as heating or cooling changes indoor conditions.
- After travel or purchase: Inspect all new or recently moved plants before mixing them with the collection.
Know which plants need extra attention
Some plants seem to attract repeat problems simply because their foliage and growing conditions suit mites well. Crotons, ivies, marantas, calatheas, citrus, and many tender herbs often deserve closer watching. This does not mean they should be avoided, only that they benefit from more frequent inspection and cleaner growing conditions.
If one plant repeatedly becomes the first host, consider whether its placement is the issue. Moving it away from a hot radiator, giving it brighter indirect light, or correcting erratic watering may do more for long-term prevention than repeated treatment alone.