How to Spot Spider Mites Early

 This article shows how to catch spider mites before webbing appears, including where to inspect plants first and the subtle damage patterns that give them away. It also covers simple tools to detect and confirm an infestation quickly, why early detection matters, and what to do right away after you find them.
Spotting spider mite damage early can prevent serious stress and make treatment much easier. These tiny pests often appear before most growers notice them, causing faint speckling, dull or stippled leaves, and fine webbing tucked under foliage or along stems. Regularly checking leaf undersides, new growth, and dry, warm areas helps you catch the first signs quickly, take action sooner, and avoid a much larger infestation later.
Early signs of spider mites before visible webbing

Spider mites rarely announce themselves with obvious webbing at the start. By the time you see fine silk stretched between leaves and stems, the population is often well established. Early detection depends on noticing small changes in leaf appearance, plant vigor, and growth quality before the infestation becomes dramatic.
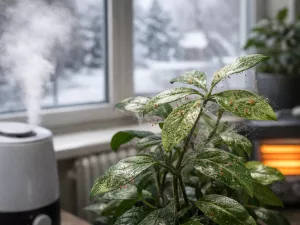
The first clues are usually easy to dismiss as minor stress. Leaves may lose their normal shine, look slightly dusty, or develop a faint pale stippling that resembles pinprick discoloration. On houseplants and greenhouse crops, this often begins on the warmest, driest side of the plant, especially near windows, vents, or grow lights.
What the earliest leaf changes look like
Fresh feeding damage from mites is subtle because they pierce plant cells and remove contents one tiny spot at a time. Instead of large holes or chewed edges, you get a fine speckled pattern. On green leaves, this may look yellowish or silvery. On darker foliage, it can appear bronze, gray-green, or washed out.
- Faint stippling: tiny pale dots scattered across the leaf surface, often easiest to see when the leaf is tilted toward light.
- Dull finish: foliage loses its healthy gloss and starts to look dry even when soil moisture is adequate.
- Color shift: leaves may turn slightly bronze or gray before they yellow.
- Mild curling: the edges may cup upward or feel a little crisp, especially on tender growth.
Plant behavior that can point to mites
Plants under early mite pressure often behave as if they are thirsty or heat-stressed. You may notice drooping in the afternoon, slower extension of new shoots, or flower buds that fail to open cleanly. Because these signs overlap with watering and humidity problems, they are easy to misread unless you inspect the leaves closely.
Spider mites favor plants already under some stress. Irregular watering, very dry indoor air, excess nitrogen feeding, and hot bright conditions can all make a plant more attractive and less resilient. If a plant suddenly declines despite otherwise decent care, mites should be on the shortlist of possible causes.
Editor’s note: If a plant looks “off” but you cannot explain why, check the undersides of leaves before changing your watering routine. Many gardeners lose time correcting the wrong problem while mites keep multiplying.
Where to look for first symptoms on plants

Knowing where to inspect saves time and helps you catch infestations while they are still localized. Spider mites do not spread evenly at first. They tend to settle in protected, warm, dry areas where leaf tissue is tender and air movement is limited.
On most plants, the earliest symptoms appear on the undersides of leaves rather than the tops. Mites feed there because the surface is more sheltered, and eggs are less exposed. A quick glance at the upper surface often misses the beginning of the problem.
Most likely starting points
Start with the plant parts that combine warmth, shelter, and softer tissue. On indoor plants, this usually means foliage facing a sunny window or tucked behind neighboring leaves. On outdoor plants, check areas shielded from rain and exposed to reflected heat from walls, paving, or containers.
- Leaf undersides: especially along the midrib and where side veins branch out.
- Lower inner canopy: mites often build unnoticed where leaves overlap and humidity fluctuates.
- Newest fully opened leaves: not the tiny emerging ones, but the tender leaves just past unfolding.
- Plants near heat sources: radiators, heating vents, grow lights, and south- or west-facing glass can accelerate outbreaks.
- Dry-stressed container plants: hanging baskets and small pots dry quickly and are common early targets.
Plants and conditions that deserve extra attention
Some plants seem to attract spider mites more often than others. Broad-leaved tropical houseplants, beans, cucumbers, tomatoes, roses, ivy, dracaena, palms, and many calathea relatives can all show damage quickly. Fine-textured foliage can hide mites well, while thick leathery leaves may show damage later but still host a growing population.
Inspection should be more frequent during warm spells above 24°C (75°F), in centrally heated rooms, and after plants have been moved indoors for winter. Newly purchased plants also deserve a close check before joining the rest of your collection, since infestations often hitchhike in from garden centers or shared greenhouse spaces.
A simple inspection route
Following the same pattern each time makes it easier to compare changes from week to week. A consistent routine also reduces the chance of missing the first affected leaf.
- Check the plant side facing the strongest light first.
- Turn over three to five leaves from the middle and lower canopy.
- Inspect leaves near the main stem and where foliage overlaps.
- Look at one or two of the newest mature leaves for stippling.
- Finish by checking nearby plants within 30 cm (12 in) to 60 cm (24 in).
Subtle damage patterns that indicate mites

Spider mite damage has a different look from nutrient deficiency, fungal spotting, or sun scorch once you know what pattern to expect. The clue is not just discoloration, but the way it is distributed. Mite feeding creates many tiny injuries grouped over active feeding zones rather than broad, even yellowing across the whole plant.
At first, the pattern can seem random. Over time, however, certain visual signatures become clear. Damage often starts as fine stippling, then merges into larger pale or bronzed patches. Leaves may still be attached and structurally intact, but they look tired, faded, and roughened.
How mite damage differs from other common issues
Because the symptoms overlap with several plant problems, comparison helps. Nutrient shortages usually affect older or newer leaves in a more predictable whole-leaf pattern. Sunburn creates larger bleached or crisp patches on exposed surfaces. Thrips often leave silvery streaks with black droppings. Mites, by contrast, produce a peppered, sandblasted look without chewing marks.
| Problem | Typical pattern | Where it shows first | Useful clue |
|---|---|---|---|
| Spider mites | Fine stippling, bronzing, dull leaf surface | Leaf undersides and warm dry zones | No holes; tiny moving dots may be visible with magnification |
| Nutrient deficiency | More even yellowing or interveinal chlorosis | Often older or newer leaves depending on nutrient | Pattern follows leaf age more than canopy position |
| Sun scorch | Large bleached or crisp patches | Most exposed upper surfaces | Damage is broader and often sharply placed on light-facing areas |
| Thrips | Silvery streaks, scarring, distorted new growth | Flowers and tender growth | Black specks of frass are often present |
Patterns that often appear before webbing
One of the most useful early signs is uneven bronzing that starts near veins or in clusters, not across the entire leaf. Another is a slight roughness to the foliage when viewed at an angle. On variegated plants, the damage may be hardest to spot because the pale areas hide stippling, so compare affected leaves with healthy ones from the same plant.
- Localized fading: one section of the plant looks washed out while the rest still appears normal.
- Vein-adjacent stippling: speckles gather along the underside vein network where mites shelter.
- Patchy bronzing: not a uniform yellow, but a dusty tan cast over feeding areas.
- Premature leaf drop: older damaged leaves fall earlier than expected without obvious rot.
Practical tip: Photograph a suspect leaf beside a healthy one in the same light. Subtle bronzing and stippling are often easier to notice in side-by-side images than by eye alone.
Tools and methods for early detection

You do not need a laboratory setup to catch spider mites early, but a few simple tools make a major difference. Since the pests are tiny, the goal is to improve visibility and create repeatable checks. Good lighting and magnification matter more than expensive equipment.
A routine inspection method is often more effective than occasional deep checks. Weekly monitoring during high-risk periods lets you spot changes before the plant shows severe stress. This is especially important in warm rooms, greenhouses, and on plants with a history of mite problems.
Useful tools for home growers
The best tools are the ones you will actually use. A hand lens, plain white paper, and your phone camera can reveal a surprising amount.
- 10x hand lens: strong enough to see moving mites, cast skins, and eggs on leaf undersides.
- White paper test: hold paper under a leaf and tap it; moving specks that crawl after falling are suspicious.
- Phone flashlight: side lighting highlights webbing, stippling, and surface texture.
- Phone macro mode or clip-on lens: useful for zooming in on suspect areas and comparing images over time.
- Soft brush or cotton swab: helps separate overlapping leaves gently without tearing tissue.
How to inspect effectively
Technique matters. Looking quickly at the top of the plant under dim room light is not enough. Spider mites hide in the places most gardeners skip, so build a method that targets those zones.
- Inspect in bright natural light or under a strong white lamp.
- Turn leaves over rather than looking only from above.
- Use the hand lens on the midrib, side veins, and leaf-stem junctions.
- Tap one or two suspect leaves over white paper and watch for movement for 10 to 20 seconds.
- Repeat on several leaves from different parts of the plant, not just the worst-looking one.
When to check more often
Some periods call for tighter monitoring. If indoor humidity drops below 40%, if temperatures stay near 27°C (81°F) or higher, or if a plant has recently been repotted, pruned hard, or allowed to dry out, increase inspections to twice a week. Stress and warmth speed up mite reproduction, so populations can build quickly between normal care sessions.
It also helps to inspect after feeding. High-nitrogen fertilizer can push soft new growth that mites exploit. If you have applied a liquid feed, such as 500 ml (17 fl oz) of diluted fertilizer solution to a medium houseplant, keep an eye on the next flush of foliage rather than assuming the plant will simply grow out of minor discoloration.
Why early detection is critical for control

Spider mites are much easier to manage at the first sign of feeding than after webbing appears. Their life cycle is short in warm, dry conditions, and several generations can overlap on the same plant. A small unnoticed colony can become a plant-wide problem in a surprisingly short time.
Early action protects more than the affected plant. Mites spread on air currents, clothing, tools, and leaf-to-leaf contact. In a shelf of houseplants or a tightly planted greenhouse bench, one infested specimen can become a source for repeated outbreaks across the whole growing area.
Why waiting makes treatment harder
Once populations are high, control becomes more labor-intensive. Dense colonies hide in webbing, eggs are scattered across many leaves, and damaged tissue does not recover even after the pests are gone. That means you are not only trying to stop the infestation but also managing defoliation, slowed growth, and cosmetic decline.
- More eggs present: later infestations require repeated treatment because new mites hatch after the first application.
- More plant stress: heavy feeding reduces photosynthesis and weakens growth.
- Faster spread: nearby plants become exposed before the original problem is obvious.
- Reduced treatment reach: webbing and crowded foliage make thorough coverage harder.
Effects on watering, feeding, and recovery
Mite-damaged plants often become trickier to care for. Leaves lose efficiency, so the plant may dry more slowly after severe damage even though it looks wilted. Gardeners sometimes respond by watering more, which can create root stress on top of the pest problem. Feeding heavily is also unhelpful at this stage; it does not repair damaged cells and may encourage tender new growth before the infestation is controlled.
Early detection allows gentler correction. You can isolate the plant, rinse foliage, prune the worst leaves, and stabilize conditions before serious decline sets in. Recovery is faster when most of the canopy is still functional and the root system has not been pushed by erratic watering.
Editor’s note: A plant that still has mostly healthy leaves can bounce back well after prompt treatment. A plant stripped down by mites may survive, but it often needs a full growing season to look good again.
How to confirm infestation quickly
When you suspect spider mites, confirmation should be fast and practical. You are looking for a combination of evidence rather than one dramatic sign. The strongest quick diagnosis comes from matching leaf symptoms with visible movement, shed skins, eggs, or very fine silk on the undersides of leaves.
Do not rely on webbing alone. Many early infestations have none that can be seen without magnification. Instead, use a short confirmation sequence that can be done in a few minutes.
A reliable 3-step check
This approach works well for houseplants, greenhouse crops, and patio containers. It is simple enough to repeat across several plants if you suspect spread.
- Inspect a suspect leaf underside: use a 10x lens and look near veins for tiny pale, amber, red, or greenish moving dots.
- Do the paper tap test: tap the leaf over white paper and watch whether the specks begin crawling.
- Check for supporting signs: look for stippling, cast skins, eggs, or fine silk at the leaf base and along the midrib.
What you may actually see
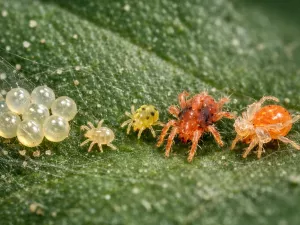
Spider mites are tiny, so first-time observers often expect something more obvious. Under magnification, adults may appear as little oval dots that move slowly but steadily. Eggs are usually round and translucent to pale. Cast skins look like tiny whitish flecks that do not move. Fine webbing, if present, tends to collect where leaves join stems or where several leaves overlap.
- Moving mites: the clearest confirmation, especially if found on multiple leaves.
- Egg clusters: a sign the infestation is active and reproducing.
- Cast skins: evidence of an established colony even if live mites are hard to find immediately.
- Silk threads: often visible only when side-lit with a flashlight.
When the diagnosis is still uncertain
If you see stippling but no mites, repeat the inspection in 48 hours. Check a different part of the plant and one nearby plant as well. Mites can be patchy at first, and poor lighting is a common reason they are missed. If the damage pattern is increasing and the paper test repeatedly shows crawling specks, treat it as a confirmed case rather than waiting for heavy webbing.
It is also worth ruling out leaf dust, mineral residue from misting, and harmless debris. Unlike residue, mites or their cast skins tend to cluster in biologically sensible places such as veins, protected leaf folds, and warm inner canopy zones.
What to do immediately after detection
The first response should be calm and targeted. Once mites are confirmed, your priorities are to stop spread, reduce the population quickly, and correct the conditions that helped the infestation take hold. Acting the same day matters more than choosing a perfect long-term strategy right away.
Immediate steps should fit the plant and the setting. A single houseplant in a bathroom can be handled differently from a greenhouse bench or a patio grouping, but the principles are the same: isolate, clean, inspect neighbors, and avoid adding stress through overwatering or heavy feeding.
First actions in the next hour
Start with the least disruptive but most effective measures. Physical removal and separation can dramatically reduce the number of pests before any follow-up treatment is applied.
- Isolate the plant: move it at least 1 m (3 ft) to 2 m (6.5 ft) away from others if possible.
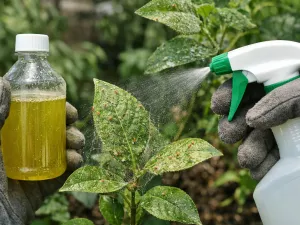
- Rinse foliage thoroughly: use a gentle stream of lukewarm water, especially on leaf undersides.
- Remove heavily damaged leaves: prune the worst ones if the plant has enough healthy foliage left.
- Clean the area: wipe shelves, pots, and nearby surfaces where mites may have traveled.
- Inspect neighboring plants: check the closest group immediately, even if they look fine.
Care adjustments that support control
After the first cleanup, stabilize the plant’s environment. Keep soil moisture even but not soggy. A drought-stressed plant is more vulnerable, yet saturated soil weakens roots and complicates recovery. If the top 2.5 cm (1 in) of potting mix is dry, water thoroughly and let excess drain. If the mix is still moist, wait rather than watering on schedule.
Hold off on strong fertilizer until the infestation is under control. Feeding a stressed plant heavily can push soft growth that is easy for mites to exploit. Improve air circulation without blasting the plant with hot, dry air, and if indoor humidity is extremely low, aim for a more moderate range rather than dramatic swings.
What not to do
Some common reactions make the situation worse. Avoid random product mixing, harsh midday spraying outdoors, or treating only the top surfaces of leaves. Spider mites are protected by their position on the plant, so incomplete coverage leads to quick rebound.
- Do not overwater: wilted-looking foliage from mite damage is not always a sign of dry roots.
- Do not fertilize heavily right away: recovery comes after control, not before it.
- Do not skip repeat checks: eggs can hatch after the first rinse or spray.
- Do not return the plant too soon: keep it separate until repeated inspections show no ongoing activity.
Over the following 7 to 14 days, continue close monitoring and repeat your chosen control method as needed according to the product label or your physical-control routine. The key is consistency. Early detection gives you the advantage, but follow-through is what keeps a small infestation from becoming a recurring one.