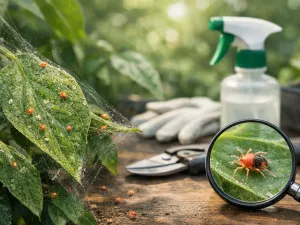
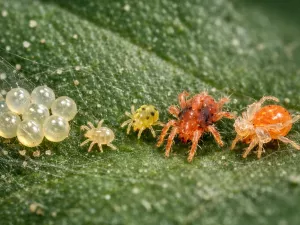
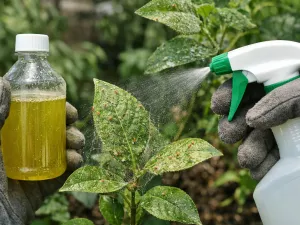
Spider Mites on Potted Plants – Control Plan

 This article explains why potted plants often get spider mites, how infestations begin in containers, and a step-by-step way to remove them. It also covers treating soil and leaves, preventing reinfestation, improving pot conditions, and long-term protection.
Spider mites spread quickly on container plants, so early action is important. These tiny pests do best in warm, dry conditions and may stay unnoticed until leaves look dull, speckled, or covered with fine webbing. Check plants often, especially under the leaves, and separate any affected pots right away. Improve humidity, rinse foliage thoroughly, and apply treatment consistently to control the mites and help prevent them from coming back.
Why potted plants are vulnerable to spider mites

Potted plants often suffer from spider mites faster than plants growing in open ground because container conditions are more confined and less forgiving. The root zone dries out sooner, air circulation is often poorer indoors or on crowded patios, and leaves may sit in warm, still air for long periods. Those stresses do not create mites by themselves, but they make plants easier for them to exploit.
Spider mites are tiny sap-feeding pests that thrive when plants are slightly weakened. A houseplant by a sunny window, a herb pot on a hot balcony, or a greenhouse specimen near glass can all become ideal hosts. Once mites settle in, the limited leaf area and close spacing of container plants allow damage to build quickly.
Stress factors that favor outbreaks
Container growing creates a different environment from garden soil. Roots are restricted, moisture swings are sharper, and nutrients can become either depleted or overly concentrated. These ups and downs reduce a plant’s resilience and often show up first as dull foliage, slowed growth, or leaf drop.
- Dry root zone: Small pots can go from evenly moist to very dry in a day, especially in heat above 27°C (81°F).
- Warm leaf surfaces: Pots near reflective walls, windows, or paving can heat up more than surrounding beds.
- Low humidity: Indoor heating and air conditioning often keep air dry enough for mites to multiply rapidly.
- Crowding: Plants touching leaf to leaf create easy pathways for pests to spread.
- Overfeeding: Soft, lush growth from excess fertilizer can be more attractive and less durable.
Why containers make detection harder
Many growers notice the problem only after leaves look dusty, stippled, or bronze. On potted plants, that delay is common because the early signs are subtle and the pests are extremely small. The undersides of leaves, stem joints, and sheltered inner growth are easy to overlook, especially on dense foliage plants.
Another issue is that container plants are moved around. A plant may spend one week indoors, then go to a porch, then return inside. That movement changes light, temperature, and airflow, which can mask the source of stress while helping pests hitchhike to new plants.
Editor’s note: If a plant suddenly looks tired even though watering seems correct, inspect the leaf undersides with a phone flashlight. Fine stippling usually appears before obvious webbing.
How infestations start in containers

Infestations usually begin quietly. Spider mites can arrive on a newly purchased plant, on a cutting from a friend, or even on clothing after time spent around infested ornamentals. In container collections, one overlooked plant is often enough to start a wider problem because pots are commonly grouped close together.
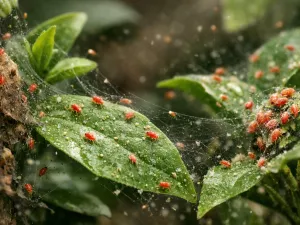
They do not need much time to establish. Under warm, dry conditions, populations can build in days rather than weeks. A few mites feeding on the undersides of leaves may go unnoticed until the plant shows pale speckling, a faded cast, or thin webbing around leaf stems.
Common entry points
Most outbreaks in pots begin through introduction rather than spontaneous appearance. Understanding the routes helps you stop the next one before it starts.
- New plants: Garden center stock may look healthy from above while carrying mites underneath older leaves.
- Outdoor exposure: Summering houseplants outside can pick up pests from nearby shrubs, annuals, or weeds.
- Shared tools and hands: Pruners, plant ties, and even sleeves brushing foliage can transfer mites between containers.
- Overwintering spaces: Conservatories, spare rooms, and enclosed porches often stay warm and dry enough for populations to persist.
Conditions that let a small problem explode
Once introduced, spider mites multiply fastest where leaves stay dry, temperatures remain high, and natural predators are absent. Indoor plants are especially exposed because beneficial insects that might suppress mites outdoors are usually missing. A stressed plant in a 15 cm (6 in) pot can decline much faster than a larger specimen with a steadier root environment.
Plants with thin, tender foliage are often hit first, but tougher-leaved plants are not immune. Citrus, ivy, calathea, hibiscus, beans, peppers, roses, and many tropical foliage plants can all host mites in containers if conditions suit them.
| How it starts | Typical clue | Why containers are at risk |
|---|---|---|
| Newly purchased plant | Damage appears within 1 to 2 weeks | Pots are placed close to existing plants right away |
| Plant moved outdoors | Older leaves show pale speckles first | Balconies and patios often have hot, dry reflected heat |
| Indoor winter storage | Fine webbing near nodes or leaf edges | Heating lowers humidity and reduces airflow |
| Spread from one infested pot | Neighboring plants decline in clusters | Leaves overlap and pests move easily between pots |
Step-by-step plan to eliminate mites

The most effective control plan is not a single spray but a short, disciplined sequence. Spider mites reproduce quickly, so one treatment rarely catches every life stage. The goal is to reduce the existing population hard, repeat treatment on schedule, and remove the conditions that let survivors rebound.
Before treating, separate the affected plant from healthy ones if possible. Even moving it 1 m (3.3 ft) to 2 m (6.6 ft) away helps reduce spread. Work on infested plants last, and wash your hands and tools afterward.
Step 1: Confirm the problem
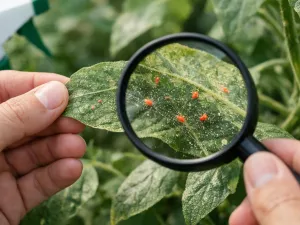
Look closely at the undersides of leaves, especially older foliage and the inner canopy. Fine stippling, dull color, and delicate webbing are strong signs. If unsure, tap a leaf over white paper; moving specks can reveal an active population.
Step 2: Physically reduce numbers
Start with plain water. A firm rinse removes many mites, eggs, and webbing before any product is used. For sturdy plants, spray the undersides of leaves with a gentle but thorough stream. For delicate plants, wipe leaves carefully with a damp cloth or soft sponge.
Let the plant drain well afterward. Water pressure alone will not solve the issue, but it makes every later step more effective by lowering the pest load.
Step 3: Prune the worst growth
Heavily damaged leaves rarely recover their appearance and can shelter dense colonies. Remove the most infested foliage, but do not strip the plant bare unless it is a species that tolerates hard cutting back. Dispose of trimmings in a sealed bag rather than leaving them near the growing area.
Step 4: Apply a suitable treatment
Use an insecticidal soap, horticultural oil, or another product labeled for mite control on ornamental or edible plants as appropriate. Coverage matters more than volume. The undersides of leaves, petioles, and stem joints must be coated because that is where mites gather.
- Test the product on a small area first and wait 24 hours.
- Treat in the early morning or evening, not in strong sun or when leaves are hot.
- Spray until all leaf surfaces are evenly covered but not dripping excessively.
- Repeat after 5 to 7 days, then again if needed after another 5 to 7 days.
For edible crops in pots, always follow the label for harvest intervals and crop safety. Homemade mixtures can burn foliage if too strong, so measured products are usually safer and more reliable.
Step 5: Monitor for two full weeks
After treatment, inspect every few days. New webbing, fresh stippling, or moving mites mean the cycle is not broken yet. Continue with follow-up applications according to the product instructions. Missing the second round is one of the main reasons infestations return.
Practical recommendation: Mark treatment dates on the pot with masking tape or in your phone calendar. Consistent timing matters more than using multiple products at once.
How to treat soil and plant surfaces

Spider mites live and feed mainly on plant tissue rather than in the potting mix, but soil and container surfaces still matter during cleanup. Fallen leaves, old webbing, and dusty rims create a neglected environment where reinfestation is easier to miss. Treat the plant itself as the priority, then clean the pot and top layer of mix so the whole container starts fresh.
This is also the point where many growers overdo it. Drenching the soil with random pesticides is usually unnecessary for spider mites and can stress roots. A cleaner, more targeted approach works better.
Cleaning leaf and stem surfaces
Plant surfaces should be cleaned before or between treatments, depending on the severity of the infestation. Dusty foliage gives mites shelter and reduces contact with soaps or oils. A soft cloth, lukewarm water, and patience are often enough for broad leaves.
- Broad-leaved plants: Wipe both sides of each leaf, supporting it from underneath to avoid tearing.
- Fine-textured plants: Rinse gently rather than rubbing, which can damage foliage.
- Hairy leaves: Avoid heavy wiping; use a careful spray and good airflow afterward to prevent rot.
- Woody stems: Clean branch forks and nodes where webbing collects.
Refreshing the top of the pot
The potting mix does not usually host the active mite population, yet the surface can hold shed webbing, dropped leaves, and debris. Remove dead material and scrape away the top 1 cm to 2 cm (0.4 in to 0.8 in) of old mix if it is crusted or littered. Replace it with fresh potting mix suitable for the plant.
Wipe the pot rim, saucer, and nearby shelf or windowsill with soapy water. If the plant is badly infested and rootbound, repotting into fresh mix can help recovery, but only if the plant is healthy enough to handle the disturbance.
When repotting makes sense
Repotting is useful when poor root conditions are adding stress. If the mix has become compacted, hydrophobic, or sour-smelling, the plant may struggle to recover even after mites are removed. Choose a pot only 2 cm to 5 cm (1 in to 2 in) wider than the current root ball unless the species grows very vigorously.
| Area to treat | Best approach | What to avoid |
|---|---|---|
| Leaf undersides | Rinse, wipe, then apply labeled treatment thoroughly | Only spraying the top of leaves |
| Stems and nodes | Remove webbing and coat hidden joints | Ignoring tight branch angles |
| Soil surface | Clear debris and replace the top layer if dirty | Heavy pesticide drenches without need |
| Pot and saucer | Wash with soapy water and dry before reuse | Returning the plant to a dirty tray |
Preventing reinfestation in pots

Once a plant looks better, the next challenge is stopping the mites from returning. Reinfestation usually happens because one nearby plant was missed, follow-up checks stopped too soon, or the growing conditions remained favorable to mites. Prevention in containers is mostly about separation, inspection, and routine hygiene.
Do not assume the problem is gone just because webbing has disappeared. Fresh growth can still be colonized by a few survivors, especially in warm rooms or sheltered patios where populations rebuild quickly.
Quarantine and spacing
Any plant that was infested should stay apart from the collection for a while after treatment. New plants should also be isolated before joining the group. This simple habit prevents one bad purchase from becoming a whole-shelf issue.
- Keep recovering plants separate for at least 2 weeks.
- Leave a gap between pots so leaves do not touch.
- Rotate plants during inspections to check hidden sides facing walls or windows.
- Clean staging areas, saucers, and decorative cachepots regularly.
Inspection habits that catch problems early
Early detection is easier when it becomes part of normal care rather than a special task after damage appears. Tie inspection to watering day, feeding day, or weekly grooming. Focus on the oldest leaves first, then the inner canopy, then the newest growth.
A small hand lens is useful, but not essential. Good light and consistency matter more. If one plant has had mites before, check it more often during hot weather or winter heating periods.
Editor’s note: Repeated outbreaks often point to a nearby “reservoir” plant that never looked dramatic enough to worry you. Check the quiet suspects, not just the badly damaged one.
Be careful with stressed plants
Plants recovering from drought, repotting shock, or irregular feeding are easier targets. Keep care steady during recovery. Avoid strong fertilizer immediately after treatment; wait until you see healthy new growth, then resume at a moderate rate.
Maintaining healthy container conditions
Healthy container conditions do not make plants immune, but they greatly improve resistance and recovery. Spider mites exploit plants that are repeatedly too dry, overheated, or nutritionally unbalanced. Stable care reduces that pressure and keeps foliage strong enough to outgrow minor feeding damage.
The aim is not to create a damp, stagnant environment. Instead, keep moisture, light, temperature, and feeding in a range that suits the plant species while avoiding the sharp extremes that often happen in pots.
Watering and moisture balance
Potted plants need even moisture more than frequent splashing. Letting the root ball become bone dry weakens the plant and can trigger leaf stress that favors mite outbreaks. At the same time, constantly saturated mix damages roots and creates a different set of problems.
- Check before watering: Feel the mix 2 cm to 4 cm (0.8 in to 1.6 in) below the surface rather than watering by habit alone.
- Water thoroughly: Apply enough so excess drains through, then empty saucers if the species dislikes standing water.
- Adjust by season: Plants often need less in cool, low-light periods and more in summer heat.
- Match pot size to roots: Oversized pots stay wet too long; undersized pots dry too fast.
Light, heat, and airflow
Bright light is important for many plants, but intense heat on leaf surfaces can worsen stress. A plant pressed against hot glass or baking on a reflective balcony may need filtered midday light. Good airflow helps leaves dry after rinsing and makes the environment less favorable to dense mite populations, but harsh drafts from vents or heaters can be equally stressful.
For indoor plants, try to keep them away from direct blasts of warm air. For outdoor containers, avoid packing pots tightly into corners where heat builds and air barely moves.
Feeding without pushing soft growth
Plants underfed for long periods lose vigor, but overfed plants can produce soft, sappy growth that pests exploit. Use a balanced fertilizer at the recommended rate or slightly weaker during active growth. If using liquid feed, measured dilution is safer than guessing.
As a general guide, many houseplants respond well to light feeding every 2 to 4 weeks during active growth, while slower growers need less. Always water dry potting mix before applying fertilizer to avoid root burn.
Long-term protection strategies
Long-term control comes from building a routine that makes outbreaks less likely and easier to stop. Spider mites are persistent pests, especially where plants spend part of the year indoors and part outdoors. A practical strategy combines seasonal checks, careful plant movement, and quick response to the first signs of trouble.
Think in terms of management rather than one-time eradication. If your growing space has had mites before, assume they may return and prepare for that possibility without overreacting.
Seasonal planning for container plants
Risk changes through the year. Winter heating indoors often creates dry air and warm rooms, while summer patios can expose plants to reflected heat and nearby host plants. Adjust your routine before those pressure periods begin.
| Season or situation | Main risk | Best preventive action |
|---|---|---|
| Winter indoors | Dry air and warm rooms | Inspect weekly and keep watering consistent |
| Spring plant purchases | Introducing hidden pests | Quarantine new plants for 2 weeks |
| Summer patios and balconies | Heat stress and spread from nearby plants | Increase spacing and monitor exposed foliage |
| Bringing plants back inside | Carrying pests into the collection | Wash foliage and inspect before moving indoors |
Use targeted responses, not constant spraying
Routine spraying “just in case” can stress plants, leave residues, and encourage careless monitoring. It is better to inspect regularly and act early when needed. If a plant has repeated problems, review its care and location first. Chronic outbreaks often signal heat stress, drought cycles, or a nearby source rather than a lack of stronger products.
Build a resilient collection
Long-term success is easier when the whole container group is managed well. Keep pots clean, remove tired leaves, repot before mixes break down badly, and avoid overcrowding shelves or benches. Plants with stable roots and balanced growth are simply less likely to collapse when pests appear.
- Standardize inspections: Choose one day each week for checking leaf undersides and new growth.
- Track repeat offenders: Note which species and locations have had problems before.
- Refresh potting mix on time: Many container plants benefit from partial or full repotting every 1 to 2 years.
- Act early: A few speckled leaves are far easier to manage than a webbed canopy.
Practical recommendation: Keep a small “plant first-aid kit” with pruners, cloths, labels, and a mite-control product approved for your plants. Fast, organized action usually prevents a minor flare-up from becoming a collection-wide setback.
With a steady routine, most potted plants recover well after an outbreak. The key is to combine direct treatment with better growing conditions, because healthy containers are much less likely to become repeat targets.