Sooty Mold From Aphids – Removal Guide

 This article explains how aphid honeydew leads to sooty mold, why leaves turn black, and how that coating reduces photosynthesis. It covers safe cleaning methods, stopping aphids so the mold does not return, and helping plants recover after removal.
A black, dusty coating on leaves usually means sooty mold linked to aphids, not a disease directly infecting the plant. That matters because the best fix is to control the sap-sucking insects and wash away the sticky honeydew they leave behind. This guide shows how to clean the leaves safely, help the plant recover, and lower the risk of the coating coming back.
How sooty mold develops from aphid honeydew

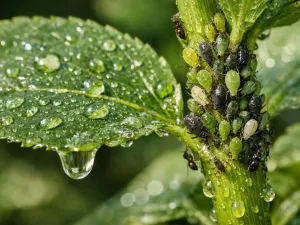
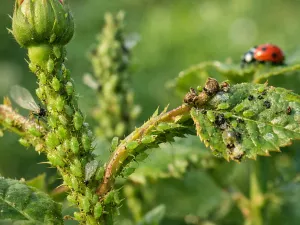
Sooty mold does not usually begin as a disease inside the plant. It starts on the surface, after aphids feed on sap and leave behind a sticky waste called honeydew. That sugary coating settles on leaves, stems, buds, and even nearby pots or furniture. Airborne fungal spores then land on that film and begin growing across it, creating the familiar dark layer.
This is why black residue often appears after an aphid problem has gone unnoticed for a while. The mold is feeding on the sugar, not on the plant tissue itself. Even so, the plant still suffers because the coating blocks light and clogs the leaf surface.
The sequence from aphids to black mold
The process is fairly predictable, especially on soft new growth where aphids gather in clusters. Warm, sheltered conditions and crowded foliage make the cycle move faster.
- Aphids pierce plant tissue and feed on sap, especially on tender stems, flower spikes, and leaf undersides.
- Excess sugar is excreted as honeydew, which feels sticky or shiny before any black coating appears.
- Dust and spores settle on the sugary layer, especially in still air or humid spots.
- Sooty mold spreads over the honeydew, forming gray, brown, or black patches that can merge into a continuous film.
Plants kept indoors near bright windows, in greenhouses, or in dense summer borders are common candidates because aphids multiply quickly there. Ants can make the problem worse by protecting aphids in exchange for honeydew, so heavy ant activity on stems is often an early warning sign.
Editor’s note: If leaves feel sticky but are not yet black, act immediately. That stage is much easier to correct than a full surface coating, and you can often prevent visible mold altogether.
Where it usually starts
You will often see the first signs on the upper surfaces of lower leaves. Honeydew drips down from aphids feeding above, so the dirtiest leaves are not always the ones with the insects on them. Check the growing tips, the undersides of curled leaves, and behind flower buds before assuming the mold is the main issue.
- Houseplants: citrus, hibiscus, hoya, schefflera, and ficus are frequent targets.
- Garden plants: roses, peppers, beans, nasturtiums, and fruit trees often show the problem in active growing weather.
- Protected spaces: conservatories and greenhouses can see rapid buildup because pests reproduce continuously.
Why black coating appears on leaves

The black coating appears because the mold grows on top of the sticky honeydew layer, not because the leaf is rotting from within. That distinction matters. A leaf covered in soot can still be alive underneath, especially if the coating is recent and the leaf remains firm and green once cleaned.
The color can range from charcoal gray to deep black depending on how thick the growth is, how long it has been present, and how much dust has become trapped in it. On glossy leaves it may look like a wipeable film. On fuzzy or textured foliage it can seem more embedded, even when it is still mostly superficial.
Why some plants look worse than others
Leaf texture, plant shape, and airflow all affect how obvious the coating becomes. Broad, smooth leaves show the problem quickly because honeydew spreads evenly across the surface. Plants with crowded canopies trap moisture and airborne particles, which helps the mold build up into a darker layer.
- Large smooth leaves show streaks and patches clearly.
- Dense branching creates sheltered areas where aphids and mold persist.
- Sticky flower bracts or buds can collect residue faster than mature leaves.
- Outdoor dust can combine with honeydew and make the coating look heavier than it really is.
What the black film is not
It is easy to confuse sooty mold with leaf spot diseases, scorch, or natural dark pigmentation. The difference is that sooty mold usually sits on the surface and can be loosened with water and gentle wiping. By contrast, fungal leaf spots are part of the tissue and remain after washing.
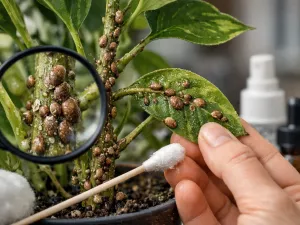
If the leaf has yellow halos, tan dead patches, or black lesions that do not smear or lift, another issue may be present at the same time. It is also worth checking whether the plant has scale insects, whiteflies, or mealybugs, since they produce honeydew too and can create the same blackened appearance.
Practical tip: Rub a small hidden area with a damp white cloth. If dark residue transfers to the cloth and the leaf beneath looks greener, you are likely dealing with a surface mold rather than internal leaf damage.
Impact of mold on plant photosynthesis

Although sooty mold usually does not invade plant tissue, it can still reduce plant performance in a very practical way: it blocks light. Leaves need light reaching their surface to drive photosynthesis, and a dark film interferes with that process. The thicker the coating, the less efficiently the plant can make energy.
This is why affected plants may look dull, stop pushing new growth, or drop leaves even when watering and feeding seem correct. A mild coating on a few leaves is mostly cosmetic. A heavy layer across much of the canopy can slow growth noticeably, especially on sun-loving plants.
How reduced light affects the plant
When the leaf surface is covered, the plant has to work harder with less energy available. That stress often shows up first in tender growth and flowering performance.
- Slower growth: shoots elongate less and new leaves may emerge smaller.
- Poor flowering or fruit set: blooming plants may abort buds or produce fewer flowers.
- Leaf yellowing: shaded, coated leaves can age faster and drop earlier.
- Weaker recovery from stress: plants already coping with heat, drought, or root issues bounce back more slowly.
When the problem becomes serious
The risk rises when aphids remain active for weeks and the mold covers a large portion of the plant. Seedlings, herbs, vegetables, and recently repotted houseplants are less able to tolerate that loss of photosynthetic area than established shrubs or trees.
Plants in lower light are also more vulnerable. A houseplant receiving only moderate indoor light has less margin for error than one growing outdoors in full sun. If half the leaf surface is coated, the plant may begin to decline even if roots are healthy and soil moisture is right.
| Level of coating | Likely effect on the plant | Recommended response |
|---|---|---|
| Light patches on a few leaves | Mainly cosmetic, with little short-term impact | Remove aphids quickly and wash affected areas |
| Moderate film across several leaves | Reduced vigor and slower growth | Clean foliage thoroughly and improve airflow |
| Heavy coating over much of the canopy | Noticeable loss of photosynthesis and stress | Treat pests in stages and clean over multiple sessions |
| Repeated buildup after cleaning | Ongoing energy loss due to active sap-feeding pests | Focus on the infestation source, not just the residue |
How to safely remove sooty mold

The safest way to remove sooty mold is to combine pest control with gentle cleaning. If you wash the leaves but leave aphids in place, the sticky coating will return. If you spray aggressively without cleaning, the plant may stay shaded under old residue. A calm, staged approach works best.
Always start by moving the plant out of harsh midday sun while you work. Wet leaves exposed to strong sunlight can scorch, and stressed plants do better with a little protection during cleanup. For indoor plants, place them somewhere bright but out of direct hot rays.
Step-by-step removal
Use lukewarm water rather than cold water, especially on tropical houseplants. Water around 20°C to 25°C (68°F to 77°F) is comfortable for most foliage and helps loosen sticky residue.
- Inspect the plant closely. Check shoot tips, leaf undersides, buds, and stems for aphids or other sap-feeding insects.
- Rinse first. Use a gentle stream of water to remove loose honeydew, dust, and some insects. Support stems with one hand so they do not snap.
- Wipe stubborn areas. Use a soft cloth or cotton pad dampened with water. On thicker leaves, a mild soap solution can help lift residue.
- Clean in sections. Work from the top of the plant downward so drips do not recoat cleaned leaves.
- Rinse again. Remove any remaining loosened mold and any soap film.
- Let the plant dry with airflow. Good ventilation helps prevent lingering moisture in tight leaf joints.
When to use mild soap
If plain water does not shift the black coating, a very weak soap solution can help break the sticky layer. A common home rate is about 5 ml (1 tsp) of mild liquid soap in 1 L (34 fl oz) of water. Use only a small amount, and avoid degreasing detergents or products with bleach, antibacterial additives, or heavy fragrance.
Test the solution on one leaf first and wait 24 hours. Some plants with delicate, hairy, or waxy leaves react badly to even mild soap. Ferns, African violets, and some succulents need extra caution.
Editor’s note: If a plant has fuzzy leaves, skip rubbing whenever possible. A gentle rinse and careful pest treatment are safer than trying to polish the leaf clean and damaging its surface.
Treating the root cause to prevent return

Removing the black film is only half the job. To stop it coming back, you need to reduce or eliminate the aphids producing honeydew. That means checking the whole plant, nearby plants, and the growing conditions that encouraged soft, pest-prone growth in the first place.
Aphids often multiply fastest on plants pushed by excess nitrogen, kept too dry at the roots and then heavily watered, or grown in crowded, sheltered spots. New growth is especially attractive, so fresh shoots should be monitored for at least two weeks after cleanup.
Direct aphid control
For light infestations, repeated washing may be enough. For heavier outbreaks, combine physical removal with targeted treatment. The goal is persistence rather than one harsh application.
- Water spray: A firm but not damaging rinse can knock many aphids off tender stems.
- Hand removal: Pinch out heavily infested tips if the plant can spare them.
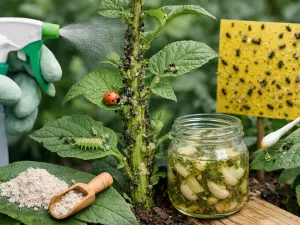
- Insecticidal soap: Useful on active colonies when applied thoroughly to undersides and growing points.
- Neem-based products: Can help on some plants, but test first and avoid use in heat above 29°C (84°F).
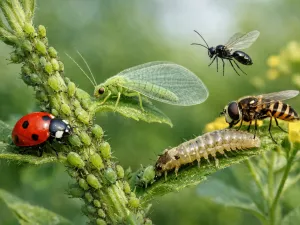
- Biological control outdoors: Ladybirds, lacewings, and hoverfly larvae can reduce recurring populations.
Cultural changes that make aphids less likely
Healthy growth is not the same as soft, overfed growth. Plants given balanced care are usually less attractive and recover faster after pest pressure.
- Moderate feeding: Avoid high-nitrogen fertilizer bursts that create lush, weak shoots.
- Steady watering: Keep moisture even rather than swinging between bone dry and saturated soil.
- Better spacing: Increase airflow around crowded plants to make inspection easier.
- Pruning: Remove congested or badly infested growth to reduce hiding places.
- Quarantine: Isolate new houseplants for 10 to 14 days before placing them near established plants.
Also look for ants. If ants are moving up and down stems, they may be protecting aphids from natural predators. Managing ant access can make biological control much more effective outdoors.
Cleaning methods that won’t damage plants
Not every leaf should be cleaned the same way. Thick rubbery foliage can handle more wiping than thin, tender leaves. The safest method depends on surface texture, plant size, and how long the residue has been there. The aim is to remove enough coating to restore light and function without bruising tissue or stripping natural protective waxes.
Before cleaning, make sure the plant is not wilted. A dehydrated plant is easier to damage because the cells are already under stress. Water the root ball if needed, then wait until the foliage is turgid again before doing a full wash.
Choosing the right method for the leaf type
Matching the cleaning approach to the plant makes a big difference in how well it recovers afterward.
| Plant or leaf type | Best cleaning approach | Avoid |
|---|---|---|
| Thick glossy leaves such as citrus or ficus | Soft cloth with water, followed by a gentle rinse | Harsh scrubbing that scratches the cuticle |
| Thin tender leaves such as peppers or herbs | Light spray rinse and minimal handling | Heavy wiping that tears edges |
| Hairy leaves such as African violets | Careful pest treatment and light airflow drying | Rubbing or soaking the leaf surface |
| Succulents with waxy bloom | Spot-clean only if necessary | Removing the natural powdery coating |
Products and habits to avoid
Many leaf-shine shortcuts cause more trouble than the mold itself. Strong household cleaners can burn foliage, block pores, or leave residues that attract more dust. Even natural remedies can be too concentrated.
- Do not use vinegar on foliage unless you are following a proven plant-safe dilution for a specific purpose; acidity can mark leaves.
- Do not use alcohol broadly on delicate plants; it can dehydrate tissues and cause spotting.
- Do not use cooking oils as a wipe-on cleaner; they can clog surfaces and interfere with gas exchange.
- Do not clean in hot sun or when leaves are above 30°C (86°F).
- Do not over-polish leaves repeatedly; once the residue is gone, stop.
For larger shrubs outdoors, a hose-end rinse in the morning is often enough once the insects are controlled. For indoor specimens, patience matters more than force. It is better to clean over two or three sessions than to strip or bruise the leaves in one go.
Restoring plant health after mold removal
Once the mold is gone and the aphids are under control, the plant still needs time to regain strength. Leaves that were heavily shaded may not fully recover, and some may yellow and drop. That is normal. Focus on supporting healthy new growth rather than trying to save every marked leaf.
Good aftercare is mostly about balance: enough light, even moisture, moderate feeding, and careful observation. Avoid the temptation to overcorrect with strong fertilizer or constant spraying. Plants recover best when conditions are steady.
Aftercare in the first two weeks
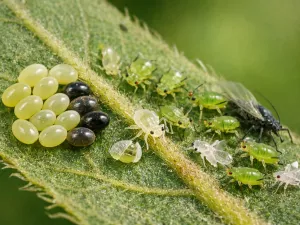
The first 10 to 14 days are when hidden survivors or fresh hatchlings are most likely to appear. Inspect the plant every few days, especially on new shoots and the undersides of leaves.
- Place the plant in suitable light. Bright indirect light indoors or the correct outdoor exposure helps rebuild energy reserves.
- Water consistently. Keep the root zone evenly moist but not waterlogged. Let excess water drain freely.
- Hold back on strong feeding. Wait until active new growth resumes before applying fertilizer, then use a balanced product at reduced strength.
- Remove badly damaged leaves. Prune only those that are mostly yellow, brittle, or no longer useful to the plant.
- Recheck for pests. One missed colony can restart the cycle.
Signs the plant is recovering well
Recovery is usually visible in the newest growth first. Clean, firm leaves and steady extension at the tips show that photosynthesis has improved and sap-feeding pressure has dropped.
- New leaves emerge clean without sticky residue.
- Growth becomes more even rather than twisted or stalled.
- Leaf color improves and the canopy regains a healthy sheen.
- No fresh ant activity appears around stems or pots.
Practical recommendation: Keep one white tissue or cloth near your plant area for quick checks. A fast wipe under a leaf every few days can reveal sticky residue before black mold has a chance to return.
If the plant remains weak after cleanup, review the basics. Check whether the potting mix is compacted, whether roots are staying too wet, and whether the plant is getting the right amount of light for its species. Sooty mold often exposes a broader care imbalance, and correcting that overall environment is what leads to lasting recovery.