Where Aphids Hide on Plants

 Here we where aphids hide on plants, especially under leaves and along stems, and how to inspect hard-to-see spots for early signs of infestation. It also explains which tools help detect them and why complete treatment matters to prevent reinfestation.
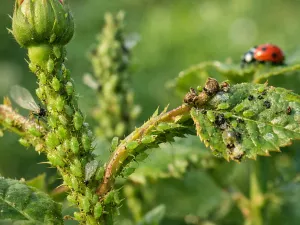
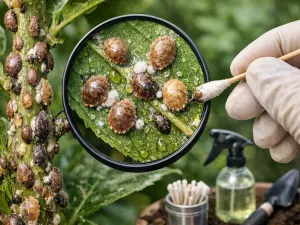
Aphids often gather in the easiest places to miss, so knowing their favorite hiding spots can help you catch an infestation early, before leaves curl and plant growth slows. These tiny sap-feeding insects usually settle on tender new shoots, the undersides of leaves, unopened flower buds, and tight stem joints, where they stay protected and can be hard to notice during a quick routine check of the plant.
Common places aphids hide on plants

Aphids rarely sit out in the open unless a colony has already become large. Most of the time they settle in sheltered spots where plant tissue is soft, sap is easy to access, and predators are less likely to find them. Knowing their preferred hiding places makes routine plant care far more effective, especially on tender vegetables, roses, herbs, houseplants, and fruiting shrubs.
The most common mistake is checking only the top of the plant. Aphids prefer protected growth, so the worst infestations often begin where leaves overlap, stems branch, or flower buds are packed tightly together. On vigorous plants fed heavily with nitrogen, these hidden areas can stay soft and juicy for weeks, giving colonies time to expand unnoticed.
Typical hiding zones on outdoor and indoor plants
Young growth is usually the first place to inspect. Fresh shoots contain the highest concentration of easily pierced tissue, and aphids gather there before they spread farther down the plant. Even a healthy-looking plant can host a cluster in a folded leaf or behind a bud.
- Leaf undersides: especially on tender annuals, brassicas, peppers, cucumbers, and many houseplants.
- New shoot tips: the newest 2.5 to 7.5 cm (1 to 3 in) of growth often hold the first visible cluster.
- Stem joints and nodes: where leaves meet stems, creating a sheltered crease.
- Inside curled leaves: aphids feeding on new tissue can distort it, then remain hidden inside the curl.
- Flower buds and calyxes: tightly packed petals and sepals protect colonies from spray and rain.
- Along soft stems: especially on seedlings and recently pruned plants pushing fresh growth.
- Near the crown or lower interior: dense plants may host colonies low down where airflow is poor.
Plants and growth conditions that make hiding easier
Dense, leafy plants naturally provide more cover. So do specimens that are overcrowded, shaded in the center, or watered and fed in ways that encourage lush but weak growth. Aphids are particularly comfortable where leaves stay layered and still, because wind and direct sun reach them less often.
Indoor plants can be even trickier because there is no rain to wash pests away. On windowsill plants, aphids may cluster on the side facing the glass, while on larger houseplants they often gather in the inner canopy where leaves overlap. Outdoors, they also hide on the leeward side of the plant, where wind exposure is lower.
Editor’s note: If a plant suddenly looks “too lush” after feeding, inspect it within a few days. Soft, fast growth is often more attractive to sap-sucking pests than older, firmer tissue.
Why aphids gather under leaves and on stems

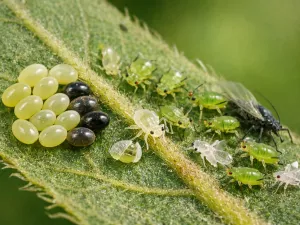
Aphids are not choosing random spots. They gather where feeding is easiest and where they are least likely to be disturbed. The underside of a leaf offers shade, humidity, and a degree of physical shelter, while stems and shoot tips provide direct access to nutrient-rich sap moving through actively growing tissue.
These insects use slender mouthparts to tap into plant fluids. Younger leaves and tender stems are easier to pierce than mature, leathery growth. That is why outbreaks often appear after pruning, after a flush of spring growth, or after heavy fertilizing. The plant is producing exactly the kind of tissue aphids prefer.
Protection from weather and predators
The lower surface of a leaf is a safer environment than the top. It is less exposed to rain, harsh sun, and casual inspection. On many plants, the leaf itself acts like a roof, reducing direct disturbance and helping colonies stay in place long enough to reproduce rapidly.
Predatory insects can still find them, but hidden colonies are harder to reach. Aphids that settle in leaf folds, bud scales, or stem crotches are especially difficult to dislodge with a simple hose spray. This is one reason a plant can seem improved after treatment, only for the population to rebound days later.
Plant physiology and sap flow
Actively growing stems and young leaves contain a strong flow of nutrients. Aphids benefit from this because they can feed continuously without moving much. Plants stressed by uneven watering can also produce growth patterns that make them more vulnerable: a dry spell followed by heavy watering often triggers a flush of soft tissue that attracts colonization.
- Young tissue is easier to pierce: less structural resistance than older leaves and woody stems.
- Undersides stay milder: lower light and less heat stress help colonies remain active.
- Dense growth creates shelter: overlapping leaves reduce airflow and make detection harder.
- Fresh feeding sites keep appearing: every new bud or shoot tip offers another protected entry point.
Plants grown in low light indoors can be especially susceptible because they often produce stretched, tender growth. Combined with warm temperatures around 20 to 26°C (68 to 79°F), this creates ideal conditions for aphid reproduction. Strong, balanced growth from correct light, measured feeding, and even moisture does not make a plant immune, but it does reduce the amount of highly attractive tissue.
How to inspect plants for hidden infestations

A good inspection is deliberate rather than quick. A casual glance at the top leaves will miss early colonies almost every time. The goal is to check the plant in layers, starting with the newest growth and then moving into protected areas where pests and sticky residue collect first.
Inspection is easiest when plants are well spaced and dry. Wet foliage can hide honeydew, and tightly packed pots make it hard to turn stems and leaves without damaging them. If possible, inspect in bright indirect light or morning sun, when details are easier to see and the plant is not heat-stressed.
A simple step-by-step inspection routine
Use the same order every time so you do not skip likely hiding places. This is especially useful for gardeners checking many plants in a greenhouse, on a patio, or across vegetable beds.
- Start with the newest shoot tips and flower buds.
- Turn over several upper leaves, not just one or two.
- Check where each leaf joins the stem.
- Separate crowded foliage and inspect the inner canopy.
- Look lower down for sticky residue, shed skins, or ants.
- Examine any curled, puckered, or twisted leaves by gently opening them.
- Inspect nearby plants, because aphids often spread before damage is obvious.
How to handle the plant without spreading pests
Be gentle when moving stems. Rough handling can knock aphids onto nearby foliage or damage the soft tissue you are trying to protect. On indoor plants, place a plain sheet of paper or a tray under the pot while inspecting; this helps you notice falling insects, cast skins, or sticky droplets.
For shrubs and larger perennials, inspect from more than one angle. Colonies often build on the back side of the plant, against a wall, fence, or greenhouse glazing where air movement is reduced. If a plant is very dense, a little selective pruning can improve visibility and make future checks easier.
Practical tip: Choose one “indicator plant” in each area of the garden and inspect it twice a week. Aphids often appear first on the softest, fastest-growing specimen nearby.
Signs of aphids in hard-to-see areas

You will not always spot the insects first. Often the earliest clue is a change in the plant itself or in the surface around it. Hidden colonies leave evidence: distorted growth, sticky honeydew, pale speckling, or unusual insect activity. Learning to read these clues helps you catch infestations before leaves become heavily curled and difficult to treat.
Damage tends to show up on the newest parts of the plant because that is where feeding pressure is concentrated. A shoot tip that looks crumpled, stunted, or glossy may be hosting aphids even if none are immediately visible from above.
Plant symptoms that suggest concealed feeding
Subtle symptoms matter. A plant can still look green and alive while aphids are established inside folded leaves or around buds. Compare suspicious growth with healthy shoots on the same plant if possible.
- Curled or puckered leaves: often caused by feeding on emerging tissue.
- Twisted shoot tips: new growth may look bent or compressed.
- Sticky surfaces: honeydew on leaves, pots, benches, or nearby furniture.
- Black sooty mold: fungus growing on honeydew, especially in sheltered spots.
- Ant activity: ants may travel repeatedly up stems to collect honeydew.
- Bud failure: flowers may open poorly or remain deformed.
- White flecks: shed aphid skins caught in leaf axils or on the soil surface.
Clues that appear before a major outbreak
Early infestations often create a faint sheen rather than obvious stickiness. Leaves may feel tacky before droplets are visible. You may also notice one branch looking weaker than the rest, or a single stem carrying more ants than neighboring stems. On houseplants, the windowsill or saucer may collect tiny sticky spots before the colony is easy to find.
Plants under stress can show similar symptoms for other reasons, so context matters. If distorted growth appears after overfeeding, poor airflow, or a warm spell around 24 to 29°C (75 to 84°F), inspect carefully rather than assuming it is only a nutrition issue. Aphids often exploit plants already pushed into soft, rapid growth.
Tools and methods to detect early infestations

Early detection does not require expensive equipment, but the right tools make a major difference. Aphids are small, often green against green foliage, and easy to overlook on textured stems or fuzzy leaves. A few simple habits and inspection aids can reveal colonies while they are still manageable.
The best approach combines direct visual checking with signs around the plant. Looking for insects alone can be slow, especially on large collections. Looking for insects, residue, and plant distortion together is much more reliable.
Useful tools for routine checks
Most gardeners can build an effective inspection kit from basic supplies. The aim is to improve visibility, reach hidden areas, and keep records so you can tell whether a problem is spreading or shrinking.
- Hand lens: a 10x lens helps distinguish aphids from debris, mites, or immature beneficial insects.
- Bright flashlight: side-lighting reveals honeydew, cast skins, and insects under leaves.
- White paper or card: hold it under foliage while tapping stems to dislodge hidden pests.
- Pruning snips: useful for removing badly curled tips that cannot be inspected properly.
- Sticky traps: yellow cards can alert you to winged aphids moving through the area.
- Notebook or phone log: record which plants were checked and what was found.
When each method works best
Different tools reveal different stages of infestation. A hand lens is best for confirming identity, while sticky traps are more useful for monitoring movement than for controlling a colony. Tapping over white paper works well on herbs, peppers, and woody ornamentals with many small leaves.
| Method | Best use | What it helps you notice |
|---|---|---|
| Hand lens | Close inspection of buds, leaf undersides, and stem joints | Small colonies, nymphs, shed skins, confusion with other pests |
| Flashlight from the side | Indoor plants and dense canopies | Sticky honeydew, shadows of clustered insects, hidden leaf curls |
| White paper tap test | Quick checks on branched or shrubby plants | Dislodged aphids, skins, and fine debris from concealed areas |
| Yellow sticky traps | Monitoring greenhouses, indoor grow spaces, and windowsills | Winged adults arriving or spreading between plants |
Practical recommendation: Sticky traps are a warning system, not a cure. If traps catch winged aphids, inspect the nearest soft new growth immediately rather than waiting for visible damage.
Why missing hidden aphids leads to reinfestation

Reinfestation is often not a new invasion at all. It is the original colony recovering because part of it was never removed. Aphids tucked inside curled leaves, around buds, or deep in the canopy can survive treatment and begin reproducing again within days. That is why a plant may seem clean after spraying, then look infested again a week later.
Many species reproduce quickly without needing much time to rebuild numbers. If even a small group remains on protected tissue, the population can rebound fast, especially in warm, sheltered conditions. Indoor plants and greenhouse crops are particularly vulnerable because there is no rain, less temperature fluctuation, and often fewer natural predators.
Why partial treatment fails
Most control methods depend on direct contact. If spray does not reach the underside of leaves or the interior of a tight bud, the aphids there may be untouched. Likewise, if only the visibly infested plant is treated but neighboring plants are ignored, winged individuals or wandering nymphs can restart the problem.
- Hidden survivors remain: leaf curls and bud clusters protect them from contact sprays.
- Eggs are not the main issue: in many common infestations, live aphids simply remain unnoticed.
- Nearby hosts are overlooked: one untreated plant can reseed the whole area.
- Plant stress continues: soft regrowth after hard pruning or overfeeding attracts another wave.
The role of plant care in repeat outbreaks
Even after removal, poor cultural conditions can set the stage for a return. Overfeeding with nitrogen, irregular watering, low light indoors, and crowded spacing all encourage tender growth and reduce airflow. A plant that is constantly pushing weak, sappy shoots offers aphids a steady supply of ideal feeding sites.
This does not mean you should starve or dry out a plant. Instead, aim for balanced growth. Water deeply and consistently, use fertilizer at a measured rate, and avoid forcing lush growth out of season. If pruning is needed, monitor the fresh regrowth closely for the next 7 to 10 days, because that is often when hidden survivors reappear.
How to treat plants thoroughly and completely
Effective treatment is a combination of removal, coverage, and follow-up. The goal is not just to knock down visible aphids, but to reach the concealed ones and reduce the plant conditions that helped them settle in the first place. A single quick spray is rarely enough on a plant with curled leaves, dense buds, or heavy new growth.
Start by deciding how severe the infestation is. Light outbreaks on a few shoot tips can often be managed with physical removal and repeated inspection. Heavier infestations usually need pruning of the worst growth plus a contact treatment applied carefully to all hiding places.
Physical removal and pruning
For mild cases, a firm stream of water is often the best first step. Spray the undersides of leaves and the growing tips, not just the top surface. Outdoors, repeat every few days as needed. Indoors, take the plant to a sink, shower, or sheltered outdoor spot if temperatures are above about 16°C (61°F).
If leaves are tightly curled and packed with insects, remove them. Those folds often shield aphids from soap or oil sprays. Prune only what the plant can spare, and make clean cuts just above a healthy node. Dispose of removed growth rather than leaving it on the soil or composting it immediately near susceptible plants.
Applying sprays so hidden areas are covered
Insecticidal soap, horticultural oil, or other labeled aphid treatments work best when they contact the insects directly. Coverage matters more than volume. Spray until surfaces are thoroughly coated, including leaf undersides, stem joints, and buds, but do not drench the soil unnecessarily.
- Water the plant appropriately first if it is dry-stressed, unless the product label says otherwise.
- Move the plant out of harsh direct sun during treatment.
- Spray the top and bottom of leaves, then rotate the plant and repeat.
- Target shoot tips, nodes, and any curled or folded growth.
- Let the plant dry with good airflow.
- Repeat according to the product label, often after 5 to 7 days.
Always avoid spraying heat-stressed plants or applying oils in conditions that are too hot. As a general caution, temperatures above about 29°C (84°F) can increase the risk of leaf damage with some products. Test a small area first on delicate plants such as ferns, tender herbs, or fuzzy-leaved houseplants.
Aftercare to prevent a return
Once the visible infestation is down, adjust the growing conditions that encouraged it. Reduce excessive feeding, especially high-nitrogen fertilizer. Improve spacing or thin crowded growth to increase airflow. Keep watering even and avoid cycles of drought followed by heavy soaking, which often trigger soft regrowth.
- Recheck every 3 to 4 days: hidden survivors show up quickly on fresh growth.
- Inspect nearby plants: treat the area, not only the worst specimen.
- Wash away honeydew: sticky residue attracts ants and supports sooty mold.
- Support steady growth: proper light, balanced feeding, and regular moisture make plants less vulnerable.
Thorough treatment is really a process, not a one-time event. When you combine careful inspection, complete coverage, selective pruning, and better plant care, aphids lose the protected footholds that let them hide and return.