Scale Insects on Plants – Identification and Control

 This article explains what scale insects are, why they’re easy to miss, how to spot them on leaves, stems, and other plant surfaces, early signs of damage, soft vs. armored scale, treatment options by infestation level, and how to monitor plants after treatment.
- What scale insects are and why they are hard to notice
- How to identify scale insects on different plant surfaces
- Common signs of infestation before severe damage appears
- Difference between soft scale and armored scale on plants
- How scale insects feed and weaken overall plant health
- Early treatment options for light infestations
- Best control methods for moderate and heavy infestations
- How to monitor plants after treatment to prevent reinfestation
Yellowing leaves, sticky residue, and weak growth can signal sap-sucking pests. Scale insects on houseplants and garden plants often resemble small, harmless bumps on stems or beneath leaves, making them easy to overlook until damage becomes serious. Learning to recognize early warning signs and using simple, effective treatments can protect plant health, stop the infestation from spreading, and help plants recover more quickly.
What scale insects are and why they are hard to notice

Scale insects are small sap-feeding pests that attach themselves to stems, leaves, and sometimes roots, then remain in place for much of their lives. Unlike obvious chewing insects, they do not leave large holes or ragged edges. Instead, they sit under a waxy or shell-like covering and quietly draw nutrients from the plant. That still, protected habit is one reason infestations can build for weeks before a gardener realizes anything is wrong.
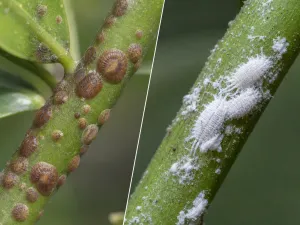
Many species look less like insects and more like tiny bumps, scabs, or raised blisters. On woody plants they can resemble natural bark texture. On houseplants they may be mistaken for dried sap, corky spots, or harmless discoloration. Because they blend into the plant surface, people often notice the damage first and the insects later.
Why they escape attention so easily
The most difficult stage to spot is often the settled adult stage, when the insect has already chosen a feeding site. At that point it may be brown, tan, gray, black, or translucent, depending on species. Some are flat and shield-like, while others are rounded and slightly domed. Their size is usually only a few millimeters, so a quick glance is rarely enough.
- They do not move much: once attached, many scales stay fixed, so they do not trigger the same visual alarm as ants, aphids, or caterpillars.
- They mimic plant tissue: their coverings often match stem color or leaf midrib texture.
- They hide in protected places: common locations include leaf joints, the undersides of leaves, branch crotches, and crowded inner growth.
- Damage develops slowly: yellowing, leaf drop, and weak growth can appear gradually and be blamed on watering or light problems.
Indoor plants are especially vulnerable because the environment is stable and natural predators are limited. Outdoors, shrubs, citrus, camellias, euonymus, magnolia, and many fruit trees can host scale, but container plants brought in for winter are also common targets.
A practical check: if a “spot” on a stem can be lifted with a fingernail and leaves behind a moist or greenish mark, suspect scale rather than a natural blemish. Do this gently on one or two spots only, so you do not unnecessarily wound the plant.
How to identify scale insects on different plant surfaces

Good identification starts with knowing where to look and what the insects look like on each part of the plant. Scale does not present the same way on broad leaves, woody stems, tender new growth, or leaf undersides. A careful inspection in bright light is more useful than a quick overall glance.
On stems and branches
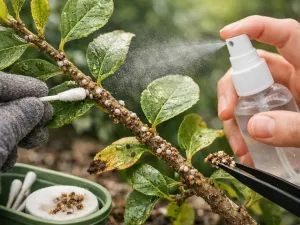
Woody and semi-woody stems are classic hiding places. Here, scale often appears as neat rows of tiny bumps along the stem, especially near nodes and branch junctions. On indoor ficus, citrus, schefflera, and many tropicals, they may cluster where leaves join the stem.
- Look for raised oval or circular bumps that do not brush off like soil.
- Check older stems as well as soft new growth.
- Inspect branch crotches and crowded interior growth where air movement is poor.
On upper leaf surfaces
Some species settle along the midrib or major veins on top of the leaf. On glossy foliage, they may look like droplets of dried varnish or hard, flattened scales. Damage around them can include pale stippling, yellow patches, or a dull, tired-looking leaf surface.
Broad-leaved houseplants such as rubber plants, gardenias, and orchids may show isolated insects at first, then scattered colonies as the infestation expands. A magnifying lens helps, but even without one, a pattern of repeated, similarly shaped bumps is a strong clue.
On leaf undersides and petioles
The underside of the leaf is one of the most overlooked areas. Scale often settles there because it is sheltered from direct sun, rain, and casual inspection. Petioles and leaf bases are also common sites, especially on dense foliage plants.
- Turn leaves over one by one near the center of the plant.
- Check leaves that are yellowing before the rest of the plant.
- Inspect areas near sticky residue or black sooty growth.
On succulents, cacti, and unusual surfaces
On succulents and cacti, scale may be harder to distinguish from natural corking or old scar tissue. The difference is usually pattern and texture. Corking tends to be irregular and part of the skin, while scale sits on the surface and often appears in repeated shapes. On palms and cycads, examine the bases of leaflets and the central stem where insects can gather in overlapping layers.
If you are unsure, isolate the plant and compare several spots. Natural plant markings are usually integrated into the tissue. Scale insects look attached to the surface rather than grown from it.
Common signs of infestation before severe damage appears

Plants usually give subtle warnings before a scale problem becomes serious. Catching these early signs matters because small colonies are far easier to remove than established infestations spread across stems, leaf undersides, and hidden joints. The first clues are often indirect rather than dramatic.
Changes in leaf appearance and growth
As scale feeds, leaves may lose color, become slightly yellow, or develop a washed-out look. New growth often emerges smaller than normal, and the plant may seem to stall even during its active season. On flowering plants, buds may fail to open well or drop early.
- Pale foliage: especially on one branch or one side of the plant first.
- Leaf drop: older leaves may fall sooner than expected.
- Weak shoots: stems can remain thin, soft, or underdeveloped.
- Reduced vigor: the plant needs longer to recover after pruning or repotting.
Sticky residue and secondary problems
Soft scales often excrete honeydew, a sugary liquid that coats leaves, pots, shelves, and nearby surfaces. This stickiness can appear before you notice the insects themselves. Once honeydew is present, black sooty mold may begin growing on it. The mold does not invade plant tissue directly, but it blocks light and makes the plant look dirty and stressed.
Ant activity can also be an early warning outdoors or in greenhouses. Ants are attracted to honeydew and may travel up and down stems, effectively pointing to a hidden infestation.
| Early sign | What it suggests | Where to check next |
|---|---|---|
| Sticky leaves or furniture | Honeydew from soft scale or another sap-feeding pest | Leaf undersides, stems, branch joints |
| Black film on foliage | Sooty mold growing on sugary residue | Upper leaf surfaces and nearby stems |
| Patchy yellowing | Localized sap loss from feeding insects | The affected branch, petiole, and midrib area |
| Ants repeatedly visiting a plant | Possible honeydew-producing pests | Hidden stem crevices and dense inner growth |
Do not assume sticky leaves always mean overwatering or spilled fertilizer. If the residue returns after wiping, inspect for sap-feeding insects the same day rather than waiting for more obvious decline.
Difference between soft scale and armored scale on plants

Not all scale insects behave the same way, and understanding the difference between soft scale and armored scale helps you choose the right control method. Both types feed on plant sap, but they differ in body covering, honeydew production, and how tightly they are protected from sprays.
Soft scale characteristics
Soft scales have a more flexible, often slightly domed covering that is part of the insect body. Many produce honeydew, so they are commonly associated with sticky leaves and sooty mold. They are often easier to crush or scrape than armored scales, though they can still be persistent in large numbers.
On ornamental shrubs and indoor foliage plants, soft scale may appear shiny, tan, brown, or translucent. Some species are broad and oval, while others are more rounded and swollen.
Armored scale characteristics
Armored scales have a harder, more separate protective cover. They generally do not produce much or any honeydew, which means infestations can be missed because there is no sticky residue to draw attention. They are often flatter and more shield-like than soft scales.
Because the cover is more protective, contact sprays can be less effective against settled individuals. Treatments often work best against the crawler stage, when the young insects have not yet formed a full shield.
| Feature | Soft scale | Armored scale |
|---|---|---|
| Covering | Part of the body, softer and more rounded | Separate hard shield, often flatter |
| Honeydew | Usually present | Usually absent or minimal |
| Sooty mold risk | Common | Less common |
| Ease of detection | Often noticed from stickiness | Often missed until plant decline appears |
| Spray sensitivity | Moderate, depending on stage | Lower once shielded |
In practice, gardeners do not always need a perfect species-level identification before acting. It is usually enough to recognize whether the infestation is honeydew-producing and whether the insects have a hard shield. That tells you a lot about what to expect from wiping, horticultural oils, and follow-up timing.
How scale insects feed and weaken overall plant health

Scale insects weaken plants by inserting needle-like mouthparts into plant tissue and drawing out sap. This feeding removes water, sugars, and nutrients that the plant needs for leaf production, root growth, flowering, and recovery from stress. A small population may only cause mild cosmetic damage, but a larger one can steadily drain vigor from the entire plant.
Why the damage spreads beyond the feeding site
Even when the insects are clustered on one stem or one side of the plant, the effects are rarely limited to that exact spot. Sap movement is part of the plant’s transport system, so repeated feeding can reduce energy available to new shoots, roots, and developing buds. This is why a plant with scale may seem generally weak, even if only a few branches look heavily infested.
Plants already dealing with poor light, inconsistent watering, root crowding, or depleted potting mix are hit harder. A healthy specimen can tolerate a light infestation for a short time, but a stressed plant often declines quickly.
Typical effects on growth and care response
One frustrating feature of scale damage is that it can mimic basic care problems. A plant may wilt faster, yellow between waterings, or stop pushing new leaves, leading the grower to adjust water or fertilizer when the real issue is sap loss. Extra fertilizer does not solve this and can sometimes worsen stress if roots are already compromised.
- Reduced photosynthesis: yellowing leaves and sooty mold lower the plant’s ability to use light efficiently.
- Poor root support: less energy is available for root maintenance and new root growth.
- Weak flowering and fruiting: buds may abort, flowers may be smaller, and fruit set can decline.
- Greater drought sensitivity: infested plants often dry out unevenly and recover more slowly after missed watering.
- Higher disease risk: stressed tissues are less resilient and more likely to suffer from secondary issues.
If a plant has scale, avoid heavy feeding until the infestation is under control. Gentle, steady care works better than “boosting” the plant with strong fertilizer while pests are still actively draining sap.
Early treatment options for light infestations
When only a few leaves or stems are affected, early action can solve the problem without harsh measures. Light infestations respond best to a combination of physical removal, isolation, and repeated inspection. The goal is not just to remove visible insects, but to catch newly hatched crawlers before they settle.
Manual removal and cleaning
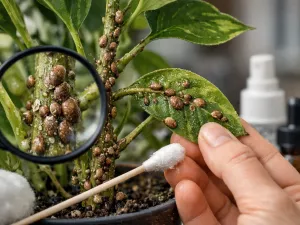
For houseplants and small ornamentals, hand removal is often the fastest first step. Use a cotton swab lightly moistened with 70% isopropyl alcohol, or wipe with a soft cloth dampened in mild soapy water. Test one small area first, especially on thin, fuzzy, or delicate leaves.
- Move the plant away from others to prevent spread.
- Inspect stems, leaf undersides, petioles, and branch joints.
- Lift or wipe off each visible insect carefully.
- Rinse or wipe away residue so you can spot survivors later.
- Recheck the plant every 5 to 7 days for at least 3 weeks.
Alcohol should be used sparingly, not poured over the plant. Too much can damage tender tissue, especially in warm sun or on drought-stressed plants.
Pruning and sanitation
If one stem is heavily covered but the rest of the plant is clean, pruning can be the simplest solution. Remove the most infested twigs or leaves with clean pruners and dispose of them immediately. Do not compost badly infested material unless your compost system runs hot and is well managed.
- Clean tools after cutting to avoid moving pests to other plants.
- Wipe windowsills, plant stands, and nearby pots if honeydew is present.
- Space plants slightly farther apart to improve visibility and airflow.
Low-impact spray options
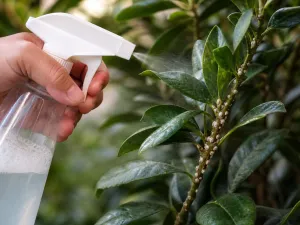
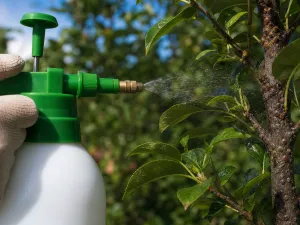
In the early stage, insecticidal soap or horticultural oil can help suppress crawlers and exposed individuals. Coverage matters more than force. Spray all plant surfaces, including hidden undersides and stem crevices, but avoid treatment in direct hot sun or when temperatures are above 29°C (85°F). For indoor plants, let foliage dry in bright indirect light with good air circulation.
Always follow the product label. Some plants, including certain ferns, succulents, and blue-leaved evergreens, can be sensitive to oils or soaps.
Best control methods for moderate and heavy infestations
Once scale is widespread, a single wipe-down rarely solves the problem. Moderate and heavy infestations usually require layered control: reducing the existing population, treating the plant thoroughly, and improving growing conditions so recovery is possible. The more hidden the infestation, the more important follow-up becomes.
Start with reduction before spraying
Dense colonies protect each other and make sprays less effective. Begin by pruning out the worst areas if the plant can tolerate it. On large-leaved houseplants, physically wipe stems and leaves before applying any product. On shrubs and small trees, remove dead twigs and open crowded growth so treatments can reach the surface.
If a plant is severely weakened, leafless on major sections, or repeatedly reinfested despite treatment, replacement may be more realistic than prolonged rescue. This is especially true for inexpensive houseplants with scale embedded deep in tight growth.
Use horticultural oils and insecticidal products correctly
Horticultural oil is one of the most useful tools because it smothers exposed insects and can help with crawlers. Thorough coverage is essential. Spray until surfaces are evenly coated but not dripping excessively. Repeat according to label directions, often every 7 to 14 days depending on product and conditions.
- Horticultural oil: useful for many settled scales, especially on woody stems and broad leaves.
- Insecticidal soap: better for exposed young stages, but less reliable on heavily shielded insects.
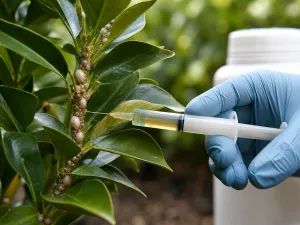
- Systemic insecticides: sometimes used for severe infestations on ornamentals, especially where manual access is poor.
- Dormant oil outdoors: helpful on deciduous plants during the proper season to suppress overwintering populations.
Systemic products should be chosen carefully. They may not be appropriate for edible crops, pollinator-attractive plants, or indoor settings without label approval. If treating a fruit tree or herb, make sure the product is specifically labeled for that use.
Support the plant while it recovers
Control works better when the plant is not also struggling from poor care. Keep soil moisture even rather than swinging from dry to saturated. Repot only if roots are severely compromised; otherwise, avoid stacking too many stresses at once. Bright, appropriate light helps recovery, but do not move a weakened shade plant suddenly into strong direct sun.
- Water deeply, then allow the top layer to dry according to the plant’s normal needs.
- Hold back on strong fertilizer until active feeding damage is reduced.
- Remove heavy sooty mold with gentle washing so leaves can use light again.
- Improve airflow around dense canopies and crowded indoor collections.
For larger outdoor shrubs, treatment may need to continue across one growing cycle because eggs, crawlers, and settled adults overlap. Patience is part of successful control.
How to monitor plants after treatment to prevent reinfestation
After treatment, the job shifts from removal to surveillance. Scale often seems gone before it truly is, because tiny crawlers can settle in hidden places and rebuild the population. A simple monitoring routine is the best way to prevent a repeat outbreak.
What to check in the first month
The first 4 weeks are the most important. Inspect the plant every 5 to 7 days, looking at the same high-risk areas each time so small changes are easier to notice. Good light matters; a phone flashlight or bright window can reveal bumps and sticky residue that are easy to miss in dim corners.
- Check stems near leaf joints and branch forks.
- Turn over several leaves from the center and lower part of the plant.
- Look for fresh honeydew, black mold, or ants.
- Remove any new insects immediately.
- Repeat any labeled follow-up treatment on schedule.
Long-term prevention habits
Reinfestation often begins with one overlooked plant. Quarantine new plants for at least 2 weeks before placing them with the rest of the collection. If possible, keep them in a separate room or at least 1.5 m (5 ft) away from established plants. Inspect plants brought indoors for winter just as carefully, since scale frequently arrives from patios and garden beds.
- Clean foliage regularly: wiping broad leaves makes pests easier to spot early.
- Avoid chronic stress: plants in poor light or erratic watering are slower to recover and easier for pests to exploit.
- Thin crowded growth: better airflow and visibility reduce hidden colonies.
- Check neighboring plants: scale can spread through close contact and shared handling.
- Track problem plants: note treatment dates and areas where insects reappear.
Outdoor gardeners may also need to watch for ant activity and inspect susceptible hosts seasonally, especially in spring when crawlers begin moving. Indoors, continue monthly checks even after the plant looks healthy again. A few minutes of routine inspection is much easier than restarting control on a full infestation.
One of the most effective habits is simply rotating plants during watering or cleaning. Seeing stems and leaf undersides from a different angle often reveals pests long before the plant shows obvious decline.