How to Water Aloe Vera Plants Properly

 This article explains why aloe vera stores water in its leaves and how that affects watering indoors and outdoors. It covers proper watering methods, letting soil dry between waterings, choosing fast-draining soil, spotting overwatering or dehydration, and avoiding common care mistakes.
- Why aloe vera stores water in its leaves
- How often to water aloe vera indoors and outdoors
- Best watering techniques for succulent aloe plants
- How to let soil dry properly between watering
- Choosing soil that prevents water retention issues
- Signs aloe vera is overwatered or dehydrated
- Common mistakes when caring for aloe plants
Proper moisture is key to keeping an aloe vera plant healthy, with the right balance often making the difference between firm leaves and soft, stressed growth. Because aloe stores water in its thick leaves, it needs less frequent watering than many houseplants. Let the soil dry out fully between waterings, then water thoroughly without leaving the roots soggy. This simple routine helps prevent rot, dehydration, and other common care problems.
Why aloe vera stores water in its leaves

Aloe vera is built for dry conditions. Its thick, fleshy leaves act as storage tanks, holding moisture the plant can use slowly when rain is scarce or watering is delayed. That natural design is the main reason aloe suffers more from excess water than from occasional dryness. If you treat it like a leafy houseplant that likes evenly moist soil, the roots often decline before the leaves show obvious damage.
The leaves are made of water-rich tissue, and the plant also has a waxy outer surface that helps reduce moisture loss. This means aloe can stay healthy through periods when the potting mix is completely dry. The goal when watering is not to keep the plant constantly supplied, but to imitate a cycle of soaking followed by drying.
How this affects day-to-day care
Because aloe stores its own reserve, watering should be based on soil dryness rather than the calendar alone. A plant in active growth may use water faster, but even then it prefers a deep drink and a rest period afterward. This is very different from herbs or tropical foliage plants that need frequent moisture near the root zone.
- Leaves act as backup storage: the plant can draw on internal moisture for days or even weeks.
- Roots need air: aloe roots perform best in a porous mix where oxygen can move freely after watering.
- Dry spells are normal: short periods of dryness help prevent rot and encourage stronger root behavior.
- Season matters: in cooler months or lower light, stored water lasts longer and the plant drinks less.
Why overwatering is so risky
When aloe sits in wet soil, the roots cannot breathe properly. Instead of using the water efficiently, the plant becomes vulnerable to root rot, stem softening, and leaf collapse. Many gardeners think wrinkled leaves always mean thirst, but with aloe, soft or sagging foliage can also point to roots that have been damaged by too much moisture.
Editor’s note: If you are unsure whether your aloe needs water, wait one more day and check the soil again. Aloe usually forgives slight underwatering far more easily than a soggy root zone.
Understanding that built-in water storage explains nearly every care rule that follows: use fast drainage, water thoroughly, then let the mix dry well before repeating the process.
How often to water aloe vera indoors and outdoors

There is no single schedule that fits every aloe vera plant. A specimen in a bright indoor window, a patio container in summer heat, and an outdoor plant in sandy ground will all dry at different rates. Instead of watering every few days by habit, judge frequency by light, temperature, pot size, airflow, and the season.
Indoors, aloe generally needs less frequent watering because evaporation is slower and the plant receives less intense sun. Outdoors, especially in warm weather, containers can dry much faster. Plants growing directly in the ground may need even less attention if the soil drains well and rainfall is occasional.
Typical timing by growing situation
These ranges are practical starting points, not fixed rules. Always confirm that the soil has dried properly before watering again.
| Growing condition | Typical watering range | What to check |
|---|---|---|
| Indoor aloe in bright light | About every 2 to 3 weeks | Top 5 to 7.5 cm (2 to 3 in) dry, pot feels lighter |
| Indoor aloe in winter or low light | About every 3 to 5 weeks | Soil dry deeper in the pot, leaves still firm |
| Outdoor aloe in a pot during warm weather | About every 7 to 14 days | Fast-draining mix fully dry, no standing water in saucer |
| Outdoor aloe in the ground | Every 2 to 4 weeks if conditions are dry | Check rainfall, soil texture, and heat exposure |
Factors that change watering frequency
Aloe uses water faster in strong sun, warm rooms above 24°C (75°F), and small terracotta pots. It uses less in cool conditions below 16°C (61°F), in plastic pots that hold moisture longer, and in dim rooms where growth slows. Newly repotted plants may also need a cautious approach because disturbed roots are more vulnerable to rot.
- Light: more sun usually means quicker drying and more active growth.
- Temperature: heat speeds evaporation; cool air slows it.
- Container type: unglazed clay loses moisture faster than glazed ceramic or plastic.
- Pot size: a small pot dries faster than a large one holding more mix.
- Season: spring and summer often require more attention than autumn and winter.
If your aloe lives outside for part of the year, adjust gradually. A plant moved from indoors to bright outdoor conditions may need more frequent checks, but not immediate heavy watering unless the soil is fully dry.
Best watering techniques for succulent aloe plants

The best way to water aloe is deeply and deliberately. A shallow splash only wets the top layer and encourages weak rooting near the surface. Instead, water enough that the entire root ball is moistened, then allow excess moisture to drain away completely. This mimics the pattern succulent plants are adapted to: a full soak followed by a dry interval.
How to water an aloe in a pot
Container-grown plants benefit from a simple routine. Use room-temperature water if the plant is indoors, and pour slowly so the mix absorbs it evenly rather than channeling down one side of the pot.
- Check that the soil is dry to at least 5 cm (2 in), and ideally much deeper for mature plants.
- Carry the pot to a sink, tray, or outdoor area where it can drain freely.
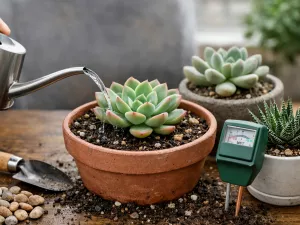
- Water slowly until moisture runs from the drainage holes.
- Wait a few minutes, then discard any water collected in the saucer or cachepot.
- Return the plant to its bright location only after drainage has finished.
This method prevents the common problem of wet feet, where roots sit in trapped water after an otherwise correct watering.
Top watering versus bottom watering
Top watering is usually the better choice for aloe because it flushes the full depth of the mix and helps move built-up salts away from the roots. Bottom watering can work occasionally, but it is less useful if the soil has become compacted or hydrophobic and may leave upper layers too dry or lower layers too wet.
- Top watering: best for most situations, especially gritty succulent mixes.
- Bottom watering: acceptable as an occasional rescue for very dry soil, but not the main routine.
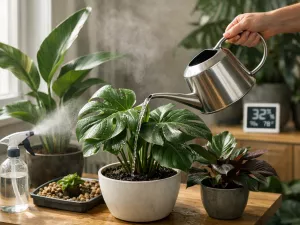
- Misting: not helpful for aloe and can encourage surface moisture without benefiting the roots.
Watering plants in the ground
Outdoor aloe planted in the landscape should be watered at the base, not overhead if possible. Directing water to the soil keeps the crown drier and reduces the chance of moisture lingering where leaves meet the stem. Apply enough water to moisten the root area, then stop and let the site dry naturally before the next irrigation.
Practical tip: If water beads up and runs off the soil surface, pause for a minute and then continue more slowly. Dry succulent mix can repel water at first, and a slower soak gives better root coverage.
Whether indoors or outdoors, the key technique is the same: soak thoroughly, drain fully, and never leave the plant standing in water.
How to let soil dry properly between watering

Letting the soil dry is not the same as forgetting the plant. It means allowing moisture to leave the root zone at a healthy pace so oxygen returns to the mix. Aloe roots need that dry-down phase to stay firm and functional. If the pot stays damp for too long, even a careful watering amount can become harmful.
Drying properly depends on more than time alone. Pot depth, root mass, drainage holes, air movement, and light exposure all affect how quickly moisture leaves the container. A large aloe in a small terracotta pot may dry in a week, while a young plant in a deep plastic pot may stay damp much longer.
Reliable ways to test dryness
Rather than guessing from the surface, use a combination of checks. The top layer often dries first, while the lower root zone remains wet.
- Finger test: insert a finger 5 cm (2 in) into the mix; if it feels cool or damp, wait.
- Wooden skewer test: push a skewer deep into the pot and remove it after a few minutes; darkened wood suggests remaining moisture.
- Pot weight: lift the container after watering and again several days later; dry soil feels noticeably lighter.
- Drainage check: if water still lingers in the saucer after a watering session, drying conditions may be too slow.
Conditions that help the mix dry evenly
Aloe dries best in bright light, warm but not extreme temperatures, and a pot with unobstructed drainage holes. Good air circulation also matters. If the plant sits in a decorative outer pot, remove it during watering and do not return it until dripping has stopped. Avoid placing the container in a dark corner where evaporation is slow and the plant is not actively using moisture.
After repotting, be especially cautious. Fresh mix can hold moisture differently from old soil, and damaged roots need time to recover. In many cases, waiting a few days before the first watering after repotting helps reduce stress, especially if any broken roots were removed.
Editor’s note: A moisture meter can be useful, but it should confirm what you see and feel, not replace observation. Pot weight and root-zone dryness are often more reliable for succulents than a quick surface reading.
Choosing soil that prevents water retention issues

Soil choice has a direct impact on watering success. Aloe vera needs a mix that drains quickly, holds some moisture briefly, and then releases it fast enough for the roots to breathe. Heavy potting composts rich in peat or fine organic matter often stay wet too long, especially indoors. Even perfect watering habits struggle to compensate for a dense, slow-draining medium.
The best soil for aloe is loose, gritty, and open-textured. Commercial cactus or succulent mix is usually a good base, but some brands still benefit from extra mineral material to improve drainage. The aim is not to create a bone-dry medium that sheds all water instantly, but one that moistens evenly and then dries without becoming swampy.
What a good aloe mix includes
Well-balanced succulent soil usually combines organic material with coarse particles that create air spaces. Those air pockets are what help prevent water retention problems around the roots.
- Cactus or succulent potting mix: a practical starting point for container-grown aloe.
- Perlite or pumice: improves drainage and keeps the mix from compacting.
- Coarse sand: can help texture, though it should be horticultural grade rather than fine builder’s sand.
- Small gravel or grit: useful in moderation to increase porosity.
Soil and container pairing
The pot matters almost as much as the mix. A fast-draining soil in a container without drainage holes still creates risk. Likewise, a very large pot around a small aloe holds unused wet soil for too long. Choose a pot only slightly wider than the root ball, often around 2.5 to 5 cm (1 to 2 in) wider than the plant’s root spread, and make sure excess water can escape freely.
Terracotta is often ideal because it allows moisture to evaporate through the pot walls. Plastic and glazed pots can still work, but they usually require longer drying times between waterings. If you use them, be more conservative with frequency.
When to replace old soil
Over time, potting mix breaks down and becomes finer. As that happens, the spaces that once held air begin to close, and the soil stays wet longer. Repotting every 2 to 3 years, or sooner if the mix has become compacted, helps restore proper drainage. This is also a good time to inspect roots, remove dead material, and trim away any mushy sections before replanting.
If your aloe repeatedly develops soft leaves despite careful watering, the problem may be the soil structure rather than the amount of water alone.
Signs aloe vera is overwatered or dehydrated

Aloe vera gives useful warning signs, but they can be easy to misread. Both too much water and too little can affect leaf shape and firmness, so it is important to look at the whole plant, especially the soil and roots, before making changes. Correct diagnosis matters because watering a struggling aloe more often can worsen rot if the real issue is excess moisture.
Common signs of overwatering
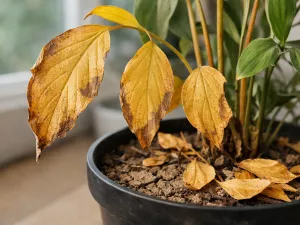
Overwatered aloe usually looks soft rather than simply dry. Leaves may turn pale, translucent, or yellowish, and they can feel mushy instead of firm. In severe cases, the base of the plant softens and the roots darken or smell sour when removed from the pot.
- Mushy leaves: tissue feels weak, watery, or collapsing.
- Yellowing: often starts with a washed-out or dull appearance.
- Soft stem or crown: a serious warning sign of rot.
- Persistently wet soil: the mix stays damp many days after watering.
- Leaf drop or splitting: swollen tissue can fail under excess moisture.
Common signs of dehydration
An underwatered aloe usually becomes thinner and less plump over time. Leaves may curl inward slightly, wrinkle, or feel lighter because stored moisture has been used up. The plant often remains structurally sound, however, without the mushiness seen in rot.
- Wrinkled leaves: especially noticeable along the sides of older foliage.
- Flattened or thinner blades: water reserves have been reduced.
- Dry, fast-draining soil: the mix may pull away from the pot edge.
- Slower growth: the plant conserves energy until moisture returns.
Quick comparison for diagnosis
Use the plant and the soil together to decide what is happening. One symptom alone can be misleading.
| Symptom | More likely overwatered | More likely dehydrated |
|---|---|---|
| Leaf texture | Soft, mushy, translucent | Firm but thin, wrinkled, or slightly curled |
| Leaf color | Pale green to yellow | Duller green, sometimes with dry tips |
| Soil condition | Wet for too long | Dry throughout the pot |
| Root condition | Brown, soft, rotting | Usually intact, though dry |
If you suspect overwatering, stop watering until the mix dries and inspect drainage. If dehydration is the issue, give a full soak rather than several tiny drinks, then return to a slower cycle.
Common mistakes when caring for aloe plants
Most aloe problems come from a few repeated care errors rather than from neglect alone. Watering too often is the biggest one, but it is rarely the only factor. Pot choice, low light, poor soil, and unnecessary feeding can all combine to keep the plant weak and slow to recover. Good care is mostly about creating a dry, bright, well-drained environment and not interfering too much.
Mistakes that lead to watering trouble
Many gardeners water on a fixed schedule, use decorative pots without drainage, or leave runoff sitting beneath the plant. These habits keep the root zone wetter than aloe can tolerate. Another common issue is using a large pot for a small plant, which leaves too much damp soil around a limited root system.
- Watering by the calendar: frequency should follow soil dryness, not a weekly routine.
- No drainage hole: excess water has nowhere to go.
- Using dense houseplant soil: moisture stays trapped too long.
- Leaving water in saucers: roots reabsorb moisture and remain saturated.
- Keeping aloe in low light: slower growth means slower water use.
Other care issues that affect plant health
Feeding too heavily can push weak, soft growth that is more vulnerable to stress. Aloe generally needs very little fertilizer, often just a diluted succulent feed once or twice during active growth in spring and summer. Pruning is also minimal; remove only dead, damaged, or fully dried leaves with a clean blade rather than cutting healthy foliage for appearance.
Light is another overlooked factor. Aloe grows best in bright conditions, with several hours of strong indirect light or gentle direct sun depending on climate. A plant kept in dim conditions may stretch, weaken, and stay wet longer after every watering. If moving it into stronger sun, do so gradually over 7 to 10 days to avoid scorch.
A simple care checklist
If your plant has been struggling, review the basics together instead of changing only one thing.
- Place the plant in bright light with good airflow.
- Use a pot with drainage holes and a gritty succulent mix.
- Water deeply only when the soil has dried well.
- Empty saucers and outer pots after watering.
- Feed lightly during active growth, not during cool, slow periods.
- Trim only damaged leaves and inspect roots if decline continues.
When aloe care is simplified, the plant is usually very forgiving. Give it light, a fast-draining home, and time to dry between waterings, and it will usually stay firm, healthy, and easy to manage.