Spider Mites Under Leaves – Early Detection

 This article explains why mites gather on leaf undersides, what early signs show up before damage spreads, and how to inspect plants correctly. It also covers tools for early detection, subtle symptoms most people miss, immediate steps after finding mites, and a preventive monitoring schedule.
Spotting spider mites early on the undersides of leaves can save weeks of frustration and stop a major outbreak. These tiny pests often stay hidden until plants look dull, speckled, or dusty. Make a habit of quick, regular checks for fine webbing, pale stippling, and tiny moving dots. Catching the first signs lets you respond fast and limit damage before it spreads.
Quick takeaway: Spider mites are easiest to catch early by checking the undersides of leaves for stippling, tiny moving dots, shed skins, and the first fine strands of webbing. In most cases, finding them before heavy bronzing and visible webs gives you a much better chance of stopping the outbreak quickly.
Why mites gather on leaf undersides
The underside of a leaf is a safer, more comfortable “microclimate” than the top surface. It’s typically shadier, less windy, and less exposed to splashing water, so tiny pests lose less moisture and are less likely to be knocked off. That sheltered spot also helps their fine webbing stay in place, which makes feeding and moving around easier.
- Protection from sun and heat swings: Direct light can overheat and dry out small-bodied mites. The lower surface stays cooler and more humid, especially on hot days above about 30°C (86°F).
- Reduced disturbance: Rain, overhead watering, and wind hit the top side first. Under the leaf, mites and eggs are less likely to be washed away or physically dislodged.
- Easier feeding access: Many plants have thinner tissue and more accessible feeding sites on the lower surface. Mites pierce cells and suck out contents, and the underside can be an efficient place to do that with less exposure.
- Egg-laying advantage: Eggs are vulnerable to drying and UV light. Laying them in a shaded, protected area improves survival, especially when indoor air is dry or outdoor conditions are breezy.
- Fewer predators and less “traffic”: Some beneficial insects patrol the top surface more often, and human handling tends to touch leaf tops first. Staying underneath reduces encounters and accidental removal.
This preference is why early checks work best when you flip leaves and look along the midrib and veins. If you only scan the top surface, you can miss the earliest colonies until stippling, bronzing, or webbing becomes obvious. If you want to verify what you’re seeing before damage spreads, read confirm tiny red mites on plants.
Signs visible before damage spreads
Early mite activity is easy to miss because the first changes look like mild stress, not an infestation. The trick is to focus on the underside of leaves and the plant’s newest growth, where colonies often start before the top surface looks “bad.” One of the most common early clues is stippling, so if you want a deeper symptom breakdown, see yellow speckles on leaves from mites.
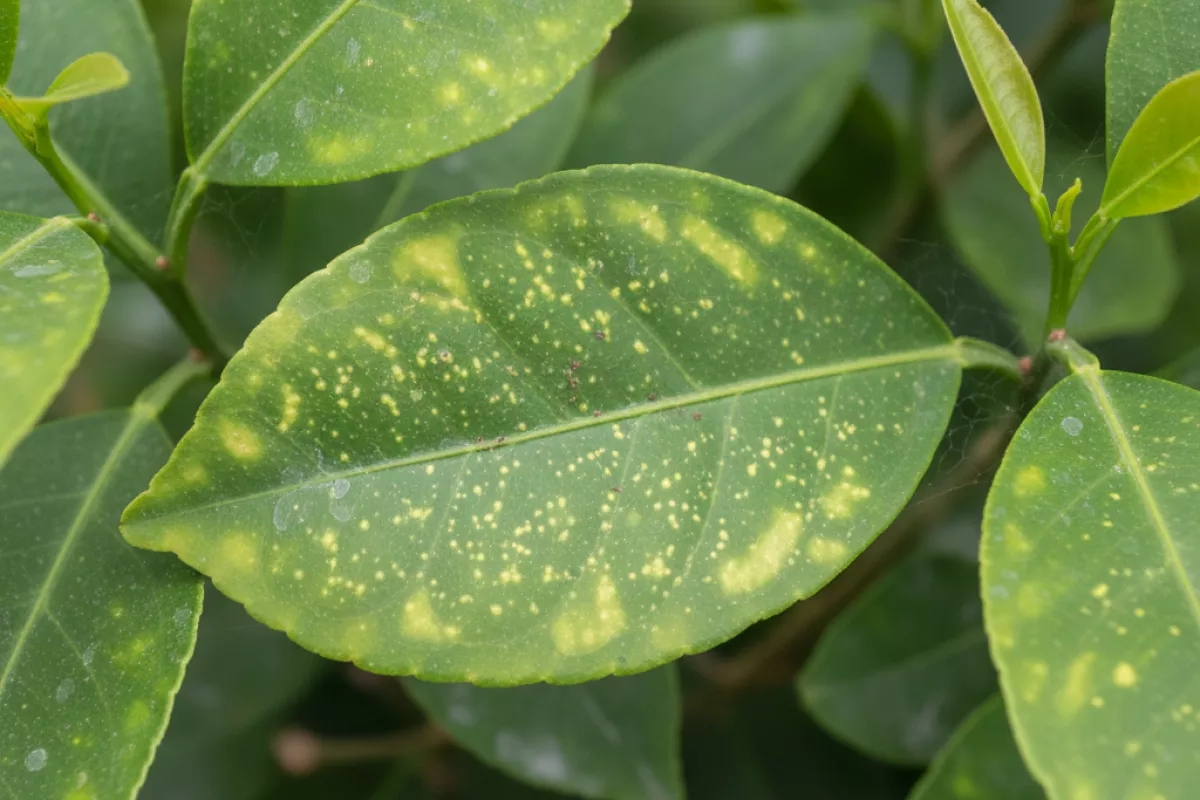
- Fine, pale stippling on the upper leaf surface (tiny pinpricks or speckles). This is feeding damage that often appears before any leaf yellowing becomes obvious.
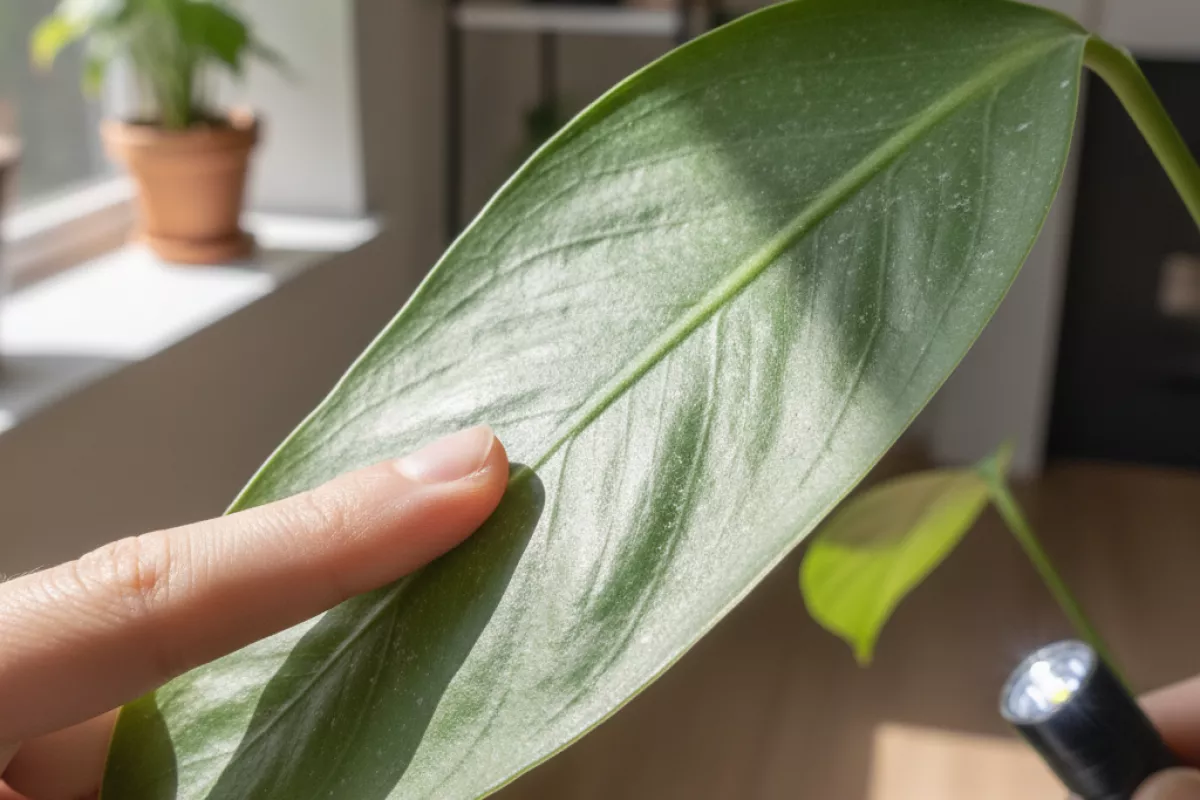
- A dull, slightly “dusty” look to the leaf, especially in bright light. It can resemble residue, but it doesn’t wipe off cleanly like actual dust.
- Subtle bronzing along veins or edges rather than uniform yellowing. Early bronzing can be patchy and easiest to spot on lighter green leaves.
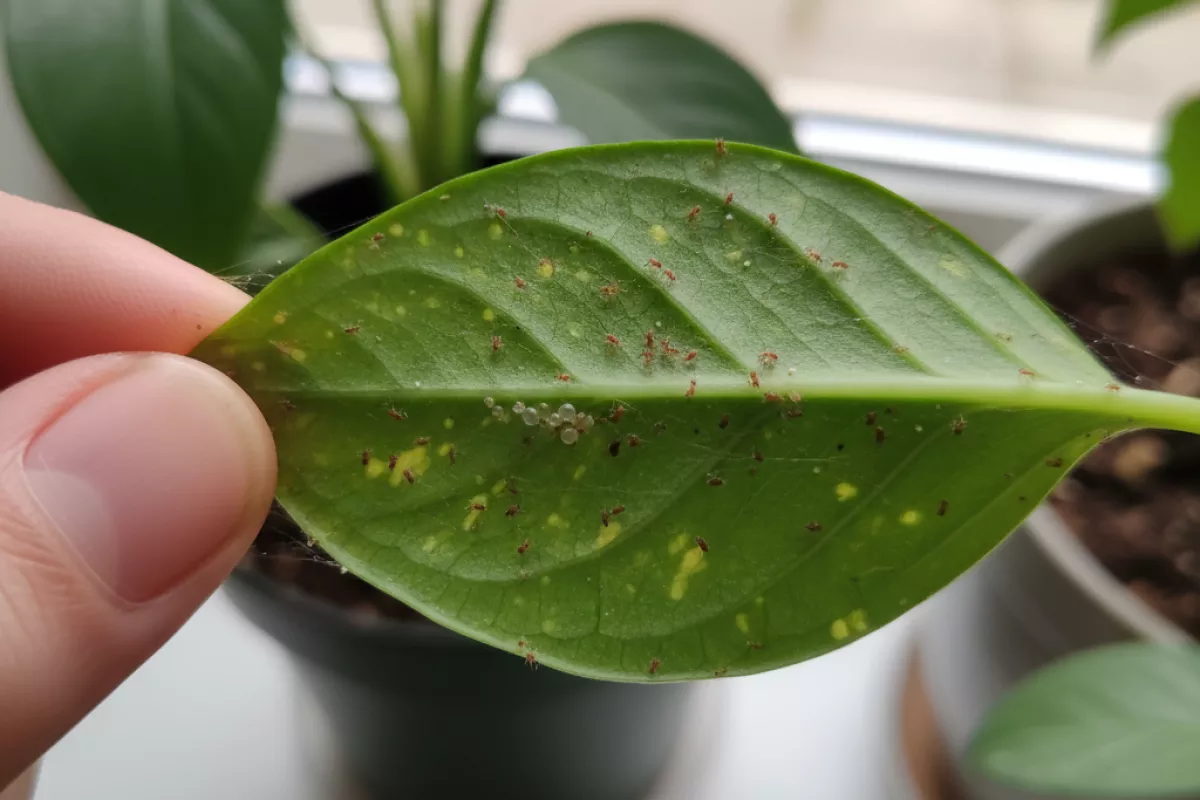
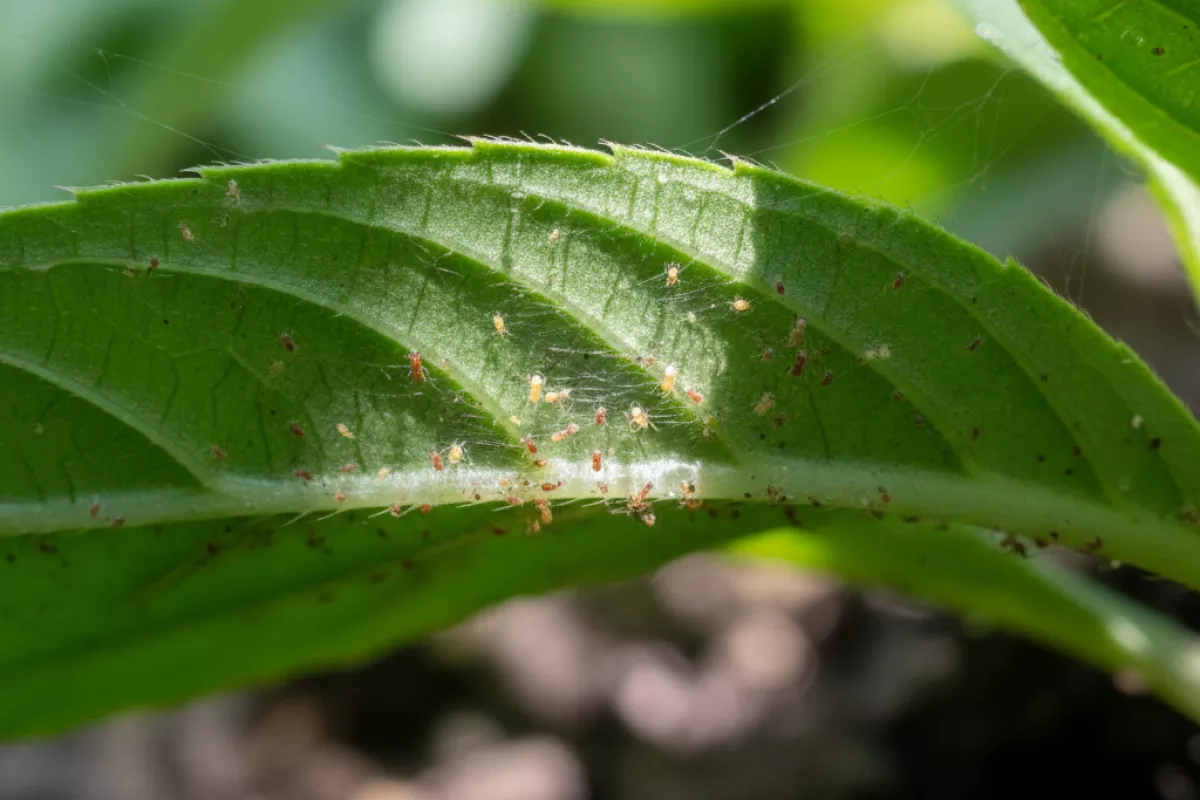
- Tiny moving dots under leaves when you look closely. Spider mites can appear as pepper-like specks; movement is the giveaway.
- Translucent shed skins and small white flecks on the underside. These cast skins collect near midribs and in leaf folds.
- Very thin webbing in protected spots (leaf axils, where the leaf meets the stem, or along the midrib). At first it may look like a single strand rather than a visible “web.”
- New growth that looks slightly distorted or less vigorous. Tips may seem smaller, rougher, or slower to expand even when older leaves still look mostly normal.
- Localized leaf drop or crisping starting low on the plant in dry conditions. This can happen before widespread discoloration shows up across the canopy.
If you want a quick confirmation without special tools, try the paper test: hold a sheet of white paper under a suspect leaf and tap the leaf firmly. If tiny specks fall and some of them crawl, you’re likely seeing mites rather than harmless debris.
| What you notice | What it usually suggests (early stage) | How to double-check |
|---|---|---|
| Light stippling on top of leaves | Feeding has started, often before webbing is obvious | Flip the leaf and inspect along the midrib; look for moving specks |
| Leaf looks matte or “dirty” in sunlight | Multiple tiny feeding sites scattering light | Wipe gently; if the look remains, inspect undersides with a bright light |
| Thin strands in corners/axils | Colony is establishing and protecting itself | Check several nearby leaves; webbing usually appears in clusters, not one spot |
| White flecks under leaves | Shed skins and egg-related debris building up | Tap-test over white paper; moving dots confirm active mites |
| New growth looks slightly stunted | Feeding pressure is affecting tender tissue first | Compare the newest 2–3 leaves to older ones; inspect undersides of the newest leaves |
When you spot any two of these clues together, it’s worth acting right away. Catching spider mites under leaves at this stage is much easier than waiting until webbing and widespread bronzing take over.
How to inspect plants correctly
Catch problems early by making leaf checks a small routine instead of a once-in-a-while deep dive. Spider mites often start on the undersides of leaves, so a quick glance at the top won’t tell you much.
Practical note: In routine plant checks, the easiest early misses usually happen when only the top surface is inspected. In practice, the first reliable signs often show up under older inner leaves, where stippling, pale flecks, and tiny moving mites are easier to catch before webbing becomes obvious.
- Pick the right time and place.
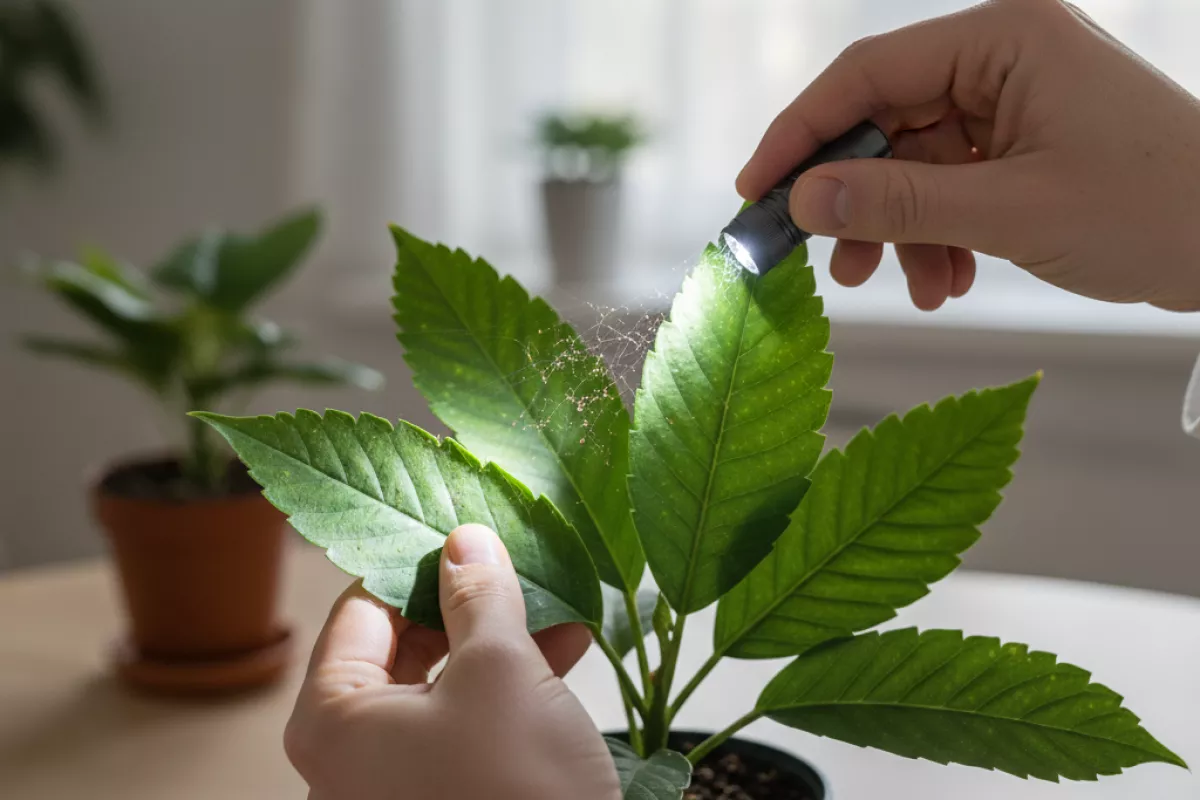
Inspect in bright, indirect light or use a flashlight held at an angle to highlight fine webbing and stippling. If possible, check plants when the room is calm (no fan blowing), so tiny mites and dust don’t get stirred up.
- Start with the “high-risk” leaves.
Look at older, lower leaves first, then move to the inner canopy where air is still. Pay extra attention to leaves that look dull, speckled, or slightly bronzed.
- Flip leaves without damaging them.
Support the leaf from beneath with one hand and lift gently at the petiole (leaf stem). Avoid pinching the blade—crushing can smear evidence and stress the plant.
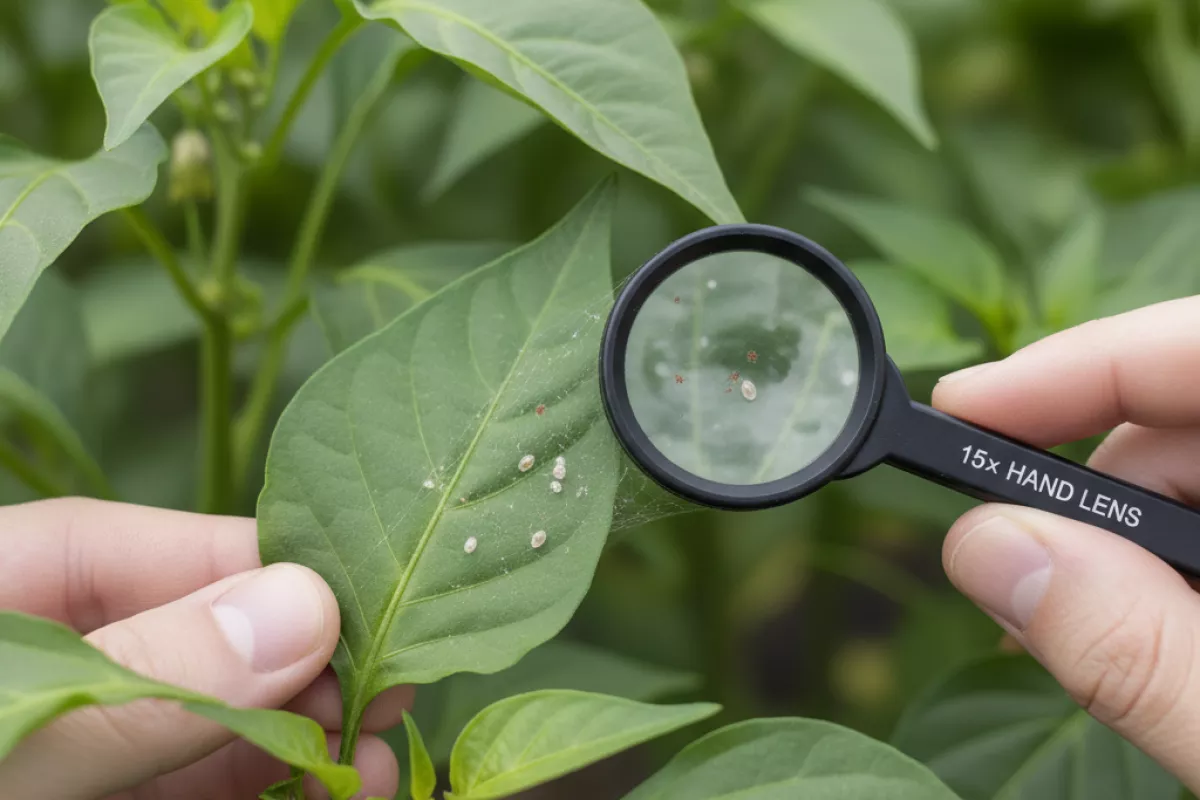
- Use a simple magnifier.
A 10× hand lens is usually enough to spot moving dots and eggs clustered near veins. If you don’t have one, your phone camera zoom can help, especially with a steady hand and good light.
- Do the white paper test when you’re unsure.
Hold a sheet of plain white paper under a leaf and tap the leaf firmly. If tiny specks fall and begin to crawl, that’s a strong clue. You can drag a fingertip through the specks—mites often smear reddish-brown or greenish depending on what they’ve been feeding on.
- Check for early plant symptoms, not just bugs.
- Fine, pale stippling (tiny dots) that makes the leaf look “sandblasted”
- Yellowing between veins, especially on stressed plants
- Thin, wispy webbing along the midrib, petiole, or where leaf meets stem
- Leaf edges curling slightly upward or inward
- Inspect nearby plants and surfaces.
Spider mites spread easily. Check plants within about 30 cm (12 in) of the suspect plant, plus the rim of the pot and the nearest stake, trellis, or windowsill.
- Track what you saw.
Make a quick note of which leaves had speckling or webbing and recheck the same spots in 2–3 days. A short follow-up window helps you confirm whether the issue is progressing or was just dust, old damage, or minor stress.
If you find suspicious signs under leaves but can’t confirm movement, isolate the plant and recheck with magnification. Early spider mite activity can be subtle, and a second look under better light often makes the difference.
Tools that help detect mites early
Spotting an infestation while it’s still small usually comes down to seeing what your eyes miss: tiny moving dots, early stippling, and the first strands of webbing tucked along veins and petioles. A few simple tools make under-leaf inspections faster and more reliable, especially on plants with dense canopies.
- Hand lens (10×–20×): A 10× lens is often enough to confirm mites, eggs, and shed skins; 20× helps when the leaf surface is textured or dusty. Hold the lens close to your eye and bring the leaf up to focus, rather than moving the lens toward the leaf.
- Clip-on phone macro lens: Useful when you want a record you can compare over time. Take photos of the same leaf zone (for example, the underside of the 3rd–5th leaf from the tip) every 3–7 days to catch changes early.
- White paper “tap test”: Place a sheet of plain white paper under a suspect leaf and tap or flick the leaf midrib. Mites fall as pepper-like specks; watch for slow crawling. This is quick for screening multiple plants before you zoom in with magnification.
- Yellow sticky cards: These don’t catch many spider mites consistently, but they can reveal a broader pest picture (like thrips) that often shows up alongside leaf stippling. Use them as a supporting clue, not your only check.
- Bright flashlight or headlamp: Raking light across the underside makes fine webbing and leaf texture changes easier to see. Aim the beam at a low angle along the leaf surface rather than straight on.
- Soft brush or cotton swab: Gently sweep a small patch under the leaf; if you see smearing or tiny moving dots transferred to a white surface, it’s a strong sign you’re dealing with mites rather than nutrient spotting.
- Disposable gloves and alcohol wipes: Not for detection, but for clean sampling. Wipe tools between plants so you don’t spread mites while checking.
| Tool | Best for | What you’ll notice first | Common mistake |
|---|---|---|---|
| 10×–20× hand lens | Confirming mites, eggs, and shed skins on the underside | Oval eggs near veins; slow-moving dots; translucent cast skins | Looking only at the top surface and missing colonies under leaves |
| Phone macro lens | Tracking progression with repeat photos | New stippling clusters expanding week to week | Changing distance/angle each time so photos aren’t comparable |
| White paper tap test | Fast screening across many plants | Specks that crawl instead of staying like dust | Tapping too lightly or outdoors in wind, losing the sample |
| Flashlight/headlamp | Seeing early webbing and texture changes | Fine silk strands along midrib and petiole junctions | Shining straight on, which hides webbing glare and relief |
| Yellow sticky card | Context on other pests and general activity nearby | Thrips or fungus gnats that can mimic or worsen leaf damage | Assuming “no mites on traps” means “no mites on leaves” |
Subtle symptoms most people miss
The earliest clues are usually about texture and light, not obvious damage. Before you see webbing or clear speckling, leaves often start looking slightly “off” from certain angles, especially under bright window light or a flashlight. Because these symptoms are often confused with feeding issues or stress, it also helps to compare spider mite damage vs nutrient deficiency.
- A faint dusty or sandpapery feel on the underside: run a fingertip gently along the lower surface. Mite feeding and shed skins can make it feel less smooth than neighboring leaves.
- Muted sparkle or “sugar dust” look when you tilt the leaf: tiny feeding marks can reflect light unevenly, so the leaf looks subtly dull or glittery depending on the angle.
- Veins stay green while the tissue between them pales: early stippling can present as a soft, patchy fade between veins rather than distinct dots.
- Micro-curling at the edges (especially on newer growth): margins may roll slightly upward or inward even when the plant isn’t dry. This can happen before any visible yellowing.
- “Bronzing” that starts as a warm tint: instead of turning yellow first, some plants develop a faint tan or copper cast, most noticeable on older leaves.
- Uneven leaf gloss: one section looks matte while the rest stays shiny, as if it has been lightly rubbed with a cloth.
- Fine, isolated threads that aren’t a full web: you may spot a single strand between a petiole and the leaf underside, or along a midrib, long before the classic webbing shows up.
- Tiny black “pepper” dots underneath: these can be mite fecal spots. They often appear near the midrib or where the leaf meets the stem.
- Stalled growth without obvious wilting: new leaves emerge smaller, slightly puckered, or slower to unfurl, while the plant otherwise looks hydrated.
If you want a quick reality check, do a simple paper test: hold a white sheet under a suspect leaf and tap the leaf firmly 3–5 times. If you see moving specks, use a magnifier and look for slow-crawling dots; dust won’t “walk.” For a closer look, a 10× hand lens is usually enough to confirm activity on the leaf underside.
Immediate actions after discovery
Act fast, but keep it simple: isolate the plant, confirm what you’re seeing, and reduce the conditions that let mites multiply. A few focused steps in the first day can prevent a small patch of stippling under leaves from turning into widespread webbing and leaf drop. If you want follow-up treatment options after early detection, see how to get rid of spider mites naturally.
From experience: The plants that recover fastest are usually the ones isolated and rinsed as soon as the first active mites are confirmed. Waiting until webbing is easy to see almost always makes control slower, because by then colonies have already spread across more leaves than they first appeared to occupy.
- Quarantine the plant right away.
Move it away from other plants by at least 1–2 m (3–6 ft). If you can’t relocate it, create separation with space and avoid brushing foliage between pots while you work.
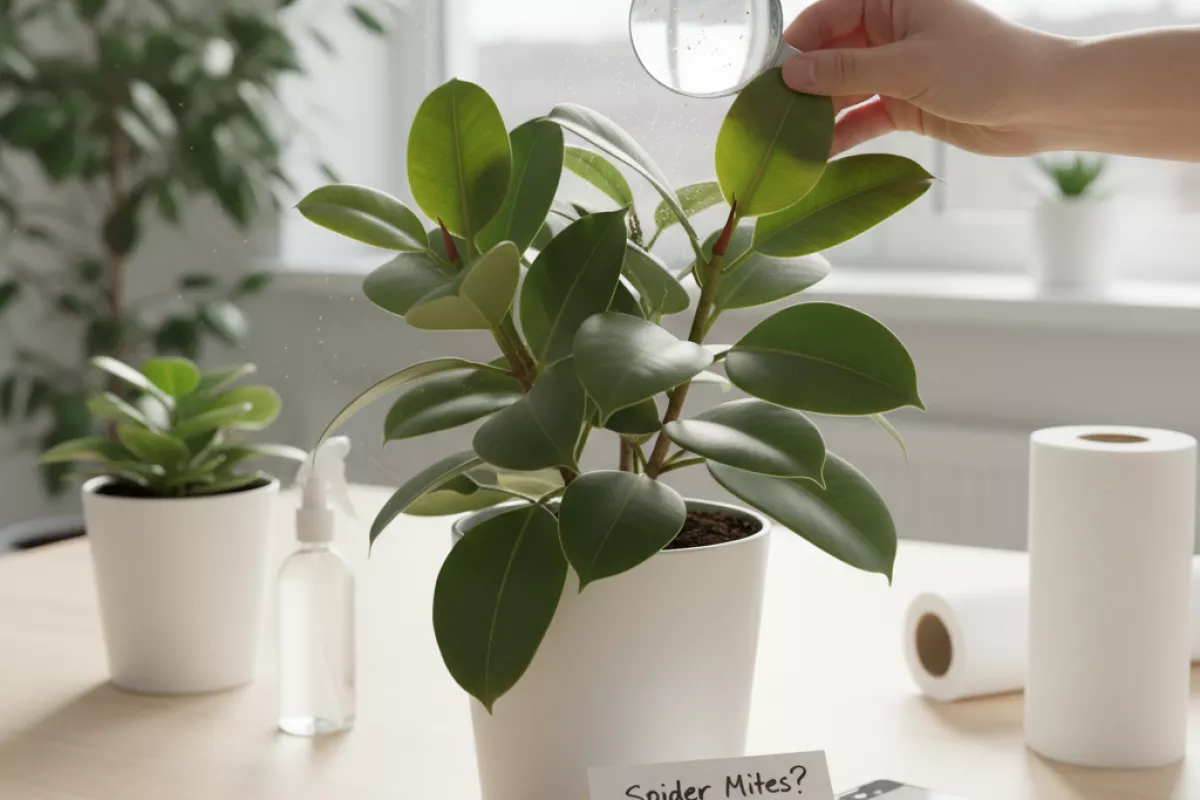
- Confirm the diagnosis before treating.
Check the underside of several leaves with a hand lens (10× is ideal) and tap a leaf over white paper to spot moving specks. Look for pale stippling, fine silk-like webbing near veins, and tiny eggs clustered along the leaf underside.
- Remove the worst leaves and bag them.
Prune heavily infested leaves (especially those with webbing) and seal them in a bag before disposal. Don’t compost them unless you’re confident your compost reaches sustained high heat.
- Rinse the plant thoroughly, focusing under leaves.
Use a firm spray of lukewarm water, aiming at the leaf undersides and petioles. This knocks down many mites and dust that shelters them. Let the plant drain well so the potting mix doesn’t stay waterlogged.
- Clean the surrounding area and tools.
Wipe shelves, windowsills, and pot rims; wash saucers; and clean pruners. Mites don’t live long off the plant, but eggs and hitchhikers can linger on nearby surfaces and hands.
- Decide on a control method and commit to a schedule.
Most products miss eggs, so repeats matter. Treat in the evening or out of direct sun to reduce leaf stress and product burn.
- Low-tox option: insecticidal soap or horticultural oil, applied to full coverage (especially the underside). Repeat every 3–7 days for 2–3 rounds, depending on label directions.
- Stronger option: a miticide labeled for your plant type, used exactly as directed. Rotate modes of action if you’re treating repeatedly to reduce resistance.
- Biological option: predatory mites can work well indoors or in greenhouses when humidity and temperature are suitable; avoid spraying oils/soaps that would harm them.
- Adjust the environment to slow reproduction.
Spider mites thrive in hot, dry, dusty conditions. Raise humidity modestly (without soaking foliage constantly), reduce heat stress, and keep leaves clean. If your grow area runs above 27°C (81°F), aim closer to 18–24°C (64–75°F) if the plant tolerates it.
- Monitor and re-check on a tight loop.
Inspect the underside of leaves every 2–3 days for at least 2 weeks. New stippling or fresh webbing means you need another round of rinsing and treatment. Keep the plant separated until you’ve had multiple clean checks in a row.
If the plant is already severely stressed (many leaves bronzed, curling, or dropping), prioritize stabilization: reduce light intensity temporarily, keep watering consistent, and avoid heavy fertilizing until new growth looks normal. Treatments work best when the plant isn’t struggling from drought or heat on top of the infestation.
Preventive monitoring schedule

Catch infestations while they’re still small by checking the undersides of leaves on a routine. Spider mites reproduce quickly in warm, dry conditions, so the goal is to look more often when risk is high and less often when plants are stable.
| When to check | What to do (quick routine) | What to record |
|---|---|---|
| Weekly (baseline for most plants) | Inspect 10 leaves per plant (or 10% of foliage), focusing on lower and inner leaves; look for stippling, pale specks, and fine webbing under leaves; tap a leaf over white paper to spot moving dots. | Plant name/location, number of leaves with speckling, any webbing, and whether mites were seen on the paper test. |
| Every 3–4 days during high risk (hot/dry spells, dusty areas, after bringing home new plants) | Repeat the underside scan; add a close look at leaf midribs and petioles; check any plants within 30 cm (12 in) of a suspect plant. | Trend notes (worse/same/better), nearby plants checked, and any “hot spots” (specific branches or shelves). |
| After any treatment: 24–48 hours, then every 3 days for 2 weeks | Confirm activity has dropped (fewer moving mites on paper test); remove heavily damaged leaves; re-check the same marked leaves/branches for new speckling. | Date/time, product or method used, visible live mites (yes/no), and whether new damage appeared. |
| Monthly (low risk: cool season, good humidity, no recent issues) | Spot-check the underside of leaves on the most prone plants first (thin-leaved, stressed, or near vents); inspect new growth and older lower leaves. | Any early stippling, plant stress signals (wilting, dryness), and environmental notes (heat sources, airflow changes). |
- Make checks repeatable: pick the same day and time, and always start with the plants that tend to get mites first (near heaters, sunny windows, or fans).
- Use a simple threshold: if you find mites on more than 1–2 of the 10 leaves checked, or you see fresh webbing under leaves, switch that plant (and neighbors) to the higher-frequency cadence.
- Mark “sentinel” leaves: choose 2–3 leaves per plant and re-check them each time; it’s an easy way to notice new speckling early.
- Don’t skip the underside: most early colonies sit under leaves along veins before damage is obvious from above.
Final thoughts
Early spider mite detection is mostly about habit: checking the undersides of leaves, recognizing the first subtle signs, and reacting before colonies spread. The sooner you confirm activity, the easier it is to isolate the plant, reduce population pressure, and prevent a small issue from turning into a full infestation.
In practice, regular under-leaf inspections are far more effective than waiting for obvious webbing. By the time webs are easy to see, the problem is usually already well established.
FAQ about spider mites under leaves
Below are answers to common questions about why spider mites stay under leaves, how to detect them early, and what to do before damage spreads across the plant.
1. Why are spider mites usually found under leaves?
Spider mites prefer the underside because it is more protected from direct sun, wind, splashing water, and physical disturbance. That sheltered surface also helps them feed, lay eggs, and build fine webbing with less exposure.
2. What is the earliest visible sign of spider mites?
One of the earliest signs is fine pale stippling on the upper leaf surface, often before webbing becomes obvious. You may also notice tiny moving dots, shed skins, or a slightly dusty look when the leaf is tilted in bright light.
3. Can I have spider mites even if I do not see webbing yet?
Yes. Webbing usually appears after colonies become more established. In the early stage, you are more likely to see stippling, pale specks, slow-moving dots under leaves, and subtle loss of leaf gloss before clear webs show up.
4. How do I check for spider mites without special tools?
A simple method is the white paper test. Hold a plain white sheet under a suspect leaf and tap the leaf firmly. If tiny specks fall and some of them begin to crawl, spider mites are likely present.
5. Which leaves should I inspect first?
Start with older lower leaves, shaded inner foliage, and leaves that look dull, speckled, or slightly bronzed. These areas often show the first active colonies before damage becomes obvious across the whole plant.
6. How often should I check plants for spider mites?
For most plants, a weekly check is a good baseline. During hot, dry periods, after bringing home new plants, or after a recent infestation, checking every 3–4 days is safer because spider mites can reproduce quickly in favorable conditions.
7. What should I do immediately after finding spider mites?
Isolate the plant, confirm the infestation under several leaves, remove the most heavily affected foliage, and rinse the plant thoroughly with attention to the undersides. Early action matters because spider mites spread fast once colonies become established.
8. Can a plant recover after early spider mite detection?
Yes, in many cases it can recover well if the problem is caught early. When mites are found before heavy bronzing, leaf drop, and dense webbing develop, treatment is usually easier and the plant experiences much less long-term stress.