Fine Webbing on Leaves – Spider Mite Damage

 Covers why mites produce webbing, where it shows up first, and how it harms plants. Explains how to tell mite webs from spider webs, gives inspection tips to confirm mites, then outlines treatment steps once webbing appears and how to prevent new webs.
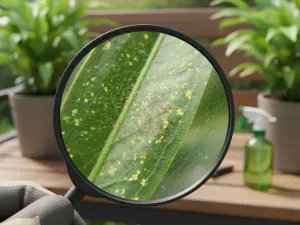
Silk-like threads stretched across leaves often point to spider mites. These tiny pests pierce plant cells to feed, causing pale speckling, dull or bronzed foliage, and weakened growth. Infestations spread fast in warm, dry weather, especially on stressed plants. Check leaf undersides regularly and act early to protect houseplants and garden crops before damage becomes severe.
Why mites produce webbing
That fine, silky “thread” on leaves isn’t random mess—it’s a tool spider mites use to survive and spread. The strands come from glands in the mites’ mouthparts, and as populations build, the webbing becomes more noticeable, especially on the undersides of leaves and along veins.
- Protection from predators: The silk creates a barrier that can slow down or deter beneficial insects and mites that would otherwise feed on them. It also gives spider mites places to hide while they continue feeding.
- Microclimate control: Webbing helps reduce airflow right at the leaf surface, which can limit moisture loss and make conditions less harsh during hot, dry weather. That’s one reason heavy infestations often seem to “explode” when plants are stressed.
- Anchoring and movement: The threads act like safety lines, letting mites move between feeding sites without falling off. On smooth or waxy leaves, this extra grip matters.
- Dispersal to new plants: When colonies get crowded, mites can use silk as a launch point for “ballooning,” where wind carries them to nearby foliage. Even light air movement can relocate them from one leaf cluster to another.
- Egg and colony shelter: Eggs laid within the silk are more sheltered from disturbance (like rain, overhead watering, or brushing against the plant) and from some natural enemies.
In practical terms, more visible webbing usually means the colony has been feeding for a while and numbers are high. Light stippling can show up before you see any threads, but once leaves look “gauzy,” it’s a sign the mites have established a protected area that’s harder to disrupt with simple rinsing.
Where webs usually appear first
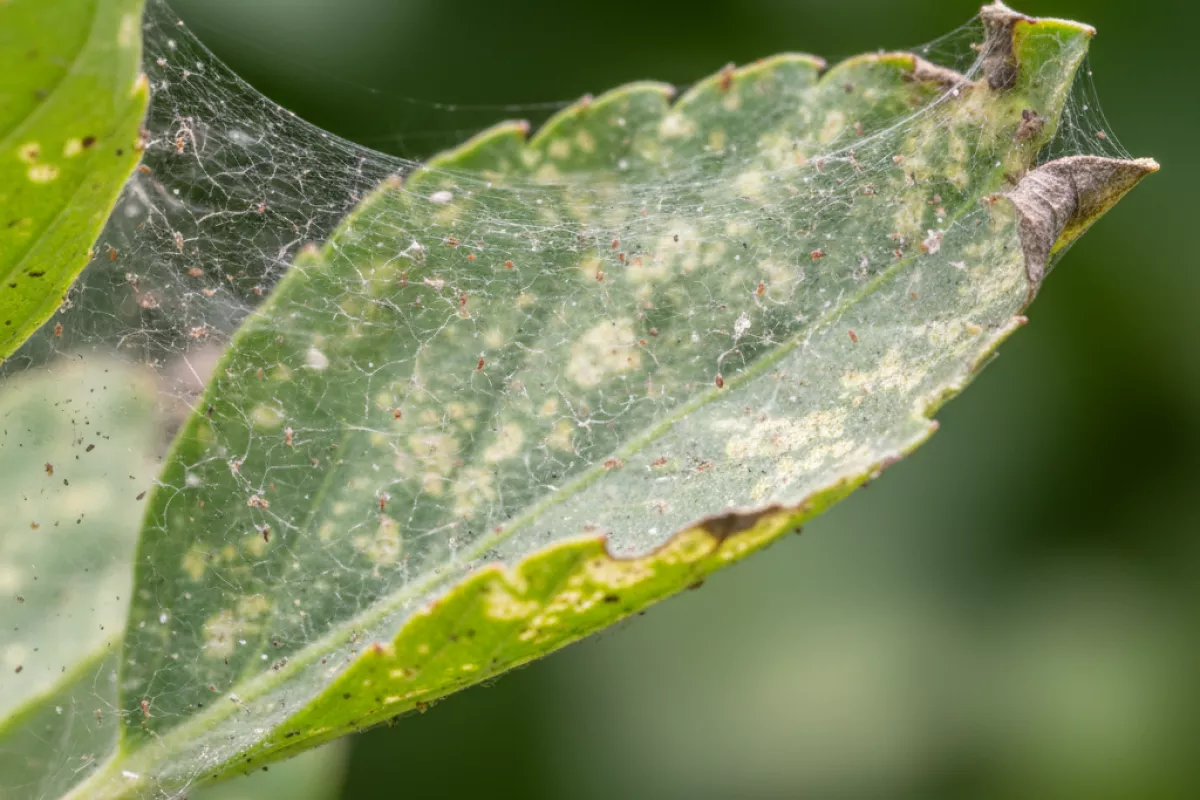
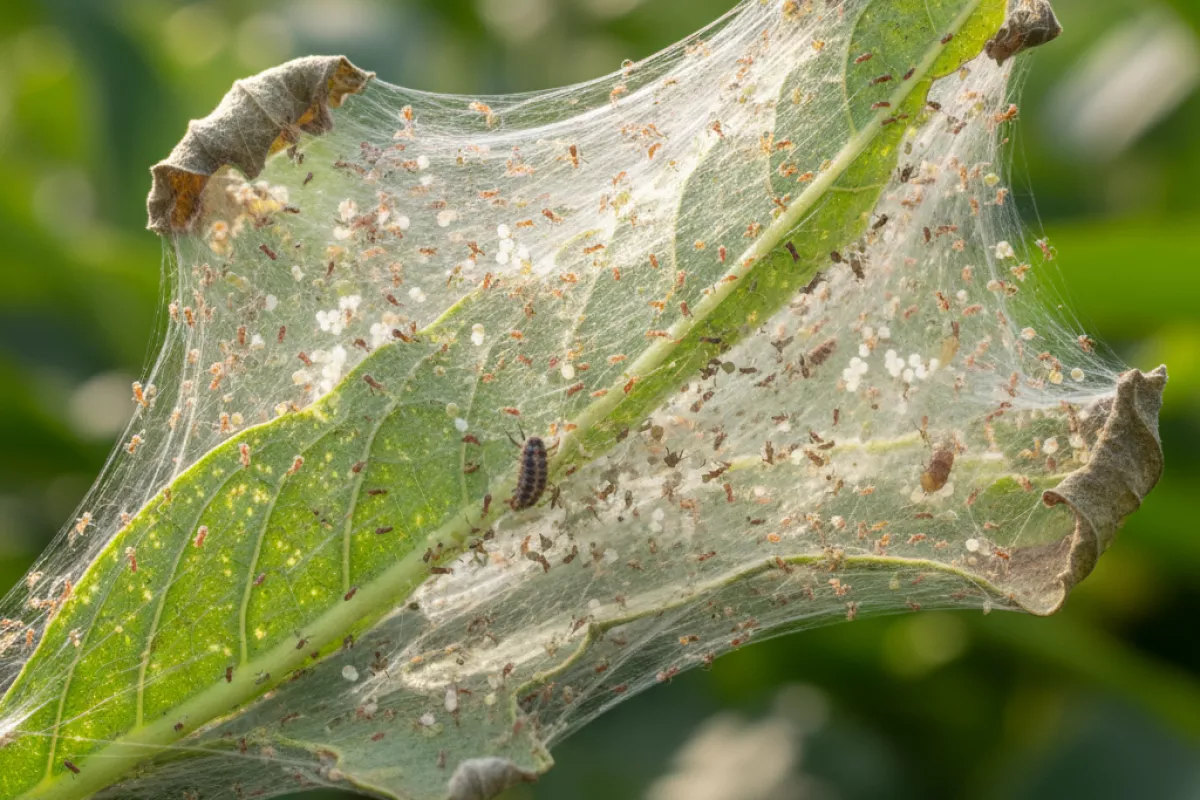
Fine silk from spider mites tends to show up in the most sheltered, least-disturbed parts of a plant. The first strands are often so light they look like dust catching on leaf hairs, so it helps to check the spots where air movement is low and leaves overlap.
- Undersides of leaves, especially along the midrib and veins: Mites feed and lay eggs here, and the tiny threads anchor easily to vein ridges.
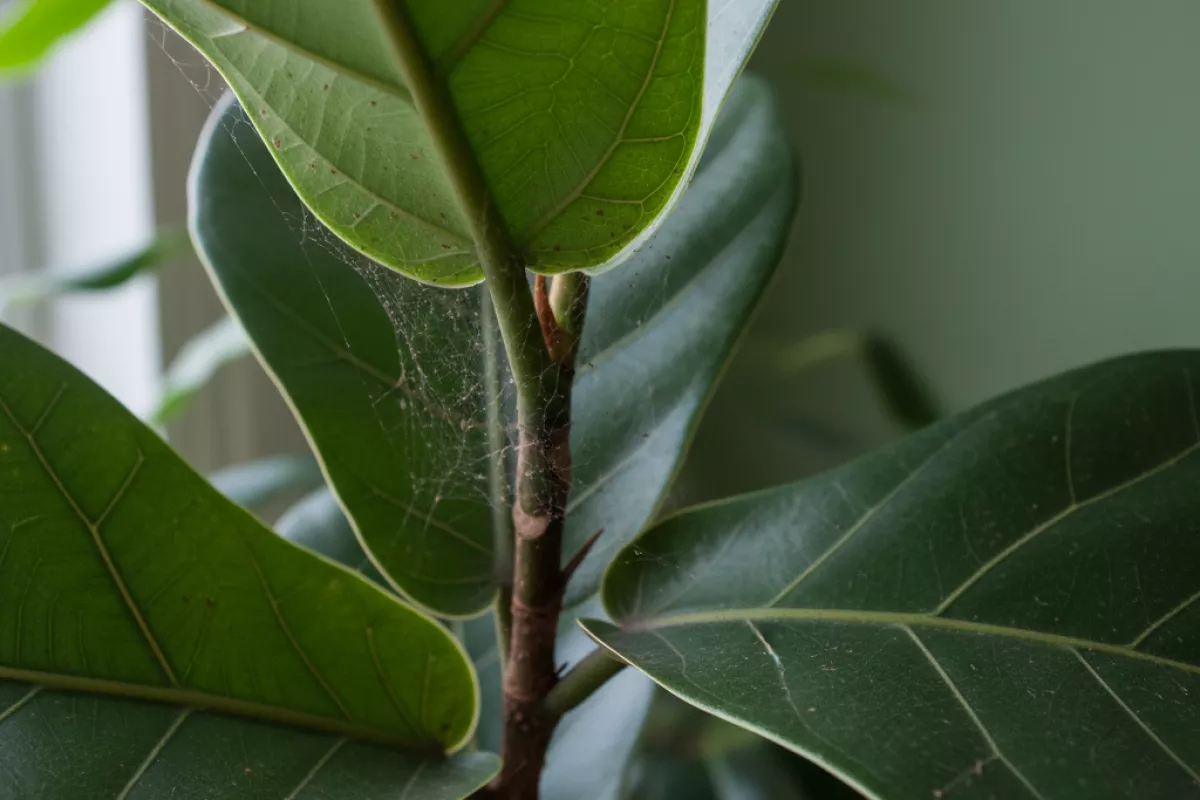
- Leaf axils and tight junctions: Where a leaf meets the stem, webbing can collect early because it’s protected from wind and watering.
- New growth and tender tips: Soft tissue is easier to pierce, so colonies often build up near fresh leaves before spreading outward.
- Between overlapping leaves: When foliage touches, silk bridges form quickly, creating a small “tunnel” that shelters mites and eggs.
- Along leaf edges that curl or cup: Curling creates a pocket; webbing can look like a thin film tucked just inside the rim.
- Near the driest, warmest microclimates: Plants beside a sunny window, heater vent, or under grow lights commonly show webbing first on the side facing the heat source.
If you’re not seeing obvious threads, look for the earlier clues in the same areas: pale stippling (tiny light dots), a dull or bronzed cast to the leaf surface, and specks that move when you tap the leaf over white paper. Catching the problem at this stage is easier than waiting until webbing spans multiple leaves.
How webbing affects plant health
The silky threads you see on leaves are more than a cosmetic issue. They’re a sign that spider mites have built a protective layer over the feeding site, which lets the colony expand while staying harder to dislodge with water sprays or reach with contact treatments.
Webbing also changes the leaf’s immediate environment. It can trap dust and shed skins, hold moisture in some spots and keep other areas drier, and slightly reduce airflow across the surface. Those small shifts add stress to already-damaged tissue and can make the plant look dull, tired, and slow to recover.
- It shields mites while they feed. The threads act like a barrier, so mites can keep puncturing leaf cells and sucking out contents with less disturbance. That feeding causes pale stippling, bronzing, and a gradual loss of green color.
- It interferes with light capture. Heavy silk, plus the debris it catches, can shade parts of the leaf. Less light reaching chlorophyll means less photosynthesis, so growth slows and new leaves may emerge smaller or weaker.
- It worsens water stress. Mite feeding damages cells that help regulate water balance. As injury spreads, leaves may curl, crisp at the edges, or drop early, especially in hot, dry conditions.
- It increases heat and stress on tender growth. Webbing often concentrates on new shoots and undersides of leaves. Those areas are already delicate, so damage there can distort new growth and reduce flowering or fruit set.
- It helps the infestation spread. Silk strands can act like “bridges” between leaves and stems, and mites can also hitch rides on air currents. Once webbing is visible, populations are usually high enough that nearby plants may be at risk.
In practical terms, webbing usually marks the point where the problem shifts from “minor leaf speckling” to “whole-plant decline.” If you’re seeing threads across multiple leaves or between stems, expect faster yellowing and leaf drop unless the mites are brought under control.
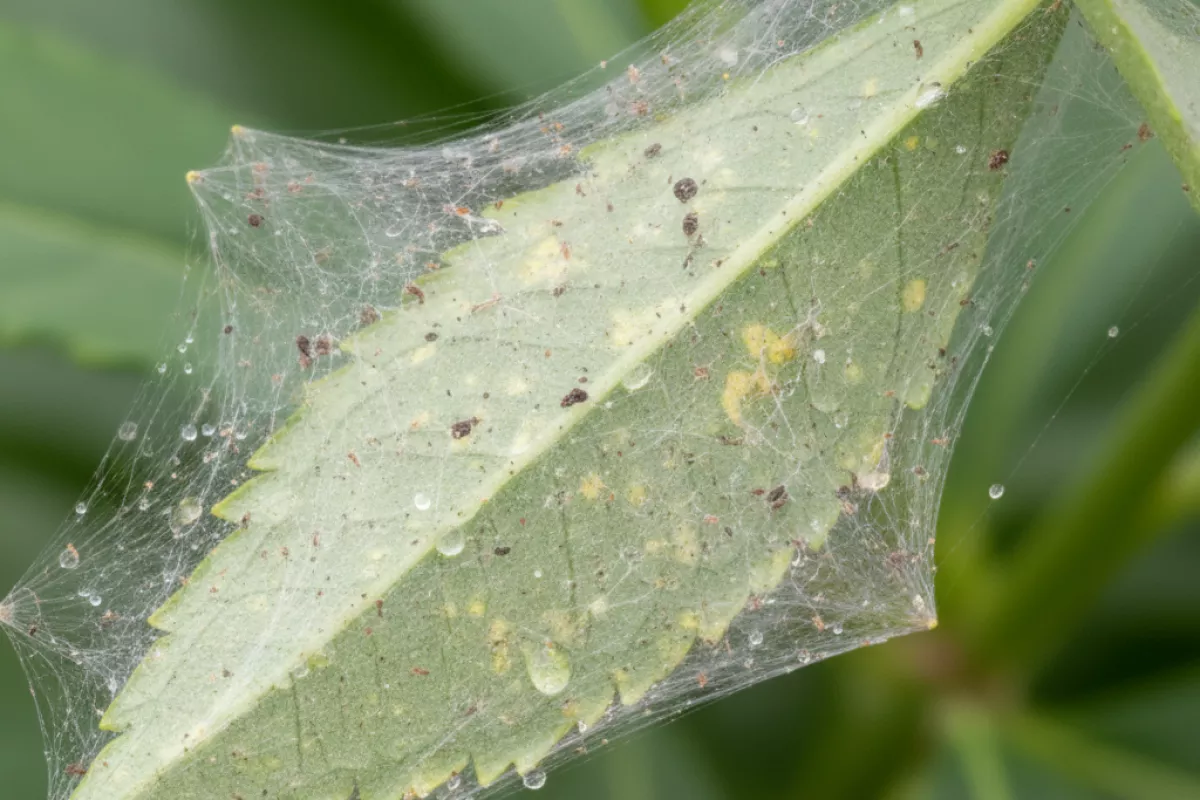
Difference between mite webs and spider webs
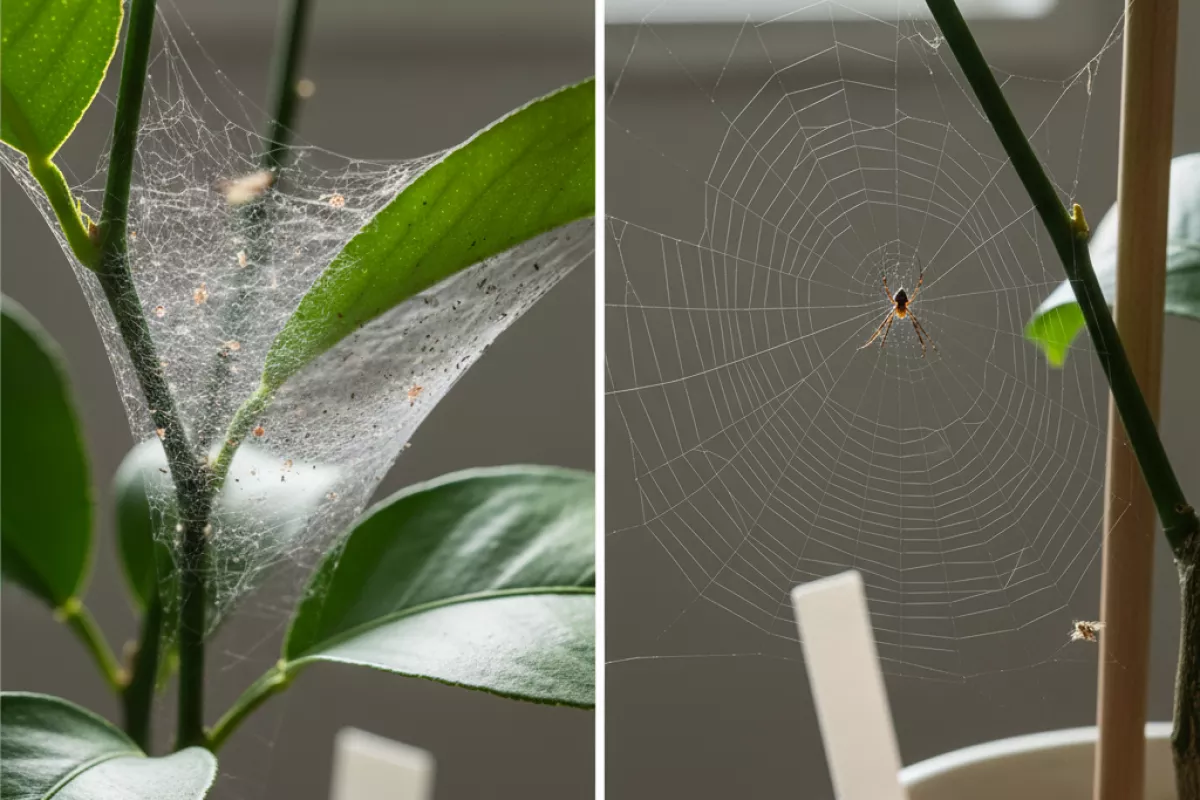
Webbing on plant leaves can come from two very different sources. Spider mites lay down a thin silk “sheet” close to the leaf surface to protect themselves and their eggs, while true spiders build webs to catch prey and usually anchor them across spaces between stems, pots, or nearby structures.
| What to look for | Spider mite webbing | Spider webbing |
|---|---|---|
| Location on the plant | Hugs the leaf surface, especially undersides, leaf joints, and new growth; often looks like a dusty veil over foliage. | Stretches between points (stems, trellis, corners, nearby plants); less often pressed flat against leaves. |
| Texture and thickness | Very fine, wispy, and low-profile; can look like a light film until it builds up. | More structured strands; often thicker and easier to see as distinct lines. |
| Associated leaf symptoms | Speckling/stippling, bronzing, dull or greyed leaves, curling; damage appears where mites feed. | Usually no feeding damage; leaves may be perfectly healthy under the web. |
| Who you’ll find in it | Tiny moving dots (mites) and sometimes translucent eggs; best seen with a hand lens. | A spider may be present nearby; you might also see trapped insects. |
| How it behaves when misted | Can mat down and look like it “melts” into the leaf; may reappear quickly as mites keep spinning. | Often beads water and stays as visible strands; structure remains even after light spraying. |
| Where it shows up first | Starts in hot, dry, sheltered spots; spreads across multiple leaves as populations grow. | Appears wherever a spider can anchor lines and intercept flying insects, often at plant edges or corners. |
- Quick check: Tap a leaf over white paper. If you see tiny moving specks, you’re likely dealing with mites rather than a resident spider.
- Magnification helps: A 10× hand lens is usually enough to spot mites and eggs; without it, mite silk can be mistaken for dust or lint.
- Don’t rely on webbing alone: Heavy silk typically shows up after the infestation is established, so leaf stippling and discoloration are often the earlier clue.
Inspection tips for confirmation
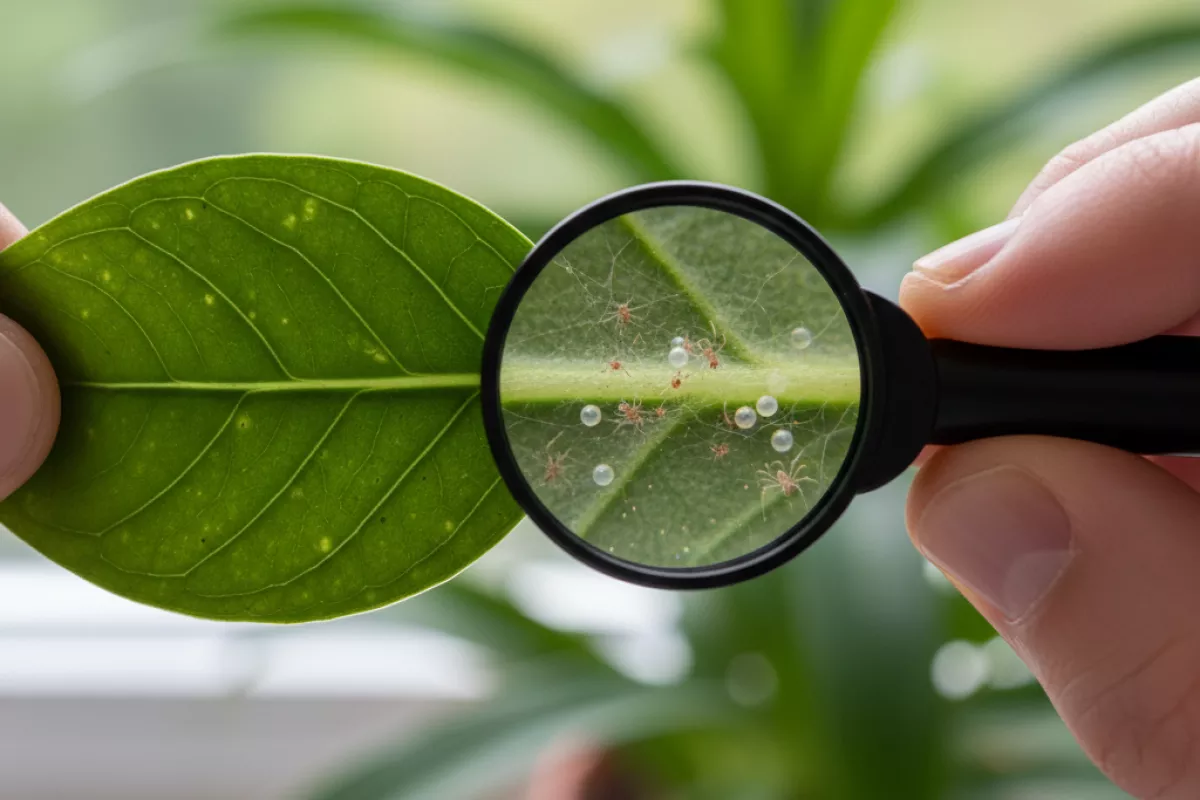
Confirming spider mites is mostly about looking in the right place and at the right time. The webbing you notice is often a late clue, so check the undersides of leaves and the newest growth first, where colonies tend to build up before damage is obvious from a distance.
- Start with the leaf underside: Flip several leaves from different parts of the plant. Mites and their eggs usually sit along the midrib and veins, protected from light and water spray.
- Use a hand lens: A 10× to 20× loupe makes a big difference. You’re looking for tiny moving dots (often pale yellow, greenish, or reddish) and round, translucent eggs clustered near veins.
- Do a white-paper tap test: Hold a sheet of white paper under a leaf and tap or flick the leaf sharply. If you see pepper-like specks that crawl after a few seconds, that supports a mite diagnosis. (Thrips may also fall, but they tend to look more elongated and move differently.)
- Check for “stippling” and bronzing: Fine pale speckles on the upper surface, dulling, and a bronzed or dusty look are typical feeding signs. If leaves are yellowing in patches without distinct spots, keep inspecting other leaves before deciding.
- Look at where the webbing sits: Mite silk often forms a thin veil between petioles, leaf edges, and stems, especially around tender tips. Webbing only on flowers or at soil level can point to other culprits (or harmless spiders).
- Inspect the newest growth: Tender tips and fresh leaves often show the earliest activity. If older leaves are damaged but new growth is clean, the issue may be resolving or caused by something else.
- Time your check: In hot, dry conditions, populations can surge quickly. Inspect again after 2–3 days to see whether specks and webbing are increasing, which is more consistent with an active infestation.
- Rule out lookalikes: Dust, pollen, and mineral residue wipe off as a smear, while mite webbing stretches in fine strands. Aphids are larger and usually cluster on stems; powdery mildew looks like a flat, floury coating rather than threads.
| What you observe | What it suggests | Quick way to verify |
|---|---|---|
| Fine webbing between leaf edges and stems, especially at growing tips | Spider mites likely (webbing is often a later-stage sign) | Check undersides with a 10×–20× lens for moving dots and eggs |
| Pale stippling on upper leaf surface; leaves look dull or bronzed | Feeding damage consistent with mites | White-paper tap test: specks fall and begin to crawl |
| Sticky residue (honeydew) and visible larger insects | Aphids/whiteflies more likely than mites | Inspect stems and new growth without magnification; look for clusters |
| Flat white coating that doesn’t form strands | Powdery mildew rather than webbing | Wipe with a finger: mildew smears; webbing stretches and catches |
| Specks on paper are elongated and move quickly | Thrips possible (can be confused with mites) | Look for slender bodies and black fecal dots on leaves |
If you confirm mites on more than a couple of leaves, inspect nearby plants too. They spread easily by contact and air movement, so catching the pattern early matters as much as spotting the webbing itself.
Treatment steps once webbing appears
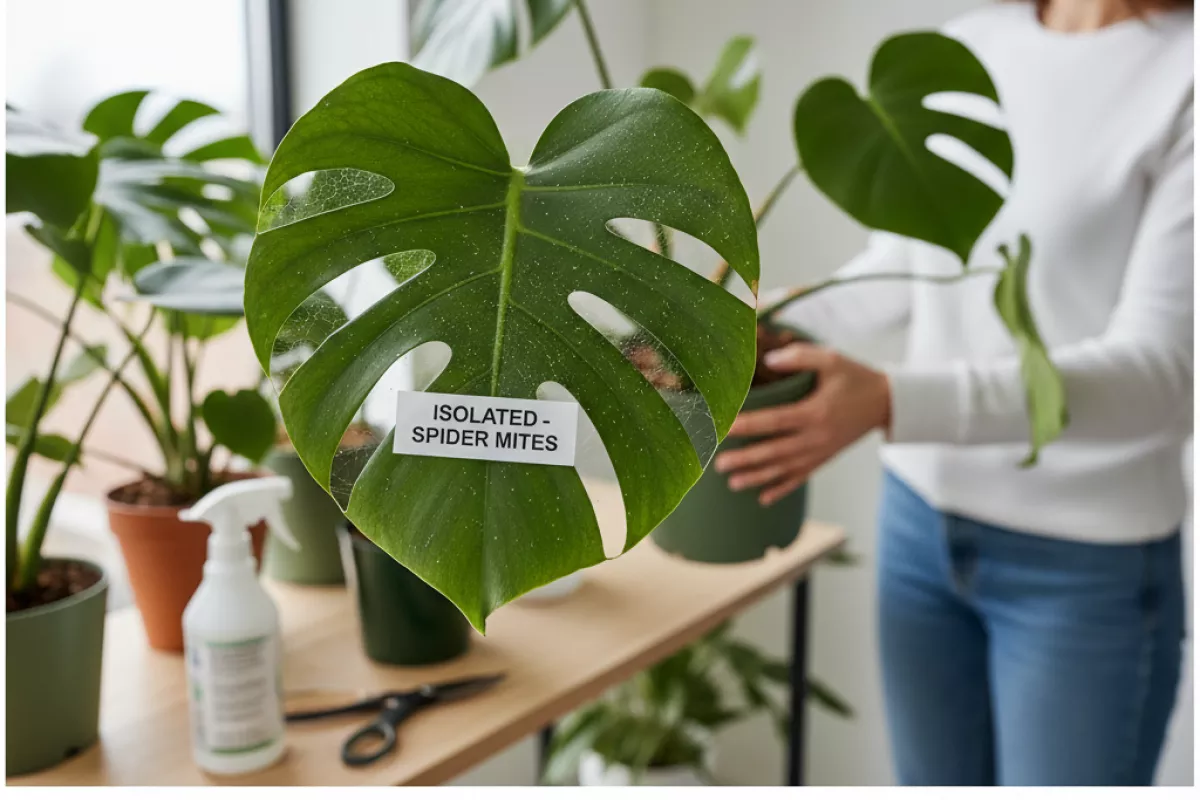
Act quickly once you see fine threads and speckled leaves, because visible silk usually means the population is already established. The goal is to knock numbers down fast, then keep pressure on for a couple of weeks so newly hatched mites don’t rebuild.
-
Isolate the plant and reduce spread.
Move the plant away from others (even 1–2 m (3–6 ft) helps) and avoid brushing foliage against neighboring plants. If it’s outdoors, separate containers and prune back touching branches.
-
Confirm where they’re concentrated.
Check the undersides of leaves and along midribs and petioles. Tap a leaf over white paper; tiny moving dots confirm active mites. Mark the worst areas so you treat thoroughly.
-
Physically remove webbing and as many mites as possible.
Rinse the plant with a firm spray of water, aiming mostly at leaf undersides. For houseplants, a shower works well. Wipe broad leaves with a damp cloth to remove silk and eggs; discard the cloth or wash it hot afterward.
-
Prune heavily damaged growth.
Leaves that are bronzed, crisp, or mostly stippled won’t recover and can shelter mites. Bag trimmings immediately and take them out of the growing area.
-
Apply a control product that matches the situation.
Coverage matters more than the label claim: spray until the plant is evenly wet, especially the undersides, without dripping excessively. Treat in the cool part of the day and keep the plant out of harsh sun until dry.
- Insecticidal soap: Good for light-to-moderate infestations; it must contact the mites to work.
- Horticultural oil or neem oil: Helps smother mites and eggs; avoid using on heat-stressed plants and don’t apply when temperatures are above about 29°C (85°F).
- Miticide (acaricide): Consider for severe outbreaks or valuable plants; rotate active ingredients if multiple treatments are needed to reduce resistance risk.
-
Repeat on a schedule that matches their life cycle.
Most sprays don’t reliably kill every egg, so plan follow-ups. Reapply every 5–7 days (about 1–2 weeks total) and continue until you see no new stippling and no movement on the paper-tap test.
-
Adjust conditions to make the plant less mite-friendly.
Spider mites thrive in hot, dry air. Increase humidity around indoor plants (without keeping leaves constantly wet), and keep the plant evenly watered. Avoid over-fertilizing; soft, lush growth can attract more feeding.
-
Clean the area and monitor nearby plants.
Wash pots, saucers, and nearby surfaces, and launder any plant ties or cloths used during wiping. Inspect neighboring plants every 2–3 days for 10–14 days (about 1–2 weeks), focusing on new webbing and fresh stippling.
If the plant is very small or the infestation is extreme, it can be more practical to discard it to protect the rest of your collection. For plants you keep, consistency is what breaks the cycle: thorough wetting, repeated applications, and close monitoring.
How to prevent web formation

Stop the conditions that let spider mites multiply: warm, dry air, dusty foliage, and stressed plants. Webbing usually shows up after populations have already built up, so prevention is mostly about making leaves less mite-friendly and catching early hotspots before they spread.
- Keep plants evenly watered (but not soggy). Drought-stressed plants are easier for mites to exploit. Water when the top 2–5 cm (1–2 in) of soil feels dry, and avoid repeated “dry-to-wilt” cycles.
- Raise humidity around susceptible plants. Mites thrive in dry air. Group plants, run a humidifier, or use a pebble tray so the air stays closer to 40–60% relative humidity. For indoor growers, aim for about 18–24°C (65–75°F) rather than hot, stagnant corners.
- Rinse foliage to remove dust and early colonies. A firm spray of water on leaf undersides dislodges mites and eggs. Do this in the morning so leaves dry by evening; repeat every 3–7 days when conditions are favorable for outbreaks.
- Inspect the undersides of leaves routinely. Look for pale stippling, tiny moving specks, and fine strands near veins and petioles. Check new growth and any plant near heat vents or sunny windows first.
- Quarantine new plants. Keep newcomers separated for 10–14 days and inspect them twice. Many infestations start with an asymptomatic plant brought indoors.
- Prune and contain early hotspots. If only a few leaves are affected, remove and bag them immediately. This reduces the chance of mites “bridging” to nearby foliage with silk.
- Use gentle controls early, not late. Insecticidal soap or horticultural oil can suppress small populations when coverage is thorough, especially on leaf undersides. Apply in the cool part of the day and follow label directions; test a small area first to avoid leaf burn.
- Rotate miticides if you must use them. Repeatedly using the same active ingredient can select for resistant mites. If treatment is necessary, alternate modes of action and time applications to hit newly hatched mites (often 5–7 days apart, depending on temperature).
- Limit nitrogen spikes and overly soft growth. Heavy feeding can create tender foliage that mites prefer. Use balanced fertilizer and avoid overapplying, especially during hot, dry periods.
- Clean the growing area. Remove plant debris, wipe shelves and window sills, and control weeds nearby. Mites can persist on neglected plants and migrate back.
If you’re seeing fine threads already, combine environmental fixes (humidity, rinsing, spacing) with targeted treatment and close monitoring for 2–3 weeks. The goal is to break the life cycle before the next generation rebuilds the population and the webbing returns.