Yellow Speckles on Leaves – Mite Symptoms

 Explains why mites cause speckled leaves, how their feeding leads to discoloration, and how to tell spotting from disease. Covers where speckles show up first, how symptoms worsen over time, plus an inspection routine and steps to stop spread quickly.
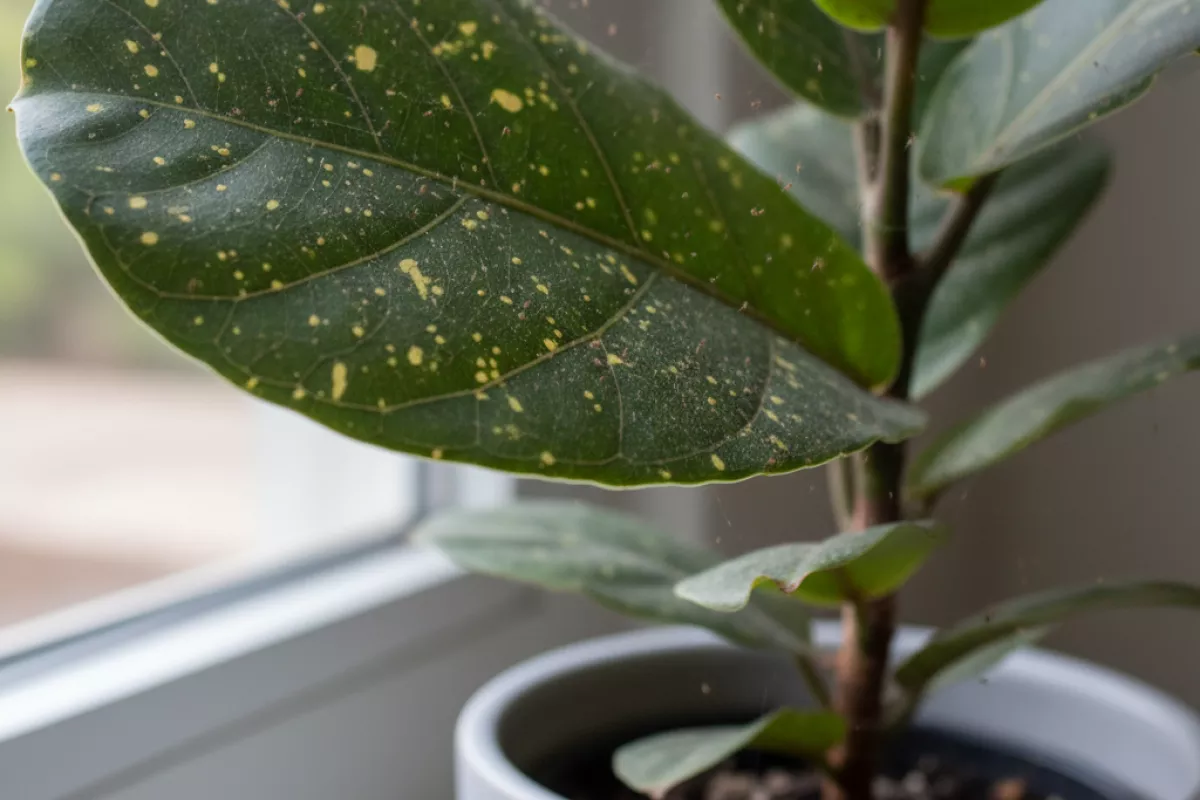
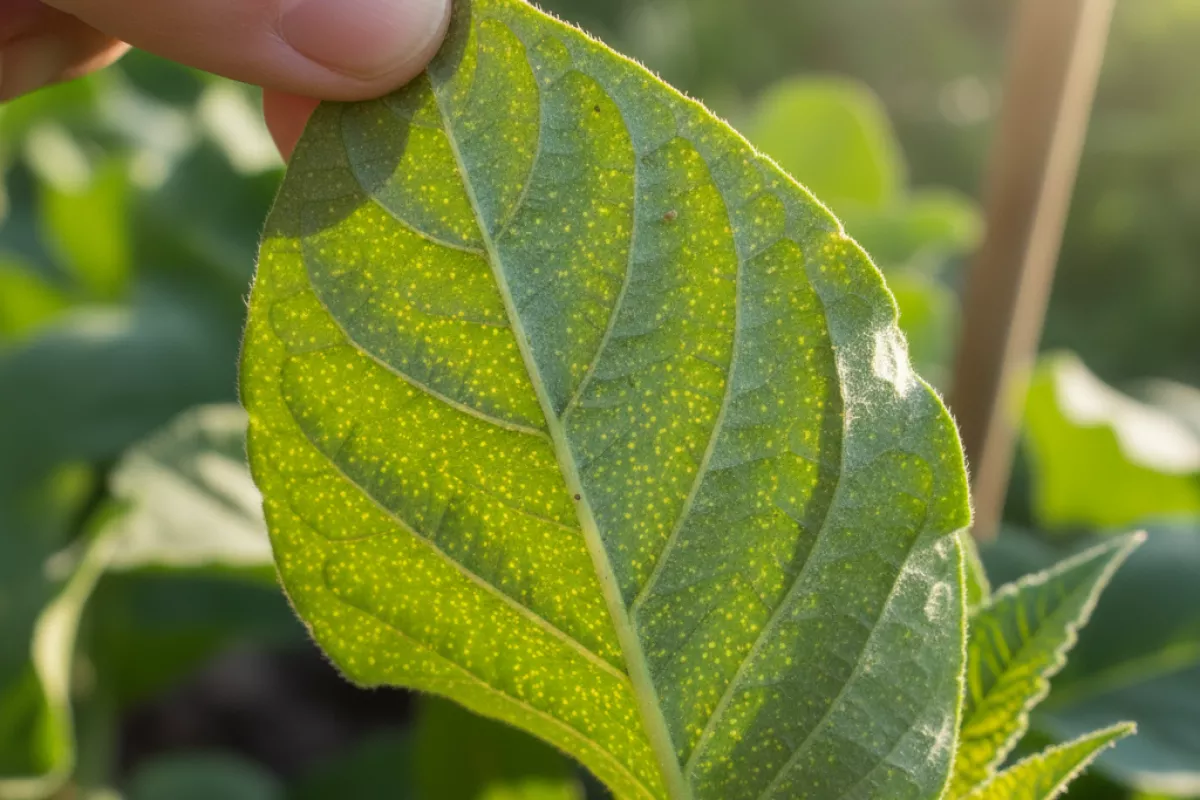
Tiny yellow flecks scattered across leaves are often an early sign of mite feeding, not a nutrient problem. Mites pierce plant cells and leave a fine, stippled pattern that spreads fast in warm, dry weather. Check the undersides of leaves and along veins for moving dots, webbing, or dusty residue. Catching it early lets you rinse foliage, isolate the plant, and treat before leaves lose color, curl, or drop.
Why mites cause speckled leaves
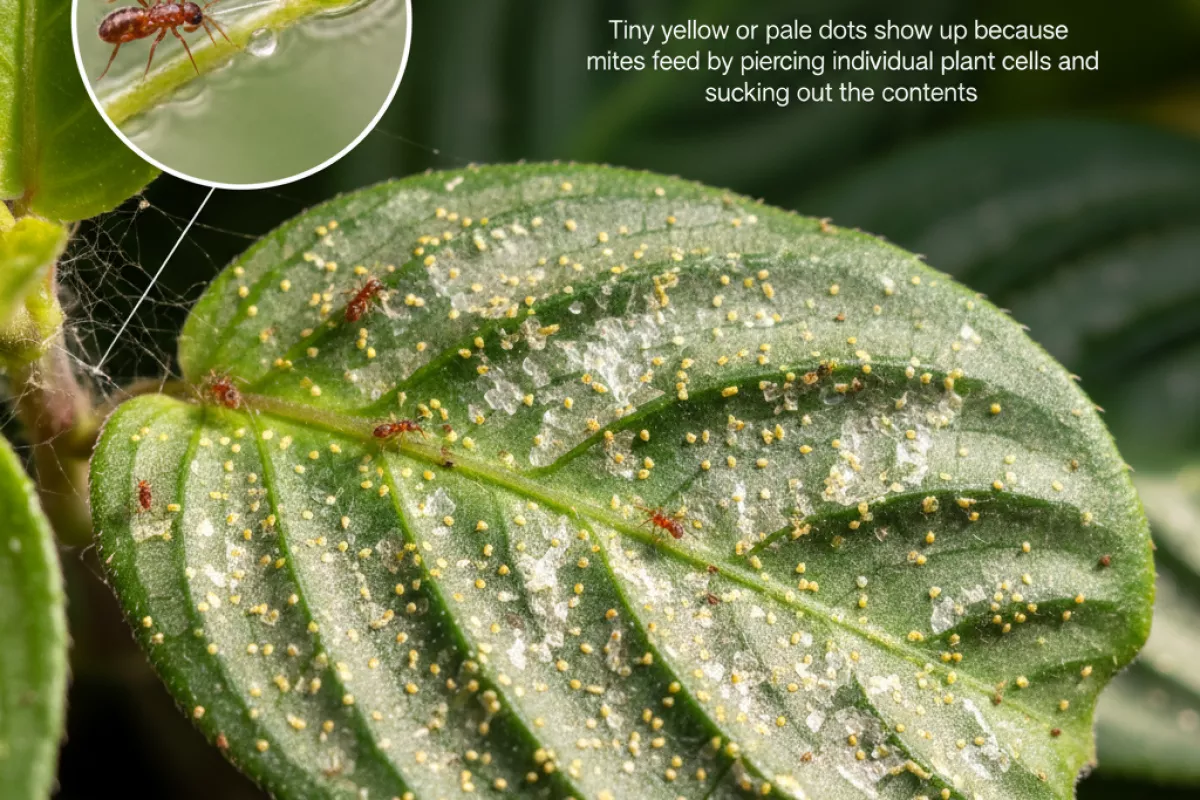
Those tiny yellow or pale dots show up because mites feed by piercing individual plant cells and sucking out the contents. Each puncture collapses a small patch of tissue, so light reflects differently from that spot. Learning the early signs of spotting spider mites makes it easier to act before stippling spreads across the leaf. At first the damage looks like fine stippling; as feeding continues, the dots merge into larger bleached areas and the leaf can start to look dull, bronzed, or silvery.
The speckled pattern is also a clue about how these pests move. They don’t chew edges like caterpillars; they spread across the leaf surface and feed in many small, scattered bites. Because mites often start on the underside, the top of the leaf may show mottling before you notice anything moving.
- Cell-by-cell injury: Mites puncture cells with needle-like mouthparts, leaving tiny pale spots where chlorophyll has been lost.
- Reduced photosynthesis: As more cells are emptied, the leaf can’t capture light efficiently, so overall color fades and growth slows.
- Patchy “constellation” look: Early feeding creates evenly scattered dots; heavy pressure turns it into blotches, bronzing, and premature leaf drop.
- Stress makes it worse: Hot, dry conditions help mite populations rise quickly and make plants less able to repair damaged tissue, so speckles appear faster and spread farther.
- Where it shows first: Many species feed mostly on the underside, so stippling often appears on upper surfaces before webbing or clusters are obvious.
As a rough guide, the more uniform and fine the stippling, the more likely it’s from sap-feeding mites rather than a nutrient issue, which tends to cause broader, more symmetrical yellowing along veins or leaf margins. If you flip the leaf and tap it over white paper, you may see tiny moving dots—often smaller than 1 mm (0.04 in)—which matches the “many small punctures” pattern you’re seeing on the foliage.
How feeding creates discoloration
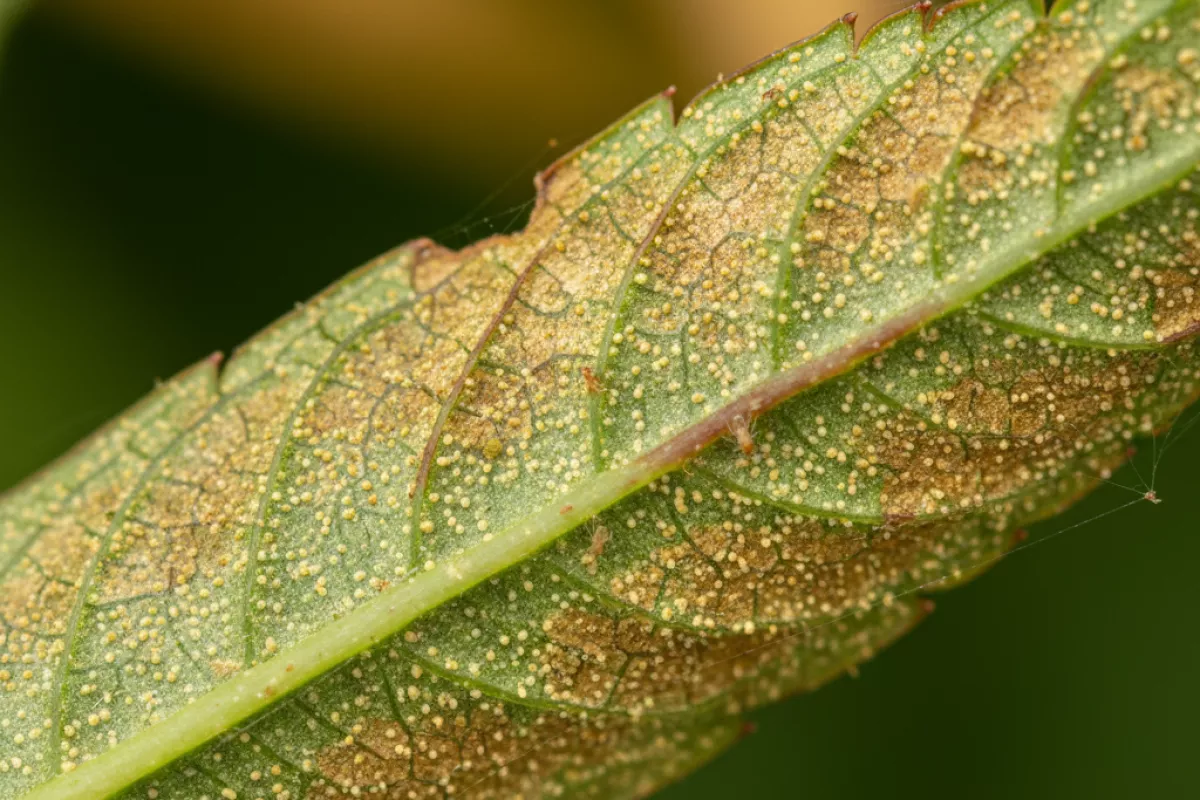
Those tiny yellow speckles show up because mites don’t chew holes; they pierce individual leaf cells and sip out the contents. Each puncture collapses a small cluster of cells, leaving a pale dot where chlorophyll is reduced or lost. When many feeding sites overlap, the leaf shifts from scattered stippling to a washed, bronzed look.
The color change is also a side effect of stressed plant plumbing. As cell walls are damaged, the leaf can’t regulate water and sugars as smoothly, so photosynthesis drops and pigments break down unevenly. That’s why the spotting often looks “salted” at first, then spreads into larger patches, especially on older leaves that have been fed on longer.
- Early stage: pinprick stippling—small, light-yellow dots that are easiest to see when the leaf is angled toward light.
- Progression: dots merge into mottled areas; the surface may look dull or slightly gray-green as more cells are emptied.
- Advanced damage: bronzing or tan patches, leaf curling, and brittle texture as the tissue dries and can’t recover.
- Where it starts: often on the undersides and along veins, then becomes visible on the top as injury accumulates.
Because the injury is cell-by-cell, the pattern tends to be evenly scattered rather than forming large, sharply defined rings or water-soaked lesions. If you’re seeing yellow speckles plus fine webbing or dusty-looking undersides, that combination fits mite feeding particularly well.
Difference between spotting and disease
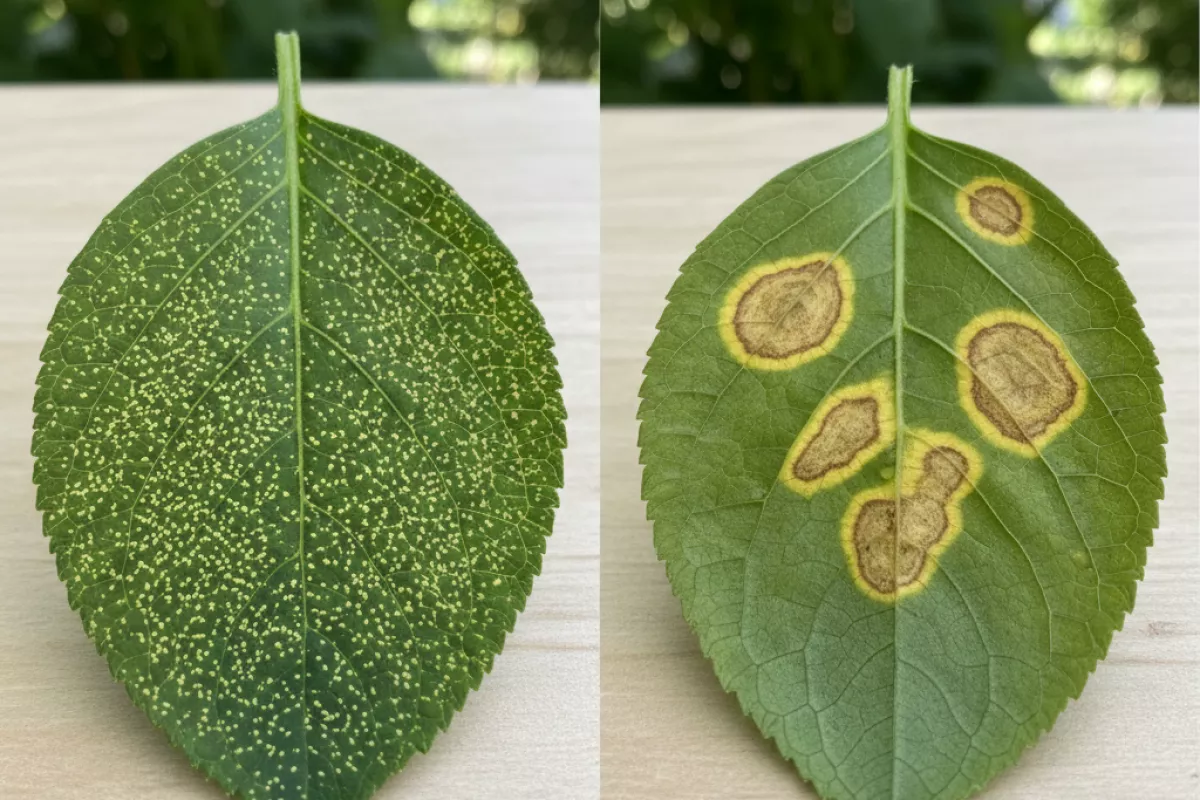
Not every yellow fleck on a leaf is an infection. Mite feeding usually creates a fine, scattered “stippling” pattern, while many diseases cause larger, more defined lesions that follow a predictable shape or spread. Comparing this with how brown spots on leaves typically develop makes it easier to separate pest damage from true disease. Looking closely at the pattern, the leaf surface, and how fast symptoms move through the plant will usually tell you which direction to investigate.
| What you observe | More typical of mite damage (spotting/stippling) | More typical of disease (fungal/bacterial/viral) |
|---|---|---|
| Spot size and layout | Many tiny yellow specks, often evenly peppered; can merge into a pale, washed look | Larger spots or blotches; often have a consistent shape (round, angular, ringed) |
| Edges of the marks | Soft, diffuse edges; looks like the color is “drained” from cells | Sharper borders; may show halos, concentric rings, or a dark outline |
| Where it starts on the plant | Often begins on older leaves and the underside; can be worse on stressed, dry plants | Can begin anywhere; often tied to splashing water, wounds, or high humidity pockets |
| Leaf surface feel | Usually dry; may feel slightly rough from cell collapse but not slimy | May develop wet-looking patches, soft tissue, or a greasy sheen (especially bacterial) |
| Underside clues | Fine webbing, tiny moving dots, shed skins, or speck-like droppings | Spore-like dust, fuzzy growth, or no pests present at all |
| How it spreads | Gradual worsening where mites are feeding; new specks appear as populations grow | Can spread rapidly after rain/overhead watering; may jump leaf-to-leaf in patterns |
| Color changes over time | Yellow speckling → bronzing/coppering → dry, crisp leaf drop in severe cases | Yellowing around lesions → browning/blackening; tissue may tear out (“shot holes”) on some plants |
| Simple check you can do now | Tap a leaf over white paper; tiny specks may crawl (a hand lens helps) | Look for patterned lesions and moisture-related symptoms; isolate if you suspect infection |
- One plant, one leaf can show both. Mites can weaken tissue and make secondary infections more likely, so you may see stippling alongside true leaf spots.
- Don’t rely on color alone. Yellow marks from feeding, nutrient issues, or sun stress can look similar at a glance; the underside inspection is often the tie-breaker.
- When in doubt, check the newest growth. Many infections distort or spot new leaves early, while mite symptoms often build first on older foliage before moving upward.
Where speckles usually appear first
Early mite feeding marks tend to show up in the spots that are easiest for tiny pests to reach and stay hidden. On thick-leaved ornamentals like Acanthus mollis, stippling often appears later and stays more localized because tougher tissue slows feeding damage. On many plants, that means the undersides of leaves and areas with a bit of shelter from wind, rain, or overhead watering. The yellow flecks are usually most noticeable when you tilt the leaf and look across it in good light, because the damage is a fine, pinprick “stippling” rather than a single large blotch.
- Underside of the leaf blade (especially near the midrib and veins): Mites often feed from below, so the top surface may look lightly speckled while the underside has more activity (and sometimes faint webbing).
- Leaf margins and tips: Edges dry out faster and can show pale dots first, particularly on plants under heat or low humidity stress.
- Older, lower leaves on many houseplants: Damage can start on mature foliage that’s been exposed longer. On some species, you’ll see the lowest leaves fade and stipple before the newest growth looks affected.
- New, tender growth on certain plants: Some mites prefer soft tissue; in that case, check the newest leaves, folded tips, and tight growth points where they can hide.
- Leaves closest to a heat source or sunny window: Warm, dry microclimates (near radiators, vents, or glass) can be the first place populations build, so speckles may cluster there before spreading.
- Dense inner canopy: Crowded foliage reduces airflow, giving mites a protected zone; stippling may appear inside the plant before you notice anything on the outer leaves.
If you’re trying to confirm the pattern, compare a leaf from the “suspect” area with one from a cooler, shadier part of the plant. Mite-related stippling often looks more concentrated in patches rather than evenly across every leaf, and it commonly starts on one side of the plant before it becomes widespread.
How symptoms progress over time

Early mite feeding is easy to miss because the plant still looks “mostly fine” at a glance. The first clue is usually faint, scattered yellow speckling (stippling) on the upper leaf surface as cells are punctured and drained. If you flip the leaf over, you may see tiny moving dots, pale shed skins, or a dusty look along veins before the damage on top becomes obvious.
| Stage | What you’ll notice on leaves | What’s happening | Common triggers that speed it up |
|---|---|---|---|
| Early (days to 1–2 weeks) | Light, pinprick yellow dots; subtle dulling; damage is patchy and easy to overlook | Small groups feed on individual cells, creating tiny chlorotic spots | Warm, dry indoor air; stressed plants (underwatered or root-bound) |
| Building (1–3 weeks) | Speckles merge into larger pale areas; leaves start to look “washed out”; slight edge curl may appear | Feeding expands across the leaf; chlorophyll loss becomes more uniform | Heat above about 27°C (81°F); low humidity; crowding that reduces airflow |
| Heavy (3–6+ weeks) | Bronzing or silvery cast; crisping at tips; older leaves yellow and drop; fine webbing may show near petioles or leaf undersides | High populations overwhelm the leaf’s ability to photosynthesize; tissue begins to die back | Neglected infestations; repeated drought cycles; dusty foliage |
| Decline / plant-wide impact | Stunted new growth; distorted leaves; buds may abort; overall thinning canopy | Energy loss and water stress compound; mites spread to fresh growth | Continued hot, dry conditions; nearby infested plants acting as reservoirs |
Progress isn’t always linear. A plant can look stable for a week, then worsen quickly after a hot spell or a missed watering. Because mites reproduce fast, the jump from “a few speckles” to widespread discoloration can happen in the time it takes a new leaf to unfurl.
- Where it starts: damage often begins on older, lower leaves or the most sun-exposed leaves, then moves upward as populations grow.
- What changes first: color shifts usually appear before leaf drop; shedding is a later sign that the leaf is no longer worth supporting.
- What can confuse you: nutrient issues tend to create more predictable patterns (like between veins), while mite stippling looks like random “spray paint” dots that gradually merge.
- When webbing shows up: visible silk is typically a late indicator; many plants have significant feeding damage before you see any threads.
If you’re monitoring, compare the same leaves every 2–3 days (48–72 hours). New speckles appearing in fresh areas, increasing pale patches, or a shift from yellow stippling to bronzing are all signs the problem is actively advancing rather than leftover damage.
Inspection routine for early detection
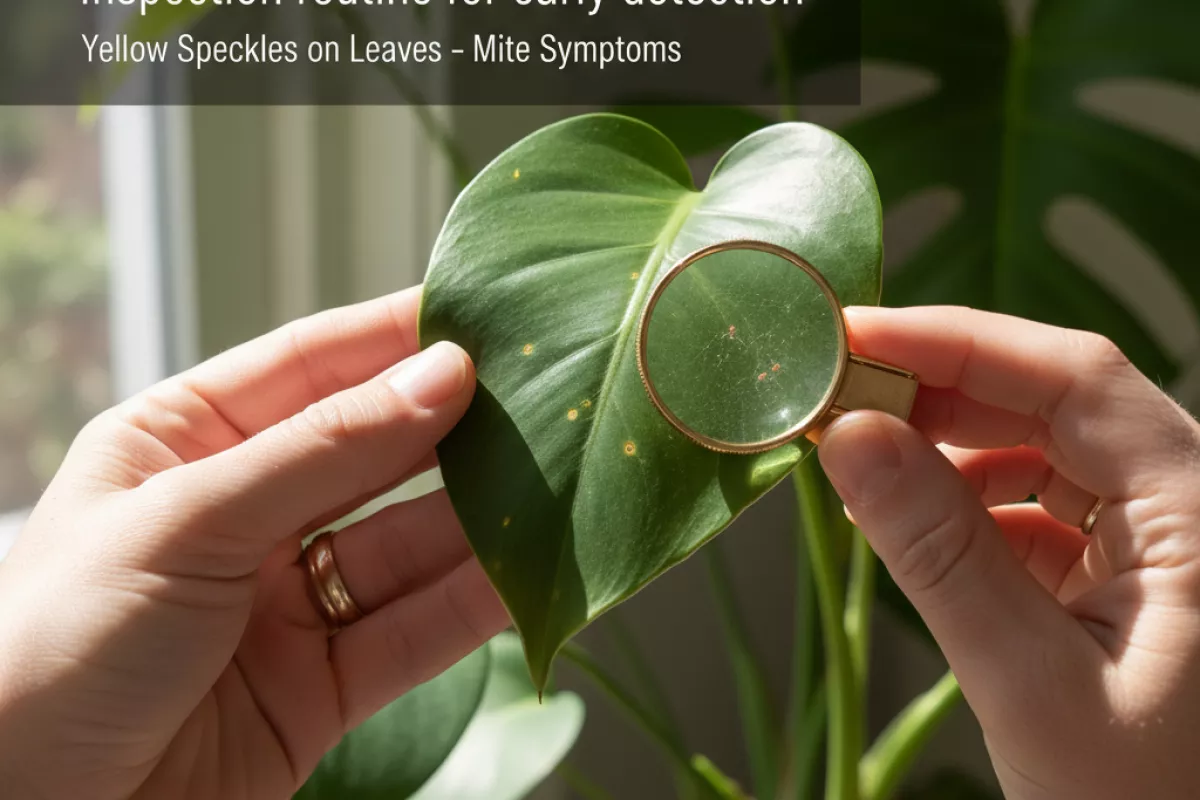
Catch mites before the leaf surface turns noticeably stippled by checking plants on a predictable schedule and looking in the places they prefer to hide. The goal is to spot the first pale pinpricks, fine webbing, or moving dots on the undersides—signs that often appear days before widespread yellow speckles show up from a distance.
- Set a simple cadence.
- Inspect once per week under normal conditions.
- Increase to every 3–4 days when it’s warm and dry (a common trigger for faster mite buildup).
- Check new plants and cuttings for 2 weeks after bringing them home or moving them indoors.
- Start with a quick whole-plant scan.
- Look for dull, “sandblasted” areas, scattered pale dots, or bronzing on older leaves first.
- Notice any uneven fading between veins; this can be an early clue before leaves yellow broadly.
- Flip leaves and focus on the underside.
- Check 5–10 leaves per plant, including a few from the lower canopy and a few near new growth.
- Pay extra attention to leaf edges, midrib areas, and where the leaf meets the petiole—mites often cluster there.
- Use a light and magnification.
- A hand lens around 10×–20× is ideal for seeing eggs and tiny nymphs.
- Shine a flashlight across the leaf at a low angle; webbing and stippling stand out more with raking light.
- Do the “tap test” over white paper.
- Hold a sheet under a suspect leaf and tap the leaf firmly.
- Look for tiny moving specks on the paper; a toothpick can help confirm movement.
- Check the plant’s microclimate.
- Feel the soil surface and note airflow; stressed plants and stagnant air can make symptoms show faster. Using tools that help monitor moisture accurately also helps reveal watering stress that accelerates mite damage.
- Watch for heat sources (radiators, sunny windows) that create hot spots, especially above 25°C (77°F).
- Record what you see.
- Take a close photo of the underside and a wider shot of the whole plant each week.
- Mark which leaves show the first flecks so you can tell if damage is spreading or staying localized.
| What to check | What it can tell you |
|---|---|
| Underside stippling (tiny pale pinpricks) | Early feeding damage; often appears before upper-surface yellow speckles are obvious. |
| Fine webbing between veins or at leaf edges | Population is building; webbing usually means the issue is no longer “just starting.” |
| Tap test on white paper | Confirms active mites (moving dots) versus old damage or nutrient-related discoloration. |
| Newest growth vs. oldest leaves | Helps separate patterns: mites commonly start on older leaves, while some deficiencies show first on new growth. |
| Hot, dry pockets (near glass/heaters, low humidity) | Higher risk zones where mites reproduce faster and symptoms expand quickly. |
If you find only a few affected leaves, isolate the plant and re-check in 48–72 hours (2–3 days). A fast change in the number of speckled leaves or the appearance of webbing is your cue that the infestation is accelerating and needs a response rather than “wait and see.”
Steps to stop spread quickly

Act early: mites multiply fast, and the yellow speckling you’re seeing is leaf tissue being punctured and drained. The goal is to reduce the population immediately, prevent hitchhiking to nearby plants, and make the environment less favorable so they don’t rebound.
- Isolate the plant right away.
Move it away from other plants (ideally to another room or at least 1–2 m (3–6 ft) apart). Mites spread by contact, air currents, and your hands/tools.
- Confirm it’s mites (not nutrient issues).
Check the underside of leaves for tiny moving dots and fine webbing near veins and petioles. Tap a leaf over white paper; if you see pepper-like specks crawling, you’re dealing with mites.
- Rinse and physically remove as many as possible.
Use a firm lukewarm shower or hose spray aimed at the underside of leaves. This alone can knock down a large portion of the population. Let the plant drain well so the pot doesn’t stay waterlogged.
- Prune the worst-hit foliage.
Remove heavily stippled, bronzed, or webbed leaves and bag them before disposal. Don’t compost them. This reduces both mites and eggs concentrated on damaged tissue.
- Apply a targeted treatment and cover all leaf surfaces.
Use insecticidal soap or horticultural oil, making sure to wet the undersides thoroughly (where mites feed). Avoid spraying in strong sun or on heat-stressed plants to reduce leaf burn. If the plant is sensitive, test on a small area first and wait 24 hours.
- Repeat on a schedule to catch new hatchlings.
Because eggs can survive initial sprays, repeat treatment every 3–4 days for 2 weeks (or follow the product label). Consistency matters more than “stronger” doses.
- Raise humidity and reduce heat stress (when appropriate).
Spider mites thrive in hot, dry conditions, but plants weakened by excess moisture recover more slowly. Using an overwatering calculator helps balance moisture so plants aren’t stressed from either extreme. Good airflow helps plants, but avoid blasting fans directly at the plant while it’s infested, since that can help mites disperse.
- Clean the surrounding area and your tools.
Wipe shelves, windowsills, and pot rims; wash saucers; and clean pruners. Launder nearby plant cloths or ties. This reduces stragglers that can restart the problem.
- Monitor and only reintroduce when it’s quiet.
Inspect twice weekly for at least 3 weeks. No new speckling, no webbing, and no moving dots on the paper-tap test are good signs before moving it back.
If you’re seeing webbing across multiple stems or rapid leaf drop, treat it as a heavier infestation: combine rinsing plus a repeatable spray plan, and consider discarding severely affected plants to protect the rest of your collection.