Tiny Red Mites on Plants – How to Confirm

 Covers what tiny red mites look like, where they show up on plants, and the movement patterns that confirm them. Explains how to tell them from dust or debris, simple magnification tricks, damage signs that support the diagnosis, and when to act immediately.
If you notice tiny red specks moving on leaves or around pots, first confirm they are mites and not dust or harmless insects. A close look with a magnifier, a gentle tap over white paper, and checking for fine webbing or stippled leaf damage can help you identify them early. Verifying the pest before treating prevents wasted effort and protects plants from worsening damage.
What tiny red mites look like
On plants, these specks usually show up as moving dots rather than obvious “bugs.” You’ll often notice the damage first (fine stippling, dulling, or bronzing), then spot the mites when you look closely at the undersides of leaves and along tender stems.
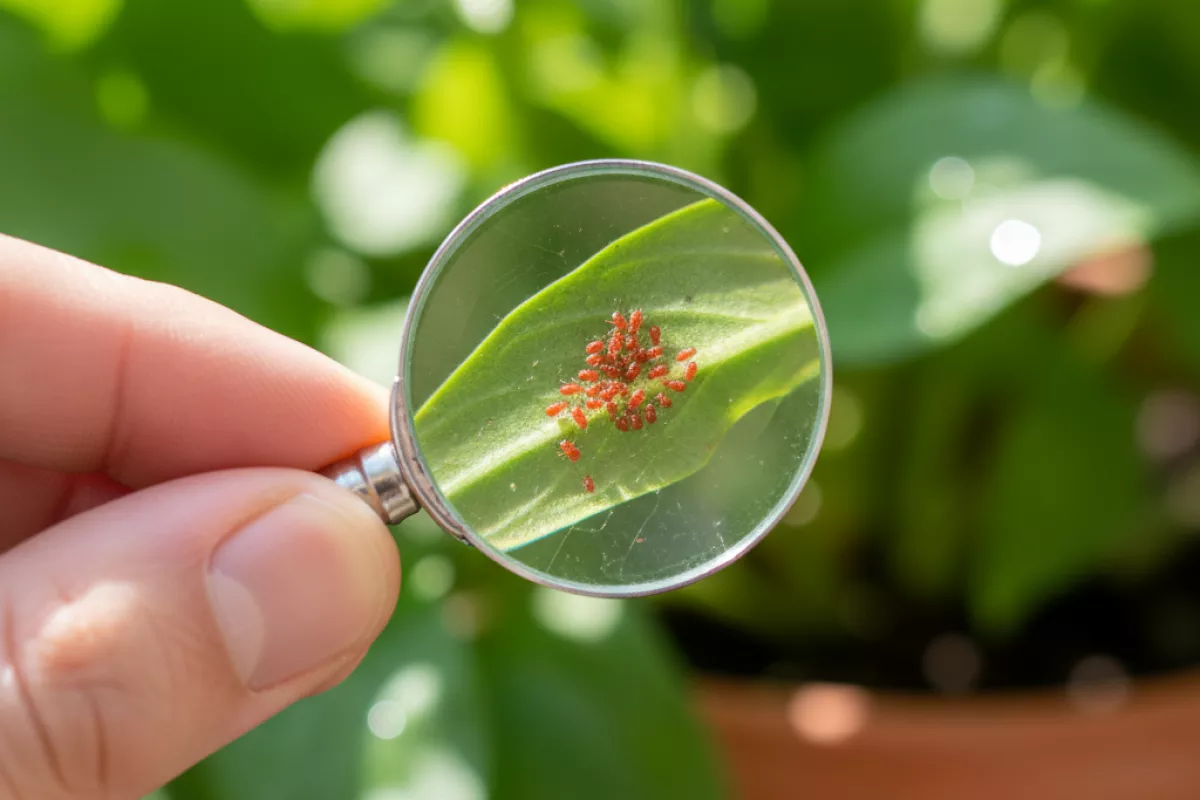
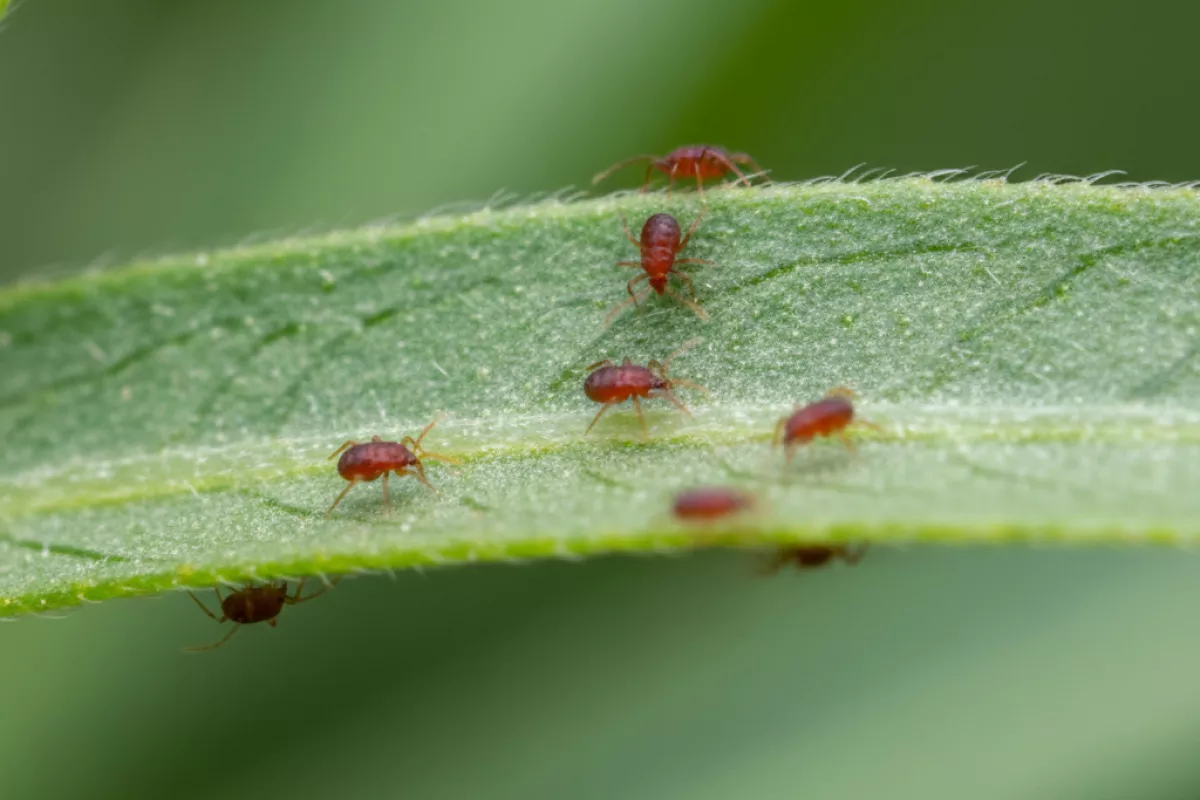
- Size: Very small—typically under 1 mm (0.04 in). Many look like pinpoints until you use a hand lens.
- Color: Bright red to rusty red; some appear more orange-red depending on age and what they’ve been feeding on.
- Body shape: Oval or slightly teardrop-shaped, with a smooth, rounded look from a distance.
- Legs and movement: Eight legs (as arachnids), with a slow, steady crawl. If you tap a leaf over white paper, you may see tiny red dots walking around.
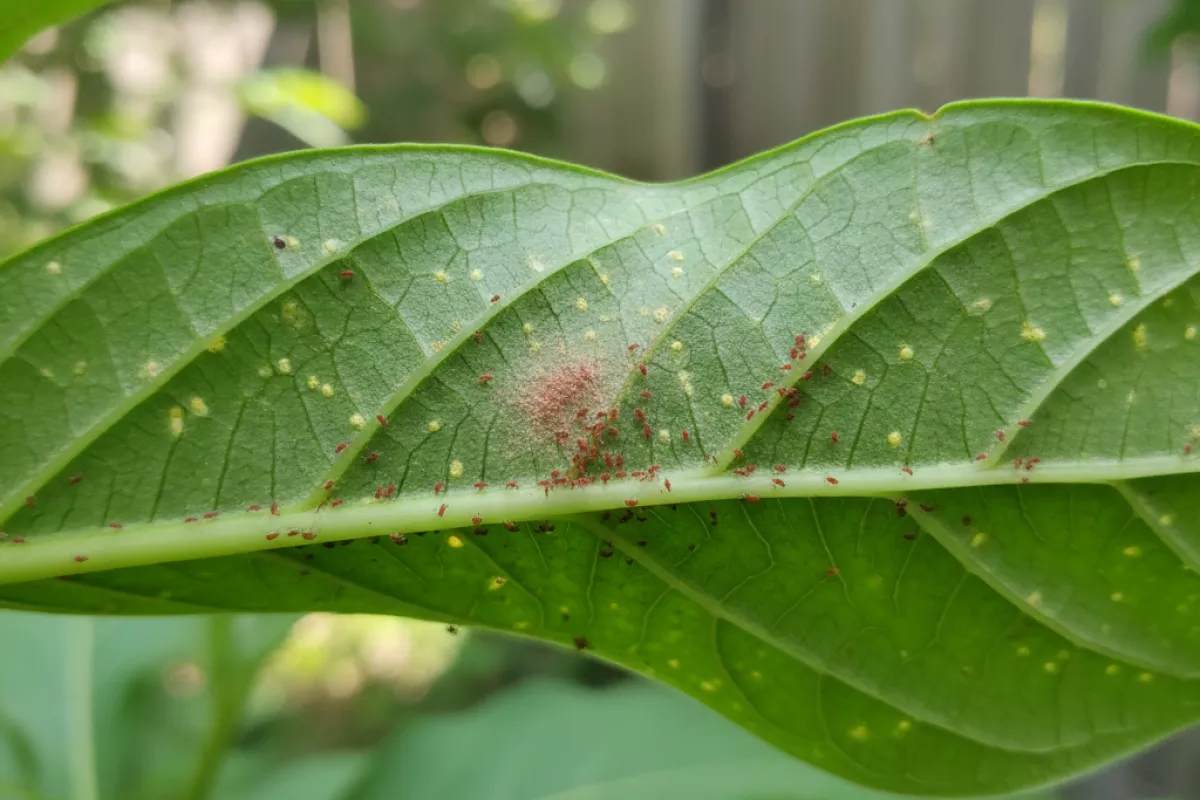
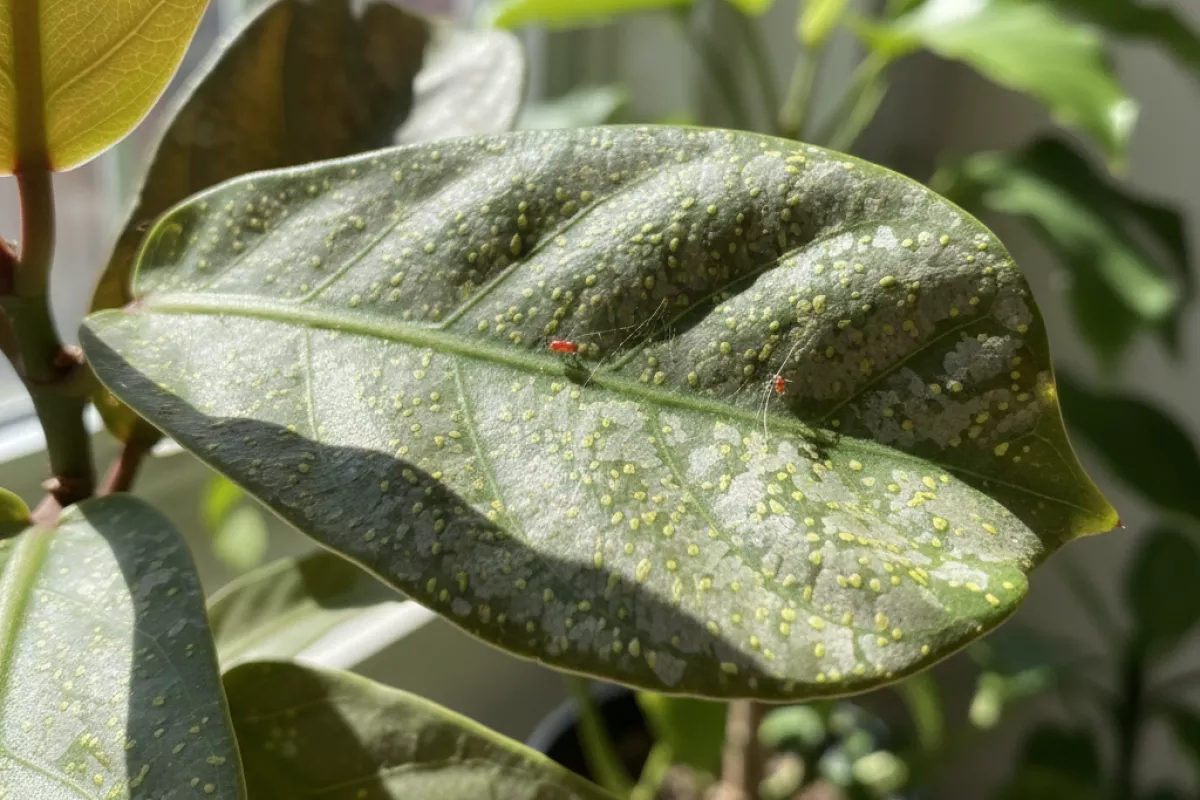
- Where they cluster: Most gather on the leaf underside, near veins, in leaf folds, and where leaves meet stems. Heavy infestations can spread to petioles and young shoots.
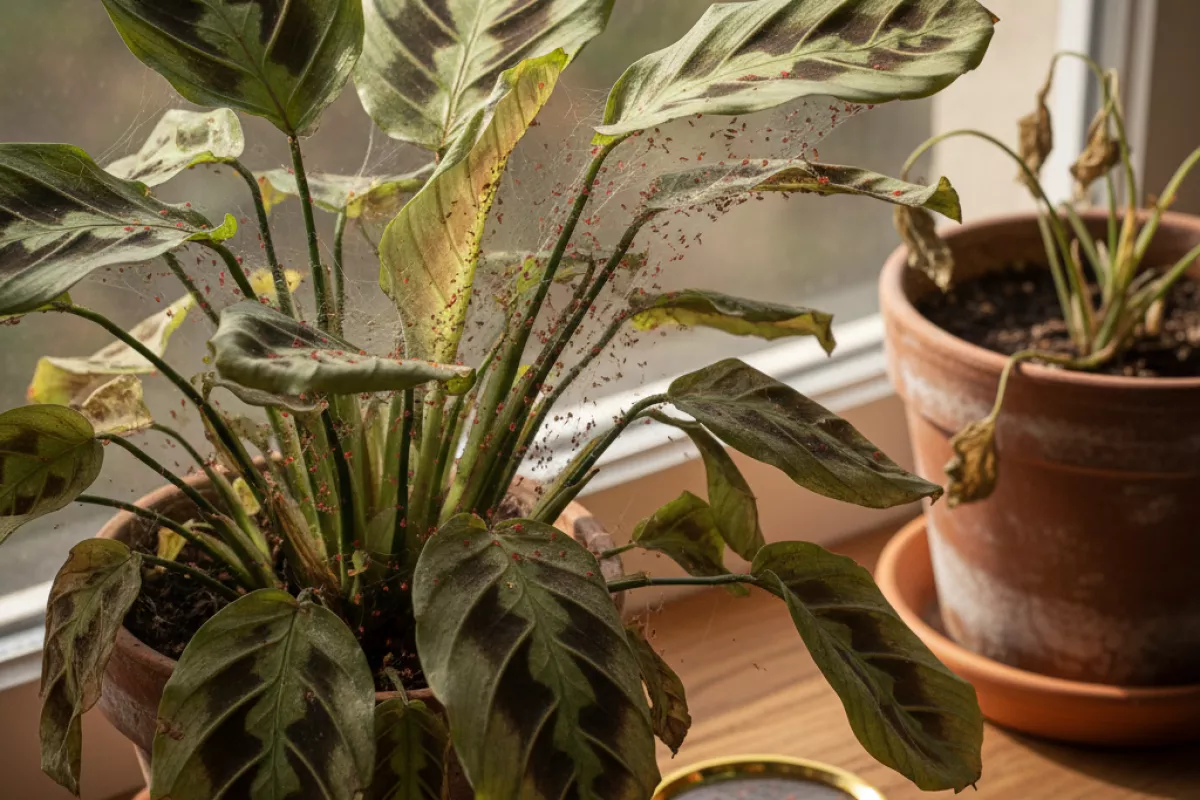
- Webbing (sometimes): Some plant-feeding mites produce very fine silk. It can look like a faint haze between leaf edges or across new growth, especially when populations are high.
- Eggs: Tiny, round, and often translucent to pale; they’re usually tucked along veins or protected crevices. Without magnification, eggs can look like dust.
It’s easy to confuse plant mites with other tiny red critters. For example, clover mites tend to wander on walls and pots and look like fast-moving red dots, while many spider mites stay tight to foliage and leave that “sandblasted” speckling on leaves. If the red specks are consistently on the plant (not just nearby surfaces) and you see leaf stippling or faint webbing, you’re likely dealing with mites feeding on the plant tissue.
Where to find them on plants
These mites don’t wander randomly; they cluster where feeding is easiest and where they’re protected from wind, rain, and casual inspection. If you’re trying to confirm what you’re seeing, focus on sheltered plant surfaces first, then work outward to more exposed areas.
- Undersides of leaves (especially along the midrib and veins): This is the most common hiding and feeding zone. Flip leaves over and look for tiny moving dots, pale stippling, or faint dusty patches that smear when rubbed.
- Leaf edges and folds: Curled margins, cupped leaves, or any natural crease can shelter a small colony. Pay attention to new distortions where the leaf tissue stays slightly tucked.
- New growth and tender tips: Soft, fresh tissue is easier to pierce. Check the newest leaves at the top of stems and the growing points where leaves emerge tightly packed.
- Where leaves meet stems (nodes) and petiole bases: The “junction” areas act like little overhangs. Use a bright light and look around the base of the leaf stalk and the stem just behind it.
- Flowers and buds: Some red mite species and look-alikes gather around buds, sepals, and the backs of petals. Inspect the outer surfaces first, then gently part the bud scales if the plant tolerates it.
- Fine webbing zones: If you see delicate threads, check the webbed area and the nearest leaf undersides. Webbing often forms between leaf tips and stems or between adjacent leaves.
- Hot, dry microclimates on the plant: Leaves closest to a warm wall, a sunny window, or a heat vent tend to show activity sooner. On outdoor plants, this can be the side facing a reflective surface like concrete.
- Lower, older leaves (for early “tell” damage): Even if the mites prefer newer growth, older leaves can show the first obvious stippling or bronzing. Use those symptoms as a map to decide where to inspect more closely.
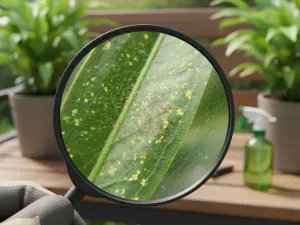
If you’re not spotting anything, try a simple “tap test”: hold a sheet of white paper under a suspect leaf and tap the leaf sharply. Tiny red specks that crawl on the paper are easier to see than on the plant. For a closer look, a hand lens around 10× to 20× magnification helps you distinguish mites from red pollen or dust.
Movement patterns that confirm mites
How the tiny red specks move can tell you a lot. Most plant-feeding mites don’t behave like fast, purposeful insects; they tend to creep, pause, and hug the surface of a leaf, especially along veins and in sheltered spots. Watching for 30–60 seconds is often enough to separate “living pest” from dust, pollen, or mineral residue.
- Slow, steady crawling rather than jumping: Mites typically move like a tiny dot gliding or creeping. If the speck suddenly springs away, you’re more likely looking at a flea, springtail, or another jumper.
- Edge- and vein-following: Many mites track along leaf veins, midribs, and the underside edges where the surface is protected. Random, open-area wandering is less typical when they’re feeding.
- Stop-and-go behavior: They often pause for a moment, then continue, especially when disturbed by airflow or a gentle tap on the leaf.
- Clustering in “hot spots”: You may see multiple specks moving in the same small area, particularly on stressed leaves or near fine webbing. Uniform distribution across the whole plant is less common.
- Reaction to light and disturbance: A quick shift away from a bright light or a finger shadow can happen, but it’s usually a subtle change in direction, not a rapid sprint.
- Surface-hugging movement: They tend to stay in contact with the leaf and rarely lift off. If the speck is blown away easily or floats, it’s more likely debris.
A simple check is to use a white sheet of paper and tap a leaf over it. Wait about 10–20 seconds (10–20 s) and look closely: living mites will start to crawl; dust stays put. If you have a hand lens, aim for around 10×–20× magnification (10×–20×) and watch whether the dot changes direction on its own rather than sliding when the paper moves.
One caution: some red “mites” people notice are actually clover mites that wander indoors and onto plants. They can still crawl slowly, but they’re more often seen traveling across pots, windowsills, or walls instead of staying tucked under leaves to feed. If the movement is mostly on hard surfaces with little leaf damage, consider that possibility before treating the plant aggressively.
How to distinguish them from dust or debris
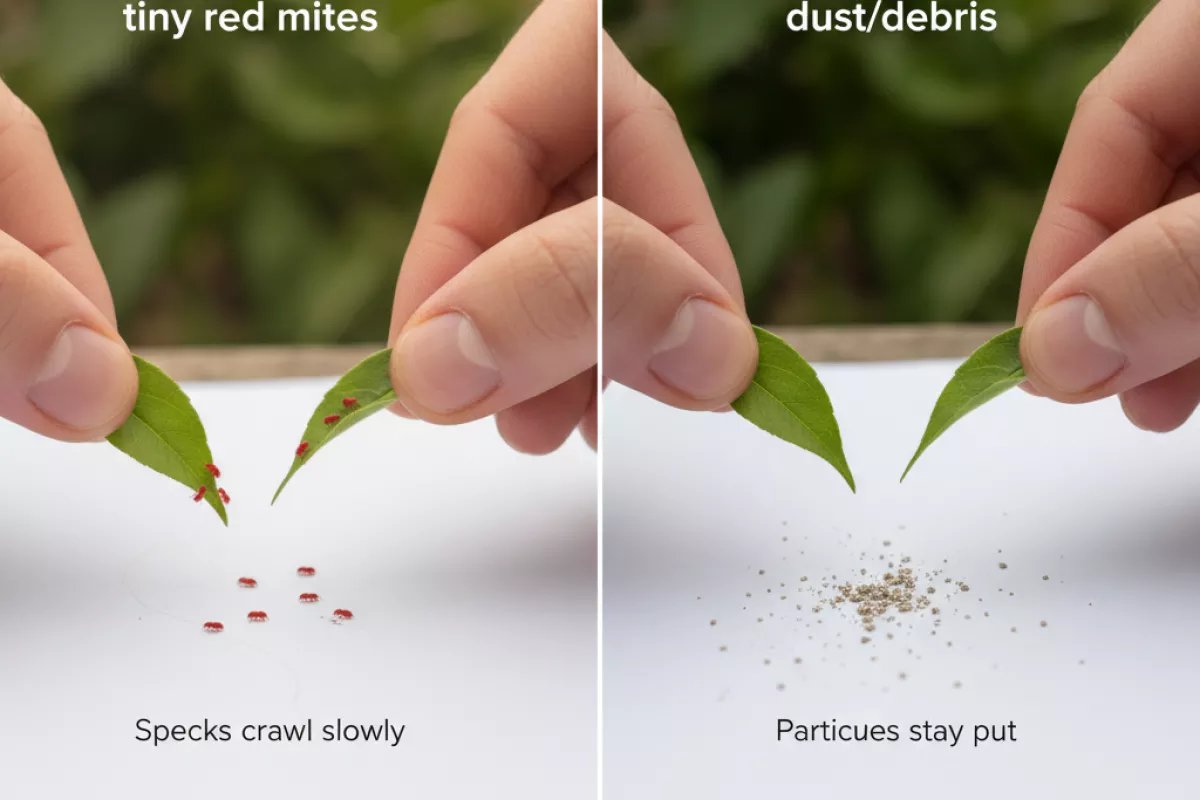
Start by checking for behavior. True mites are living specks: they shift position, cluster in protected spots, and leave subtle plant symptoms behind. Dust and grit, on the other hand, tend to sit where they land and look the same day after day unless you wipe or water them off.
| Quick check | What you’ll see with tiny red mites | What you’ll see with dust/debris |
|---|---|---|
| Movement test (white paper) | Tap a leaf over white paper; specks crawl slowly within 10–30 seconds | Particles stay put or shift only when the paper moves |
| Smear test (finger or cotton swab) | Often leaves a faint reddish/orange streak (crushed bodies/pigment) | Usually gray/brown; wipes away as powder with no “squish” feel |
| Magnification (10×–30×) | Oval body with legs; may look like a tiny moving dot with “edges” | Irregular shapes, fibers, or grains; no legs or consistent body shape |
| Where it collects | Leaf undersides, along midribs/veins, at nodes, in tight creases | Top surfaces, flat areas, pot rims, shelves—wherever air settles particles |
| Plant clues nearby | Fine stippling, dulling, bronzing, tiny pale dots; sometimes faint webbing | No consistent feeding damage; plant looks normal aside from “dirty” film |
| Rinse test | After a firm spray, some return within 24–72 hours as they re-climb or hatch | Rinsing removes most; it doesn’t “come back” unless more dust settles |
- Try a controlled wipe: Wipe a small patch of leaf with a damp cloth. If the red specks reappear in the same protected areas within 1–3 days, you’re likely dealing with a living pest rather than settled grit.
- Look for patterns, not just specks: Mites usually show up in clusters or along veins; random, evenly scattered dots across every surface often point to airborne debris.
- Use angled light: Shine a flashlight at a low angle across the leaf. Dust shows as a uniform “sheen,” while mites tend to appear as distinct points, sometimes with slight shadowing as they move.
- Check nearby surfaces: If the same red particles are equally heavy on shelves, windowsills, and pot edges, it may be environmental dust. If it’s concentrated on plant tissue (especially undersides), that supports a mite ID.
If you’re still unsure, repeat the paper-tap test twice in the same spot: once immediately, then again the next day. Dust won’t “repopulate,” but tiny red mites often will—especially on warm, dry plants kept around 20–27°C (68–81°F).
Magnification tricks for identification

To tell tiny red mites from lookalikes, you usually need more than a quick glance. The goal is to get enough enlargement and stable light to see body shape, leg length, and whether you’re looking at a plant-feeding spider mite or something harmless that just wandered onto the leaves.
- Start with the easiest “magnifier” you already have: your phone. Use the rear camera, tap to focus on the mite, and add light from the side (a desk lamp works). If your camera struggles, move the phone slightly farther away and zoom in digitally rather than pushing too close.
- Use a jeweler’s loupe (10×) or a clip-on macro lens (10×–20×) for quick checks. At this range you can often separate “red specks” (dust, pollen) from living mites by watching for leg movement and a consistent oval body.
- Step up to 30×–60× for confident ID. A simple handheld microscope or USB scope in this range makes it much easier to see whether the mite has the classic spider-mite look (rounded body, eight legs, often found on leaf undersides) versus a clover mite (very long front legs) or a predatory mite (more teardrop-shaped and fast-moving).
- Stabilize everything. Rest your hands on the pot rim or a table, or brace the loupe against the leaf. Even a few millimeters of shake can blur a creature that’s only about 0.3 mm (0.012 in) long.
- Light from the side, not from straight above. Raking light creates tiny shadows that reveal legs and body outline. If you can, diffuse harsh light with a thin white paper or tissue held near (not touching) the plant.
- Check the underside of leaves and along veins. Plant-feeding mites often cluster where they can pierce tissue easily. If you only ever see red dots on the top surface, you may be looking at debris or hitchhikers rather than an active infestation.
- Use the “white paper test” as a pre-screen. Tap a leaf over white paper, then examine what falls with your magnifier. Living mites will crawl; dust won’t. If you see smears, note the color: spider mites often leave a greenish-brown streak, while some red mites can leave a reddish smear.
| Tool / setup | What it’s best for | What you can realistically see |
|---|---|---|
| Phone camera + bright side light | Confirming “alive vs. speck” quickly | Movement, general body outline; limited leg detail unless very steady |
| 10× loupe or 10×–20× clip-on macro | Fast screening on the plant | Oval body vs. irregular debris; some leg visibility; easier to spot clusters |
| 30×–60× handheld/USB microscope | More reliable identification | Leg length differences, body shape, and behavior (slow feeder vs. fast predator) |
| Clear tape lift on a slide (viewed at 30×–60×) | Holding a moving mite still | Sharper view of legs and outline; reduces “they won’t stop moving” frustration |
If you’re trying to confirm spider mites specifically, look for a combination of clues under magnification: mites concentrated on leaf undersides, fine stippling on the leaf surface, and sometimes wispy webbing between veins or at leaf joints. Webbing can be subtle early on, so don’t rely on it as the only sign.
One practical tip: take a short video through the loupe or microscope instead of a single photo. A 5–10 second clip makes it easier to catch leg motion and speed, which are often more diagnostic than color alone.
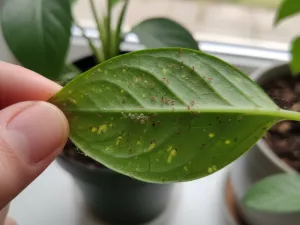
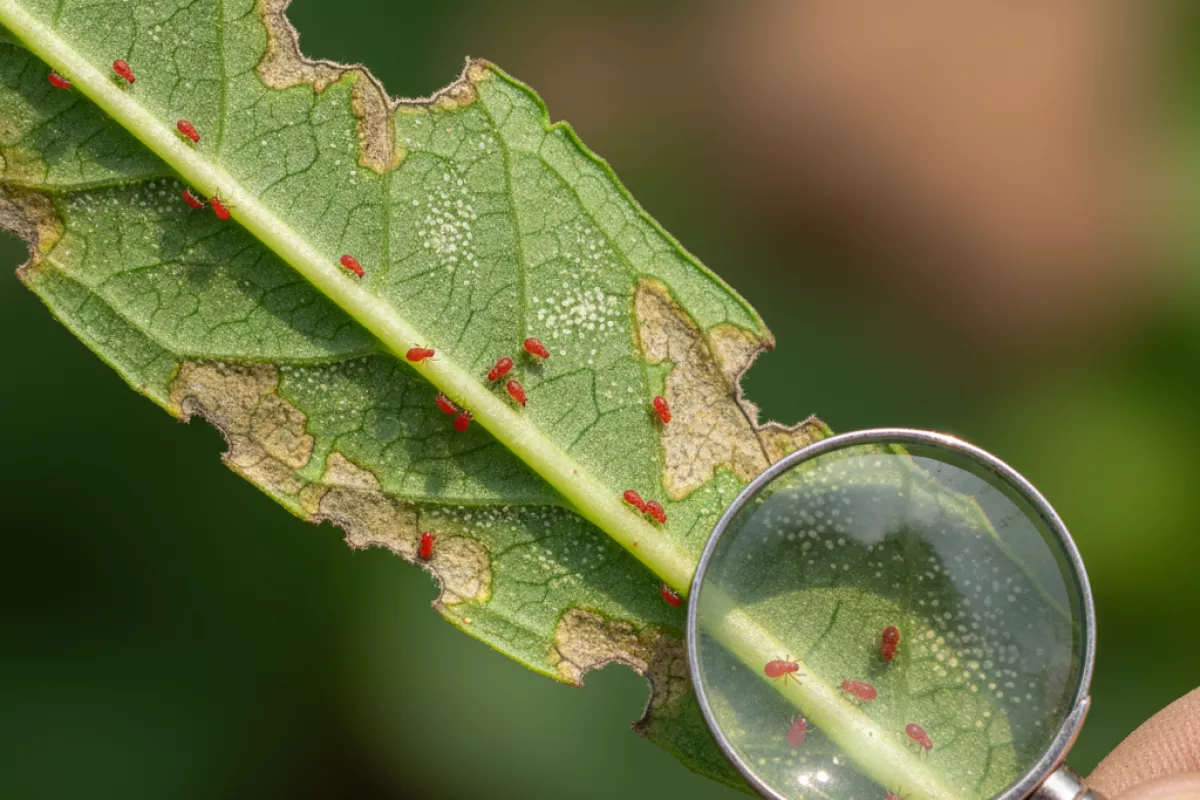
Damage signs that support diagnosis
Look at the plant first, then the tiny red specks. Feeding patterns and where symptoms show up can tell you whether you’re dealing with plant-feeding mites (like spider mites/clover mites) versus harmless hitchhikers or predatory mites that aren’t causing the problem.
- Fine stippling on leaves: Tiny pale dots that gradually merge into a washed-out, silvery, or “sandblasted” look. This is classic sap-sucking injury and often shows up before you notice the mites.
- Bronzing or dulling: Leaves lose their healthy sheen and take on a bronzed, coppery, or gray cast, especially on sun-exposed surfaces.
- Damage starts on the underside: Many plant-feeding mites concentrate under leaves along the midrib and veins. Flip leaves over and check those sheltered areas with a bright light.
- Webbing in leaf joints: Very fine silk threads between petioles, leaf veins, or buds point strongly toward spider mites. Early webbing can look like a thin haze or a few strands rather than thick “cobwebs.”
- Leaf curl and distortion on new growth: Tender tips may twist, cup, or stay smaller than normal when mites feed near buds and soft tissue.
- Premature leaf drop: When populations build, stressed leaves yellow and fall earlier than expected, even with normal watering.
- Patchy pattern that matches hot, dry zones: Symptoms often concentrate near warm windows, heaters, or the driest parts of a greenhouse/bed—conditions that favor outbreaks.
- Speckling plus “dirty” leaf surface: Heavy infestations can leave a dusty look from shed skins and fine debris, not just discoloration.
| What you see on the plant | What it suggests (and what to check next) |
|---|---|
| Stippling that becomes bronzing, mostly on older leaves | Typical spider-mite-type feeding; inspect undersides and look for eggs clustered near veins. |
| Fine webbing around nodes, leaf stems, or buds | Strong spider mite indicator; confirm by tapping a leaf over white paper and watching for moving dots. |
| Red specks present but leaves look normal | May be clover mites/predatory mites or incidental visitors; keep monitoring and check nearby surfaces (sills, pots) for trails. |
| Distorted new growth with little to no webbing | Could be broad mites/cyclamen mites or thrips; use magnification and inspect buds and leaf folds closely. |
| Yellowing in larger patches, sticky residue, or sooty film | More consistent with aphids/whiteflies/scale than mites; look for honeydew and visible insects on stems. |
If you’re unsure, focus on consistency: mite injury tends to be fine, speckled, and progressive, while nutrient issues usually follow vein patterns and watering problems often cause broader wilting or uniform yellowing. Matching the symptom pattern to where the red mites are actually congregating is the quickest way to confirm you’ve found the real culprit.
When to act immediately
Act fast if the plant is declining or the infestation is spreading beyond a few leaves. Tiny red specks can be harmless hitchhikers, but a true plant-feeding mite problem escalates quickly in warm, dry conditions and can permanently weaken tender growth.
- Leaves are stippled, bronzed, or turning gray and the damage is expanding day to day, especially on new growth.
- Fine webbing is visible along leaf undersides, at leaf joints, or between stems. Webbing usually means the population is already high.
- You confirm active feeding with a quick test: tap a leaf over white paper and smear the moving dots with a fingertip. If they leave a rusty-red streak, you’re likely dealing with plant-feeding mites rather than soil mites.
- Leaves are dropping or curling despite normal watering, or the plant looks “dusty” and dull even after rinsing.
- Multiple plants show symptoms (especially clustered houseplants or greenhouse benches). Mites move on hands, tools, and airflow.
- High-risk plants are involved, such as seedlings, cuttings, flowering plants, or anything already stressed from heat, low humidity, or recent repotting.
- Hot, dry conditions are present for extended periods, such as above 27°C (81°F) with low indoor humidity; outbreaks can jump from “a few dots” to widespread damage in a short time.
| What you observe | Why it’s urgent | What to do right now |
|---|---|---|
| Webbing + moving mites on undersides | Usually indicates a heavy, established colony | Isolate the plant, rinse thoroughly (top and underside), and start a control routine the same day |
| Rusty smear on paper test | Suggests plant-feeding species rather than harmless soil mites | Inspect nearby plants, remove the worst leaves, and treat all affected plants together |
| Rapid bronzing/stippling spreading across the canopy | Feeding damage can become irreversible on tender leaves | Increase humidity, reduce heat stress, and begin repeated treatments on a schedule |
| Infestation on seedlings/cuttings or flowering plants | Small plants and blooms are easily set back | Quarantine immediately and prioritize gentle, frequent wash-downs plus targeted treatment |
If you only see a couple of red dots near the soil line and the leaves look healthy, take a breath and confirm first. But once you’re seeing feeding marks, webbing, or spread to other plants, delaying even a few days can make control much harder.