Why Healthy Leaves Suddenly Develop Brown Spots

 Covers why brown spots can appear overnight, including environmental shocks and watering mistakes, plus early infection signs. It walks through recent changes that may be responsible, how to stabilize conditions, and when recovery is still possible.
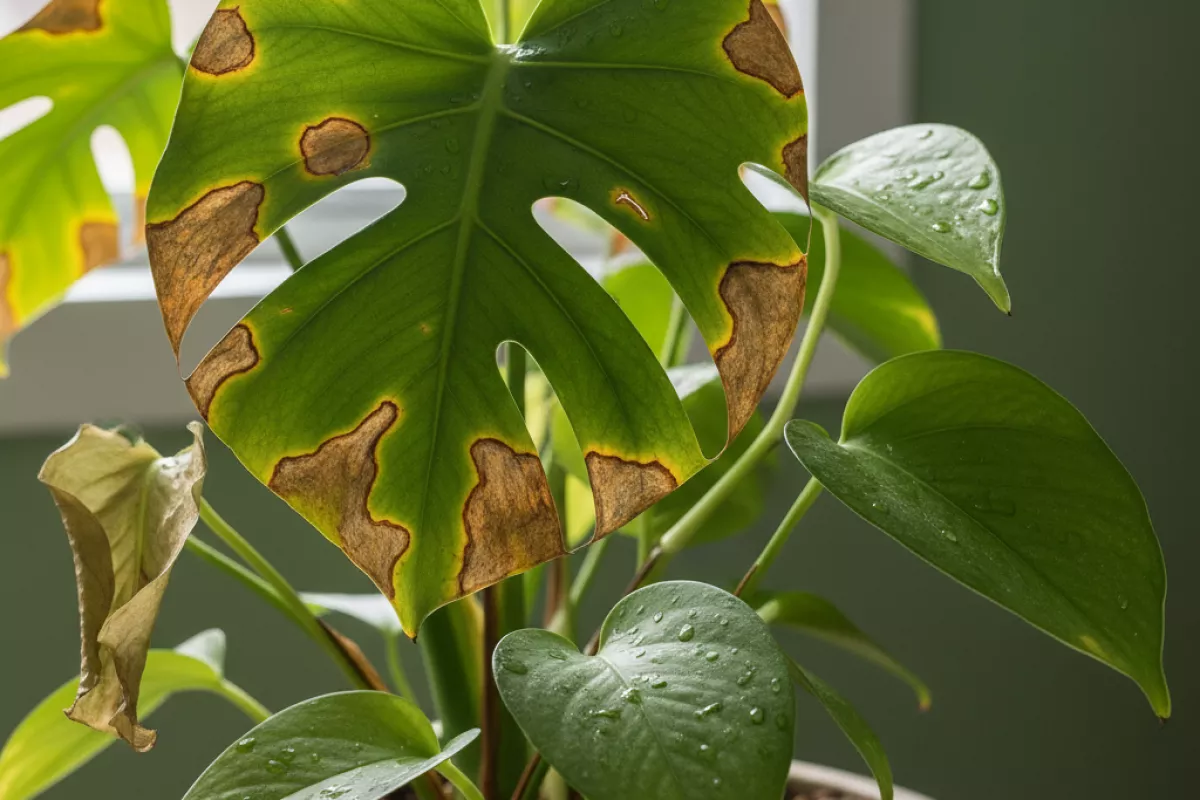
When healthy leaves develop brown speckles, it usually means something in the plant’s care or environment has changed. Several problems can look alike at first, including inconsistent watering, too much sun or heat, pests, fungal or bacterial disease, low humidity, or mineral and fertilizer salt buildup. Check soil moisture, light exposure, leaf undersides, and drainage, then adjust care promptly to prevent further spread.
Why spots can appear overnight
Leaf damage can seem to “pop up” in a single night because the injury often happened earlier, but the visible symptoms lag behind. Many problems build inside the leaf tissue for hours or days, then cross a threshold where pigments break down, cells collapse, and a spot finally becomes obvious. If you need a step-by-step approach, see how to fix brown leaf spots.
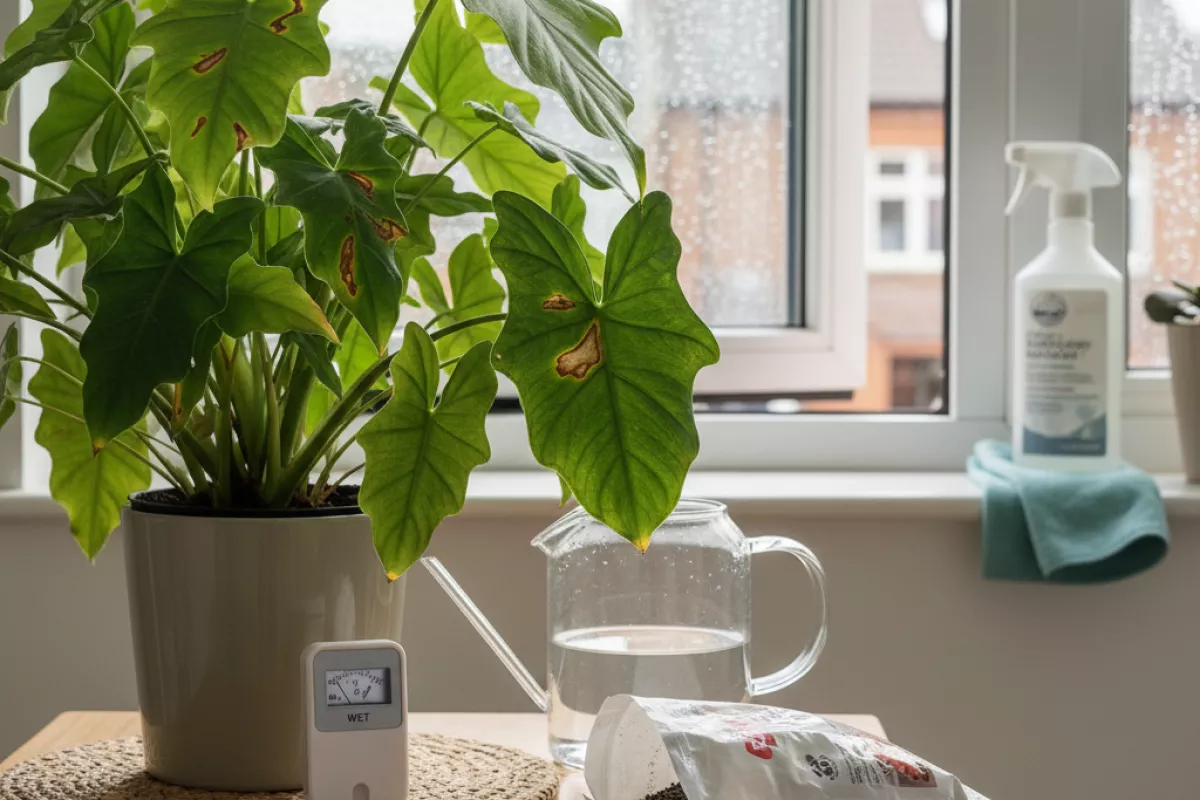
- Water on leaves + cool nights: When foliage stays wet for several hours, spores and bacteria have an easier time entering through pores or tiny wounds. The infection may start earlier, but the brown patch becomes noticeable after a night of high humidity and low airflow.
- Sudden temperature swings: A warm day followed by a cold night can stress leaf cells, especially on tender new growth. Chilling injury or heat stress can show up quickly as tan or brown blotches, often with a sharp edge where tissue died.
- Sunscald after a move: Leaves adapted to shade can burn after being shifted into brighter light. The damage may occur within an hour, but it’s common to notice the browned areas the next morning once the tissue dries and darkens.
- Fertilizer or spray burn: Concentrated fertilizer, soaps, oils, or pesticide mixes can damage the leaf surface. Droplets act like tiny reservoirs; as they dry, salts become more concentrated, and the spot can darken overnight.
- Root stress that shows up late: Overwatering, underwatering, or a root-bound pot can reduce water flow to leaves. The plant may look fine during the day, then develop crisp brown margins or spots after an overnight period when recovery is limited.
- Fast-feeding pests: Thrips, spider mites, and some caterpillars can cause a lot of stippling or chewed areas in a short time. The discoloration often looks worse the next day as damaged cells oxidize.
- Mechanical injury you didn’t notice: A leaf bent during watering, brushed against a window, or nicked during handling can bruise. The tissue may not brown immediately, but it can turn within 12–24 hours.
If you’re trying to narrow it down, check what changed in the last 24–48 hours: watering routine, a new product sprayed, a move to a sunnier spot, a cold draft, or a humid night with poor air circulation. Those recent shifts are often the reason healthy leaves suddenly show brown spots even when the plant looked fine the evening before.
Environmental shocks that trigger damage

Sudden changes in light, temperature, moisture, or air movement can injure leaf tissue even when a plant looked perfect yesterday. The result is often scattered brown spots or crispy patches that show up a day or two after the stress, especially on newer, softer growth.
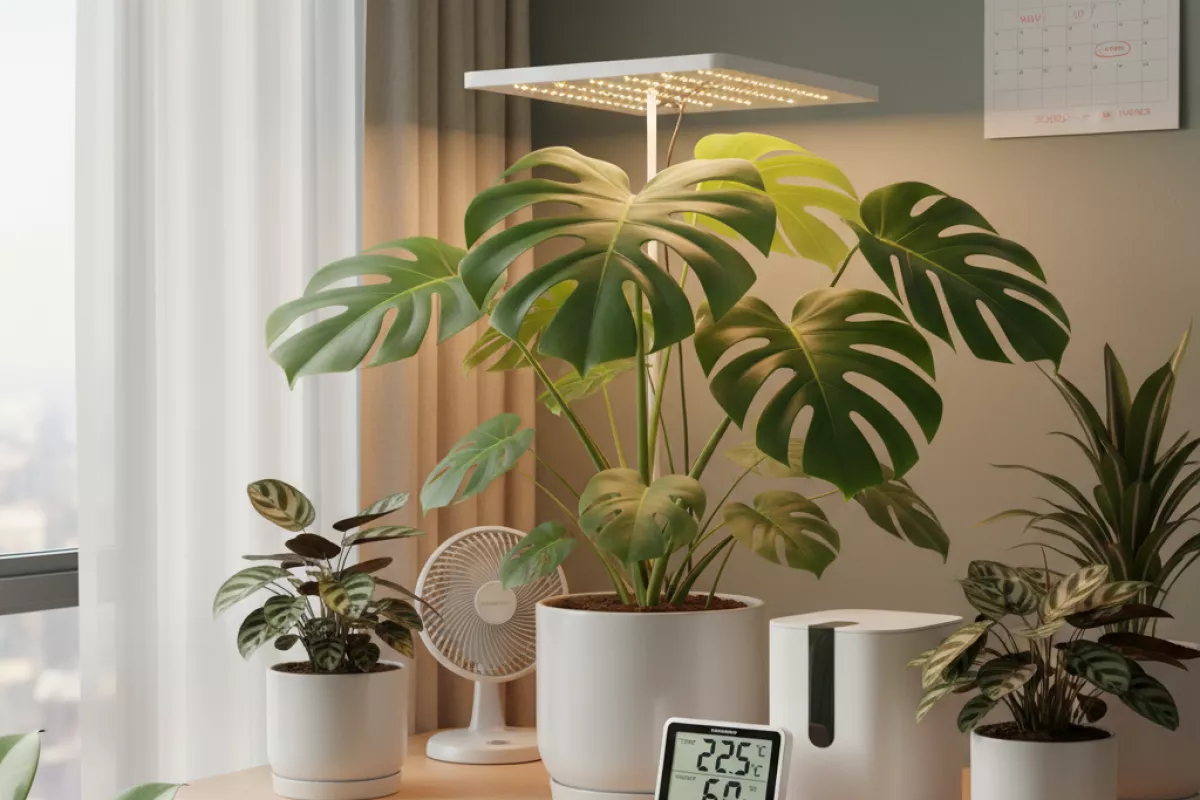
- Sun shock after a lighting change: Moving a plant from shade to direct sun (or placing it under a stronger grow light) can cause bleached areas that later turn tan-brown and papery. This often happens when a plant goes from indoor light to outdoor sun without a gradual “hardening off” period.
- Heat spikes and hot surfaces: A brief jump to 32°C (90°F) near a window, heater, or greenhouse wall can create localized scorch. Leaves touching hot glass or a dark pot can develop spots exactly where contact occurred.
- Cold snaps and chilling injury: Many houseplants and tropicals spot when exposed to 10°C (50°F) or below, even for a few hours. Damage can look like water-soaked dots that later dry into brown freckles, often after the plant warms back up.
- Irregular watering swings: Going from very dry soil to a heavy soak can split cells and disrupt water flow, leaving random necrotic specks or edge burn. The pattern is usually inconsistent across the leaf rather than symmetrical.
- Low humidity plus fast airflow: A fan, HVAC vent, or draft can pull moisture from leaves faster than roots can replace it, leading to dry brown patches, especially at tips and margins. This is common when indoor humidity drops below about 30% (no direct imperial equivalent) for extended periods.
- Overhead watering in strong light: Water droplets can act like tiny lenses in bright sun, creating small burn marks. More often, wet leaves plus warmth create micro-conditions that weaken tissue, making spots appear where droplets sat the longest.
- Fertilizer, pesticide, or soap burn: A mix that’s too strong, applied in heat, or not rinsed can cause sharp-edged brown spotting. Injury often follows spray patterns or drips, and the newest leaves may be most sensitive.
- Salt buildup from hard water: Minerals accumulate in potting mix and can cause marginal browning and scattered spotting over time. This tends to show up after repeated watering with very hard water or frequent fertilizing without occasional flushing.
| Shock event | Typical spot pattern | Quick check | What to do next time |
|---|---|---|---|
| Sudden brighter light | Bleached patches that turn tan-brown; crisp texture | Damage is worst on the most exposed leaves; shaded leaves look fine | Increase light gradually over 7–14 days; use a sheer curtain or stepwise placement |
| Cold draft or night chill | Small water-soaked dots that later dry brown | Spots appear after a cool night near a window or door | Keep above 13°C (55°F) for sensitive plants; move away from glass at night |
| Heat blast / hot glass contact | Irregular scorch, often on one side or where leaf touched a surface | Spots line up with the window side or contact points | Provide airflow and distance from heat sources; avoid leaf-to-glass contact |
| Watering extremes (dry then drenched) | Random necrotic specks; tip/edge browning | Soil alternates between bone-dry and saturated | Water when the top 2–3 cm (0.8–1.2 in) is dry; aim for consistent moisture |
| Spray or fertilizer burn | Sharp-edged spots matching droplets, streaks, or drips | Marks follow where solution landed; newest leaves affected | Mix to label rates; test on one leaf; apply in cooler hours and avoid full sun |
One clue that a sudden stressor is responsible: the spots usually don’t spread much after the triggering event stops. The damaged tissue won’t turn green again, but if conditions stabilize, new leaves should emerge clean.
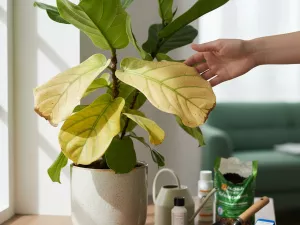
Watering mistakes that affect leaf tissue
Brown spots often start when the roots swing between “too wet” and “too dry.” That stress shows up in the leaf cells first: edges scorch, small tan freckles appear between veins, or larger patches turn papery as tissue dies back. The tricky part is that the damage can look like disease even when the real issue is how moisture is being delivered and how long it lingers. For a practical routine, use these indoor plant watering tips.
- Overwatering that keeps roots oxygen-starved
Constantly wet mix pushes air out of the root zone. Roots then struggle to take up water and nutrients, so leaves develop dull, water-soaked-looking spots that later turn brown, especially on older foliage. If the pot feels heavy for days and the surface stays dark, you’re likely watering too often. - Underwatering followed by a “rescue soak”
Letting a plant get bone-dry and then flooding it can rupture stressed leaf cells and cause irregular blotches. You may also see crisp margins and scattered brown specks on the most exposed leaves. A steadier rhythm (watering before the root ball fully dries) prevents that boom-bust pattern. - Water sitting on leaves (especially in low airflow)
Mist or splashes that remain on foliage can create localized damage: round spots with a darker rim, or pale patches that later brown. This is common when watering overhead in the evening, when leaves stay wet for hours. Aim water at the soil line and keep foliage dry when possible. - Cold water shocking warm roots
Very cold water can temporarily slow root function, and sensitive plants may respond with small brown lesions or edge burn. Using water closer to room temperature is gentler; as a practical guideline, avoid extremes and aim for roughly 18–24°C (64–75°F). - Hard water and salt buildup
Minerals accumulate in the potting mix and can “burn” leaf tips and margins, then progress into brown patches. White crust on soil or pot rims is a common clue. Periodically flushing the pot with a slow, thorough watering until excess drains out can help; if you collect runoff, discard it rather than letting the pot reabsorb it. - Watering on a schedule instead of by soil feel
A calendar can’t account for seasonal light changes, heating/AC, or a plant’s growth phase. Check moisture a few centimeters down (about 2–5 cm / 1–2 in) for many houseplants, or lift the pot to gauge weight. Adjust frequency rather than sticking to “every X days.” - Poor drainage that turns normal watering into waterlogging
Even “correct” amounts cause trouble if the container lacks drainage holes or the mix is too dense. Leaves may spot and yellow while the soil stays wet. If water pools on top or drains very slowly, consider a chunkier mix and a pot that can actually shed excess moisture.
If you’re unsure which mistake is at play, look for patterns: spots appearing after a heavy watering, after misting, or during a heat wave often point to technique rather than pathogens. Also remember that damaged tissue won’t turn green again; the goal is to stop new leaves from developing fresh brown marks by stabilizing moisture and improving drainage and airflow.
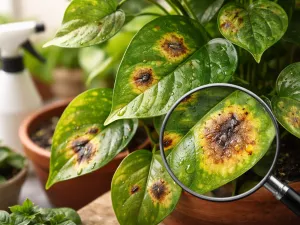
Early infection symptoms to watch for
When a leaf goes from “fine yesterday” to speckled today, the earliest clues are usually subtle changes in texture, pattern, and where the marks start. Catching those small shifts can help you act before brown spots spread across the canopy or jump to nearby plants.
- Tiny, water-soaked pinpricks that look slightly translucent before they turn tan or brown. These often appear first on softer, newer growth.
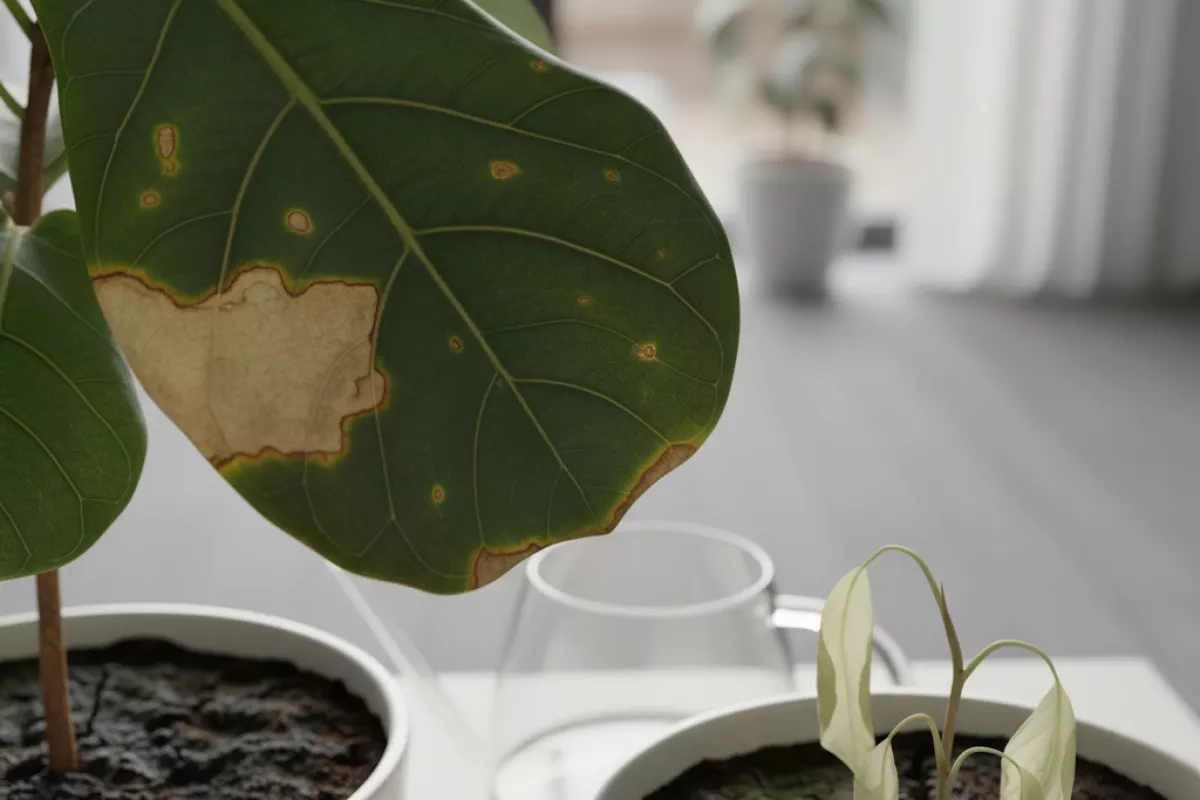
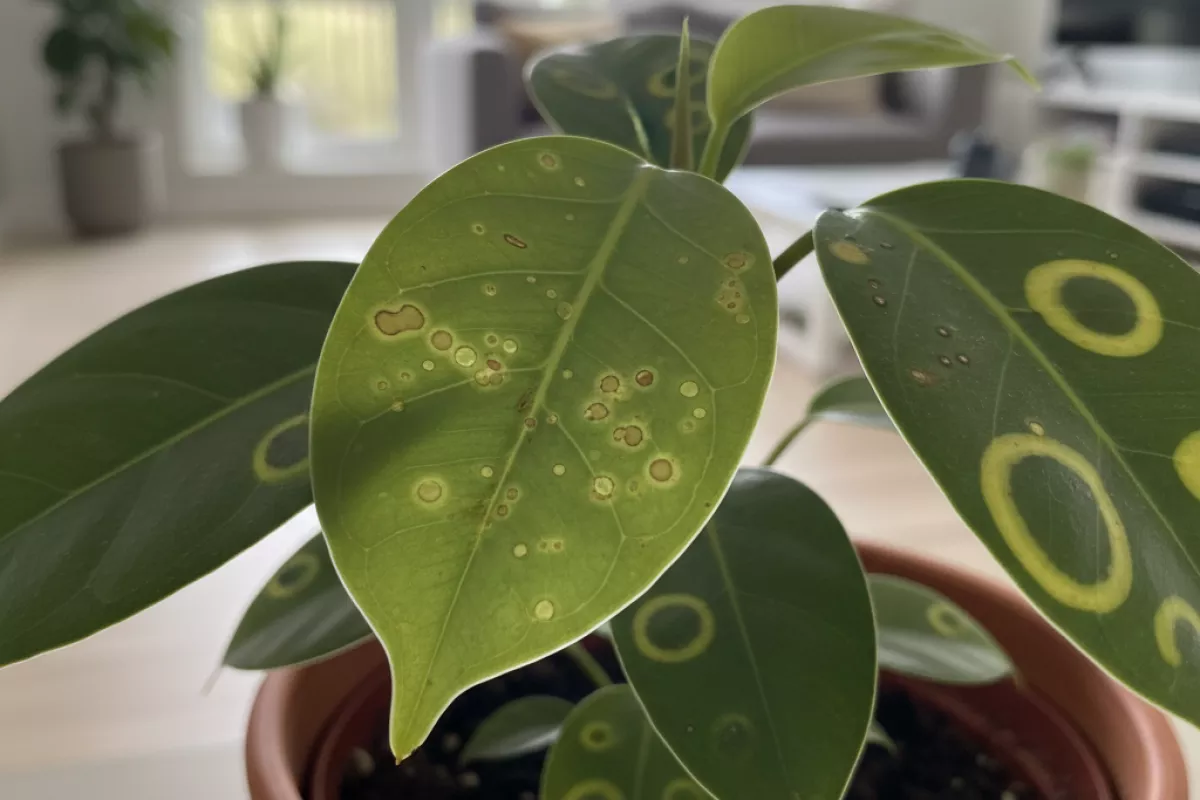
- Yellow halos around small flecks or dots. A pale ring can be an early sign the plant is reacting to a pathogen rather than simple aging.
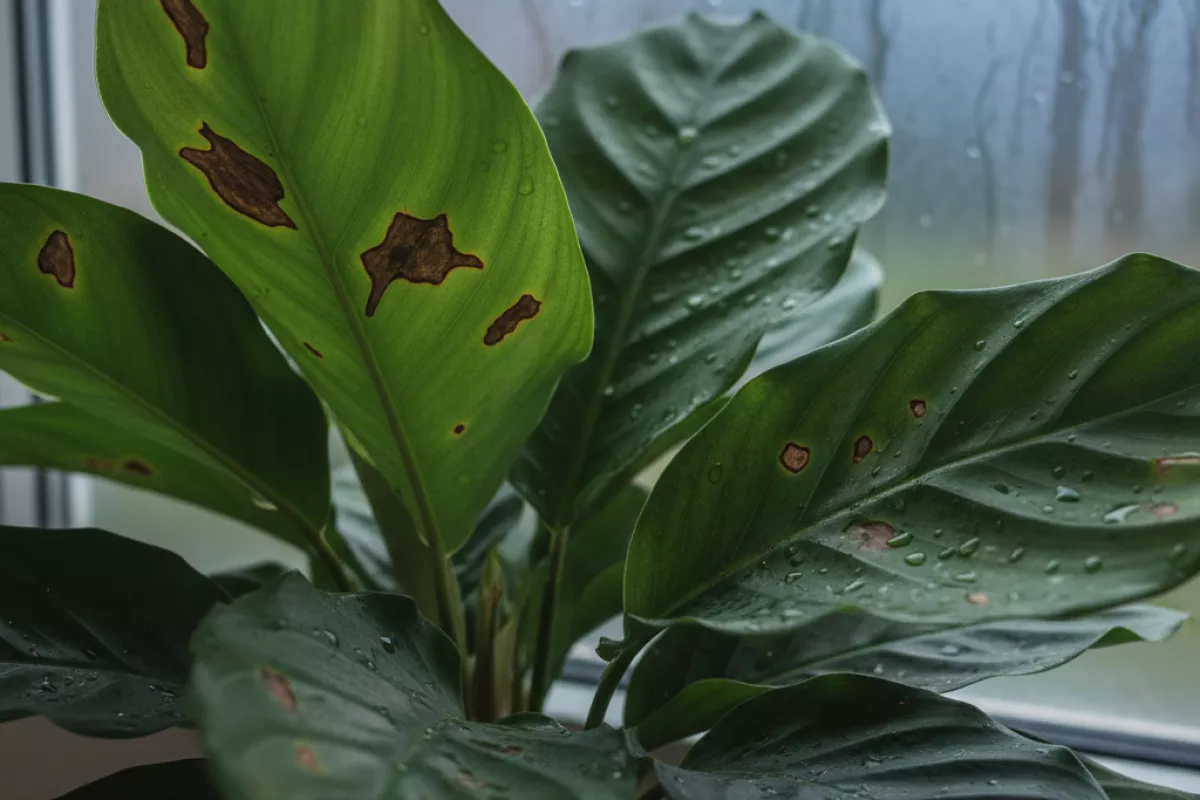
- Spots that follow veins or leaf edges instead of appearing randomly. Vein-limited blotches can point to certain bacterial or fungal issues.
- “Peppered” clusters of many small lesions close together, especially after humid nights or frequent overhead watering.
- Dark, sharply defined margins on new spots (a crisp outline), which can signal active infection rather than a nutrient imbalance that tends to look more diffuse.
- Gray, olive, or sooty-looking film on the surface that wipes or smears slightly. This can precede visible browning on susceptible plants.
- Subtle leaf distortion like puckering, slight curling, or uneven expansion around the affected area—often an early “stress response” before spots fully develop.
- Rapid progression after moisture: marks that noticeably enlarge within 24–48 hours after rain, misting, or a heavy watering are more suspicious than slow, steady changes.
Location matters as much as appearance. If the first blemishes show up on lower leaves near the soil line, splashing water is a common trigger; if they start on inner foliage where air is still, trapped humidity is often part of the story. Also note whether the underside of the leaf looks worse than the top—many leaf-spot diseases begin below and “telegraph” upward later.
| What you see early | What it often suggests | Quick check to confirm |
|---|---|---|
| Water-soaked dots that turn brown | Early bacterial or fungal leaf spot activity | Look for a greasy/translucent phase before browning; compare newest vs. oldest leaves |
| Yellow halo around a dark center | Active plant response to infection | Check if halos expand after humid nights; inspect nearby leaves for matching rings |
| Concentric “target” rings in small lesions | Common pattern in several fungal leaf spots | Hold leaf at an angle in bright light to see faint banding |
| Powdery, fuzzy, or velvety coating near spots | Sporulation (pathogen reproducing) | Gently tap over dark paper; fine dust or fuzz indicates spores rather than simple scorch |
| Spots concentrated where leaves stay wet longest | Moisture-driven spread | Identify persistently damp zones (dense center, low leaves, near sprinklers) and compare severity |
If you’re unsure, monitor one marked leaf and one clean leaf for 2 days (48 hours). A true infection often shows new lesions appearing nearby or existing ones enlarging, while mechanical damage or mild sunscald usually stays the same size and simply dries out.
Recent changes that may be responsible
When green foliage suddenly starts showing brown speckles or blotches, the trigger is often something that changed in the last few days or weeks. Think back to what’s different: where the plant sits, how it’s watered, what was added to the pot, or even a new cleaning routine nearby. These shifts can stress leaf tissue or create the damp conditions that let spotting take off.
- Watering schedule changed (more often, less often, or at different times). Overly wet soil can starve roots of oxygen, while long dry spells can cause scorch-like patches—both can show up as brown marks.
- Water left on leaves after misting or overhead watering. Droplets can encourage fungal/bacterial spotting, and in bright sun they can also create small burn points.
- New fertilizer or a stronger dose. A sudden jump in feeding (or fertilizer granules touching stems/leaves) can cause salt burn, which often looks like crisp brown edges or scattered dead spots.
- Repotting or root disturbance. Even a careful repot can damage fine roots; the plant may respond with localized leaf damage as it rebalances water uptake.
- Potting mix swapped to something that holds more water (or drains too fast). A mix that stays soggy can lead to root stress; a very fast-draining mix can cause repeated drought cycles.
- Light exposure increased (moved closer to a window, outdoors, or under a stronger grow light). Sunscald often appears within a week as tan-to-brown patches, especially on leaves that were previously shaded.
- Temperature swings from vents, heaters, or cold windows. A drafty spot or hot air blast can damage cells and leave irregular brown areas.
- Humidity dropped due to heating/AC use. Dry air can cause tip burn and make leaves more vulnerable to spotting problems that follow minor stress.
- New pesticide, soap, or leaf shine. Some products are phytotoxic, especially if applied in bright light; residue can leave speckling, bronzing, or brown patches.
- Tap water differences (harder water, softened water, or a different source). Mineral buildup can contribute to edge burn or spotting over time, and a sudden change can make it show up quickly.
- Plant was recently transported (shipping, car ride, or carried outside). Wind, cold exposure, or physical rubbing can bruise leaves; bruises often darken to brown after a day or two.
- New nearby plants. Bringing home a new plant can introduce pests or pathogens; the first visible sign is sometimes small brown dots that expand.
| What changed? | How brown spots often look | Quick check you can do today |
|---|---|---|
| More light or direct sun | Bleached/tan areas that turn brown; often on the most exposed leaves | Compare the side facing the window to the shaded side; note if damage matches the sun path |
| Overwatering or slower drainage | Dark brown spots plus yellowing; leaves may feel soft rather than crisp | Press a finger 5 cm (2 in) into the mix; if it’s wet and heavy for days, drainage is likely part of it |
| Underwatering or missed waterings | Crispy brown edges/tips; spots may look papery | Check if the pot feels very light and the mix pulls from the pot sides |
| New fertilizer / buildup of salts | Scorched tips/edges; scattered dead patches, sometimes with a yellow halo | Look for a white crust on the soil or pot; recall whether you recently increased feeding |
| Leaf wetness (misting/overhead watering) | Round spots that expand; may have a darker ring | Inspect early spots with a flashlight; if they look water-soaked before browning, moisture is a clue |
| Cold/hot drafts | Irregular patches, sometimes along the draft-facing edge | Hold your hand where the plant sits at different times; note hot/cold airflow from vents or windows |
If you can identify one or two recent shifts that line up with the pattern on the leaves, reverse those first before assuming disease. Small adjustments—like watering at the soil line, easing into brighter light over 7–14 days, or flushing excess salts with plain water—often stop new marks from forming even if old damage remains.
How to stabilize plant conditions
Stop the “new brown spots” cycle by making the plant’s environment predictable. Most spotting flares up after a quick swing in watering, temperature, light intensity, or humidity—especially when two changes happen at once (for example, moving a plant to brighter light and watering on the old schedule). If overwatering may be part of the issue, review factors that increase root rot risk.
- Freeze the variables for 10–14 days. Don’t repot, fertilize, prune heavily, or move the plant between rooms. This gives you a clear read on whether the issue is still progressing or just showing older damage.
- Water by soil dryness, not by the calendar. Check moisture 5–7 cm (2–3 in) down. Water thoroughly until excess drains, then empty the saucer so roots aren’t sitting in water. If the potting mix stays wet longer than 5–7 days, improve drainage or reduce watering volume.
- Keep leaves dry when possible. Wet foliage plus still air is a common setup for leaf spot problems. Water at the soil line, and if you mist, do it early so leaves dry before evening.
- Stabilize temperature and drafts. Aim for steady indoor ranges and avoid vents and cold windows. Even a nightly drop of 5–8°C (9–14°F) can stress some tropical plants and make spotting more likely.
- Adjust light gradually. If you’re increasing brightness, step it up over 7–10 days. Sudden higher light can cause scorch that looks like crisp brown patches, especially on previously shaded leaves.
- Raise humidity without trapping stale air. Group plants, use a humidifier, or place the pot on a pebble tray (pot above waterline). Pair humidity with gentle airflow so leaves don’t stay damp.
- Pause fertilizer until growth looks steady. Salt buildup or overfeeding can create brown margins and speckling. If you suspect buildup, flush the soil with 3–4× the pot volume of water (for example, 3 L (0.8 gal) through a 1 L (0.26 gal) pot), then let it drain fully.
- Clean up and isolate if spots are spreading. Remove the worst affected leaves with clean scissors, wipe blades with 70% isopropyl alcohol between cuts, and keep the plant a short distance from others while you monitor.
| What you observe | Likely instability | What to do next |
|---|---|---|
| New spots appear after watering; soil stays wet for many days | Overwatering, low oxygen at roots | Let mix dry further between waterings; ensure drainage holes; consider a chunkier mix if it remains soggy |
| Crispy brown patches on the side facing the window | Light/heat stress from sudden intensity | Move back 30–60 cm (12–24 in) or add a sheer curtain; increase light in steps over a week |
| Brown tips/margins plus white crust on soil or pot | Salt buildup from fertilizer or hard water | Flush thoroughly; reduce feeding; use filtered or rainwater when possible |
| Round dark spots that enlarge, especially with wet leaves | Fungal/bacterial leaf spot favored by moisture + poor airflow | Keep foliage dry; improve airflow; remove affected leaves; avoid splashing during watering |
| Scattered tiny specks with webbing or sticky residue | spider mites on houseplants (and other pests) stressing tissue | Inspect undersides; rinse leaves; treat with insecticidal soap; repeat every 5–7 days for 2–3 rounds |
Once conditions are steady, judge progress by the newest leaves. Old spots won’t heal, but you should see fewer fresh lesions and cleaner new growth within 2–4 weeks. If spotting continues despite stable care, treat it like a diagnosis problem: re-check roots for rot, confirm pests with a close inspection, and consider whether water quality or airflow is the missing piece.
When recovery is possible
Most plants can bounce back from sudden brown spotting if the growing point is still healthy and the damage is limited to older leaves. The key is whether the cause is a one-time stress you can correct (like a watering mistake or sun shock) versus an ongoing problem (like a spreading infection or root decline). If spotting is paired with yellowing, use yellow leaves and root rot as a quick diagnostic cross-check.
- New growth looks normal. Fresh leaves emerge evenly colored and firm, even if older foliage is speckled. That’s a strong sign the plant is stabilizing.
- Spots aren’t spreading after you change care. If you adjust watering, light, or airflow and the blotches stop expanding over the next 7–14 days, recovery is likely.
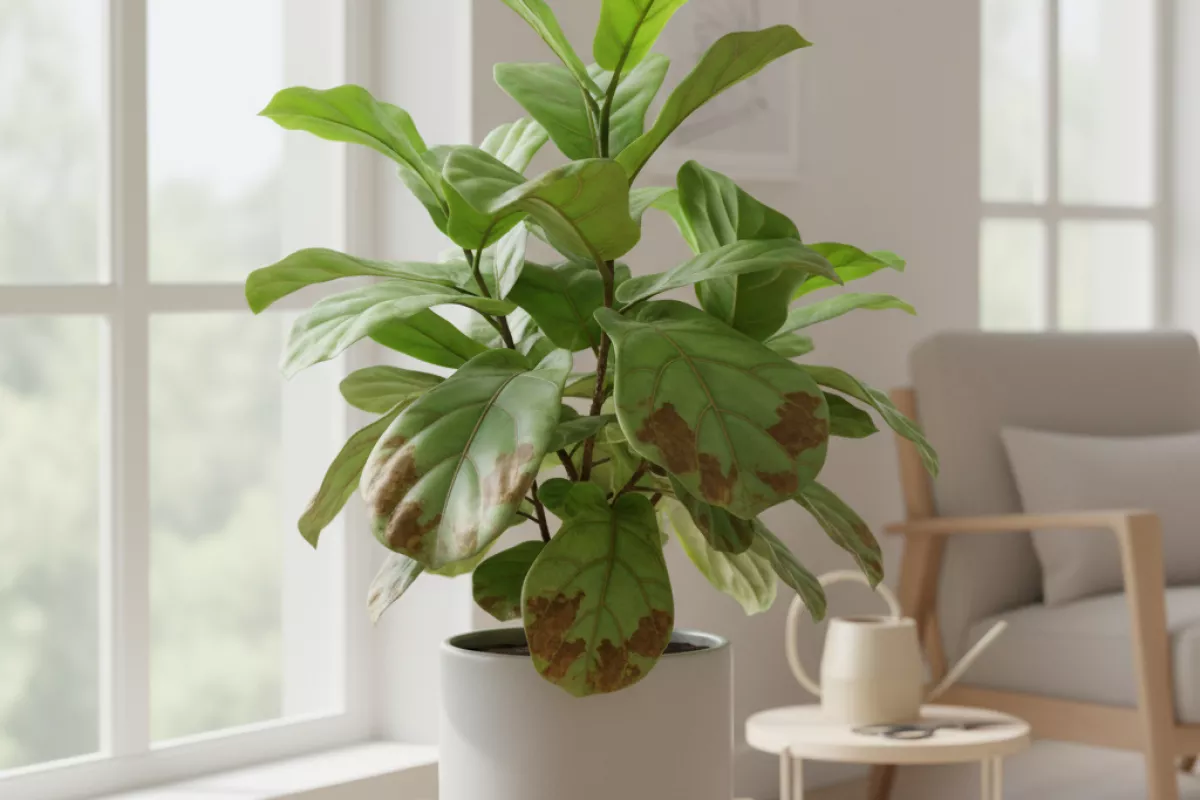
- Damage is cosmetic, not structural. Brown flecks or crisp edges that stay localized are easier to manage than lesions that turn mushy, ooze, or rapidly merge into large dead patches.
- Roots are mostly sound. When you slide the plant out of the pot, healthy roots are pale/white to tan and feel firm. A few dark roots are fixable; a pot full of soft, foul-smelling roots usually isn’t.
- Only a small portion of the canopy is affected. If less than about one-third of the leaf area is marked, the plant can typically photosynthesize enough to recover once conditions improve.
Some common “recoverable” scenarios include brief underwatering, a missed fertilizing balance that you correct, mild sunburn after moving a plant outdoors, or mineral/salt buildup that you flush out. For flushing, run water through the pot until it drains freely for 1–2 minutes, then let it drain completely; repeat once more a week later if crusty residue returns. Use room-temperature water around 20–22°C (68–72°F) to avoid temperature shock.
| What you see | What it usually means | What to do next |
|---|---|---|
| Spots appear after a move to brighter light; tissue looks dry and papery | Sunscald/light shock (often a one-time event) | Shift to bright, indirect light and re-acclimate over 7–10 days; don’t remove all damaged leaves at once |
| Brown edges + crispy tips; soil alternates bone-dry and soaked | Watering swings stressing leaf tissue | Water when the top 2–3 cm (1–1.2 in) dries; ensure drainage and empty saucers |
| Small brown specks that stop increasing after improving airflow | Mild leaf-spot pressure that’s no longer progressing | Keep leaves dry, space plants, remove the worst leaves, and monitor new growth for 2 weeks |
| Brown patches with yellow halos that keep expanding, especially in humid still air | Active bacterial/fungal spread | Isolate the plant, prune affected leaves with sanitized scissors, avoid overhead watering; reassess if spread continues |
| Lower leaves spot and drop; roots are mostly firm with a few dark sections | Early root stress that can be reversed | Trim mushy roots, repot into fresh mix, and reduce watering until growth resumes |
Don’t expect existing brown areas to turn green again; improvement shows up as clean new leaves and a halt in new spotting. Once you’re confident the issue has stopped, you can trim heavily damaged leaves to improve appearance, but keep enough foliage for the plant to keep fueling recovery.