Spider Mites on Outdoor Plants – What to Do

 Covers how outdoor mite infestations begin, which weather makes them worse, and early warning signs on garden plants. Explains immediate steps to stop spread, safe outdoor treatment options, how to protect beneficial insects, and a seasonal prevention routine.
Tiny webbing and pale speckling on outdoor plants often signal spider mites, which can spread quickly in warm, dry conditions. You can usually manage them without harsh chemicals by confirming the pest, easing plant stress with proper watering, and using targeted options like insecticidal soap, horticultural oil, or a strong water spray. Beneficial insects can also help. Early action protects new growth and reduces reinfestation.
How outdoor infestations start

Problems outdoors usually begin when tiny hitchhikers arrive on a plant that was already stressed, then conditions tip in their favor. Spider mites are so small they’re easy to miss at first, and by the time you notice stippled leaves or faint webbing, the population may already be established on the undersides of foliage.
Most outbreaks follow a few common pathways:
- Wind and “ballooning” dispersal: Mites can be carried on air currents from nearby weeds, hedges, or a neighbor’s plants, landing on the closest tender growth.
- New plants and cuttings: Nursery stock, gifted starts, or cut flowers can bring a small colony that spreads once placed among other containers or beds.
- Garden traffic and tools: Gloves, sleeves, pruners, and even tying materials can move mites from one plant to the next, especially during routine deadheading or harvesting.
- Weedy borders and groundcover: Many common weeds act as a “bridge host,” letting mites build up unnoticed before they move onto ornamentals or vegetables.
- Dry, dusty microclimates: Hot, low-humidity pockets (near walls, gravel, reflective patios, or under eaves) speed up their life cycle and reduce the effectiveness of natural enemies.
- Plant stress: Drought stress, inconsistent watering, root-bound containers, or excess nitrogen can make leaves more attractive and less resilient, turning a minor presence into a full infestation.
- Reduced predator activity: Broad-spectrum insecticide use can knock back beneficial insects and predatory mites, removing the “brakes” that normally keep populations in check.
In practical terms, the first flare-ups often show up on plants that run warmer and drier than the rest of the garden—containers that dry out fast, plants against a south-facing wall, or foliage coated with dust. Checking the underside of a few leaves in these spots every 7 days (1 week) during hot spells can catch spider mites before they spread.
Weather conditions that favor mites
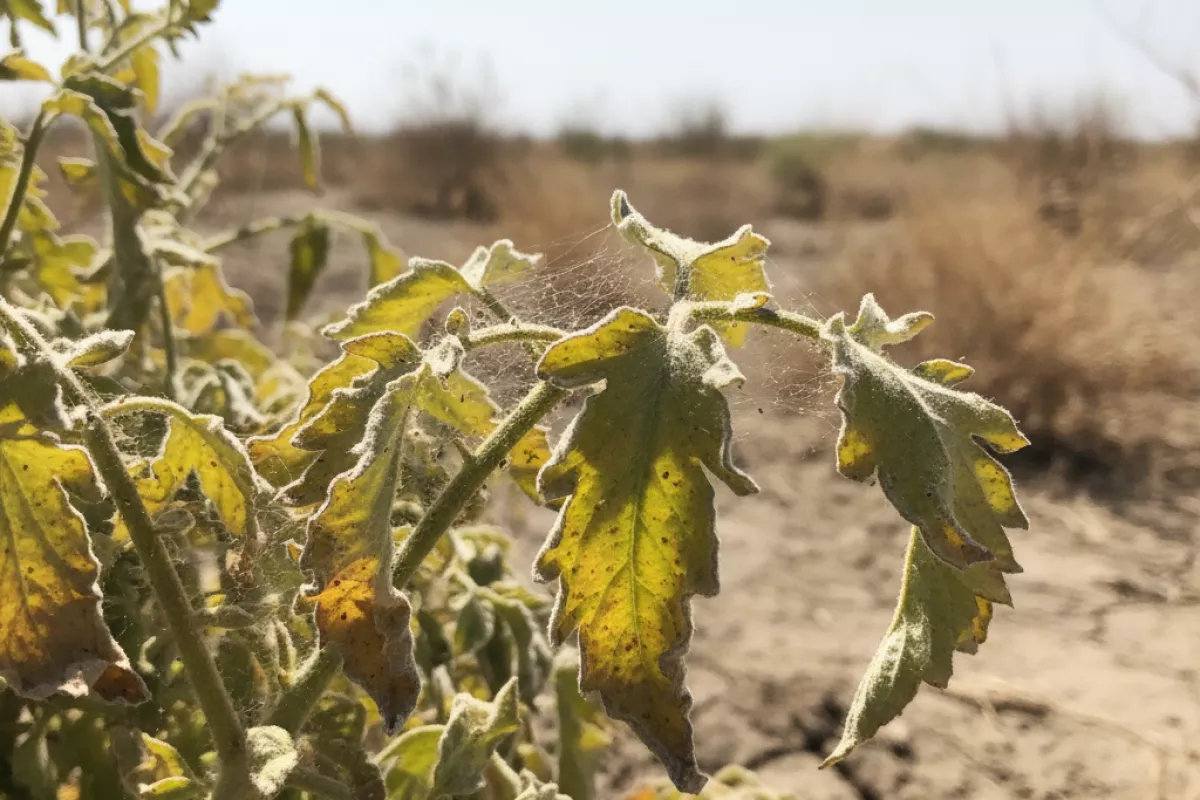
Outbreaks tend to show up when plants are under mild stress and the environment helps tiny pests reproduce quickly. Spider mites do best when it’s warm, dry, and still, especially on sun-baked leaves where moisture evaporates fast.
- Hot, dry spells: Extended heat combined with low humidity speeds up mite development and egg-laying. You’ll often see the first damage on the hottest, most exposed foliage.
- Low humidity and dusty air: Dry air favors mites, and dust on leaves can interfere with natural predators and reduces how well a rinse or spray reaches the undersides.
- Little to no rain: Regular rainfall can physically knock mites off leaves and disrupt webbing. When the weather stays dry, populations build undisturbed.
- Bright sun with heat-reflecting surfaces: Plants near walls, fences, patios, or gravel get extra radiant heat, creating a “microclimate” that mites love.
- Stagnant air around foliage: Crowded plantings or sheltered corners reduce airflow, letting warm, dry pockets form within the canopy.
- Warm days with mild nights: When evenings don’t cool much, mites keep feeding and reproducing instead of slowing down.
If you’re tracking conditions, be extra watchful during stretches around 27℃ to 35℃ (81℉ to 95℉) with consistently dry air. That’s when a small, unnoticed colony can turn into visible stippling and webbing in a hurry.
After a windy, dusty week or a run of hot days without rain, check leaf undersides first and look for fine speckling. Catching spider mites early is much easier than trying to rein them in once webs start protecting the colony.
Early warning signs on garden plants
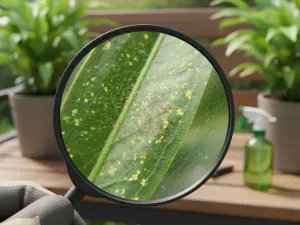
Outdoors, the first clues are usually subtle and easy to blame on heat, wind, or uneven watering. Spider mites feed by piercing leaf cells, so the earliest damage often looks like tiny pale specks rather than big holes or chewed edges. Learning to recognize the typical damage patterns caused by mites makes it much easier to act before webbing and bronzing spread across the plant.
- Fine stippling on leaves: pinprick-sized pale dots that make foliage look lightly “sandblasted,” especially on the upper surface—classic yellow speckles on leaves linked to early mite feeding.
- Overall dulling or bronzing: green leaves lose their shine, then take on a gray-green, bronze, or rusty cast as feeding increases.
- Leaf edges curling or cupping: new growth may twist or pucker; older leaves can curl inward as stress builds.
- Uneven yellowing that doesn’t match nutrient patterns: mottling shows up in patches rather than consistent veins/sections like many deficiencies.
- Tiny moving dots on the underside: look for slow-moving specks (often tan, greenish, or reddish) clustered along midribs and veins.
- Dusty look that returns after rinsing: what seems like dust can be mites, shed skins, and fine webbing catching debris.
- Delicate webbing in protected spots: silk threads between leaf stems, along the underside, or where leaves overlap; it’s more obvious early in the morning when humidity is higher.
- Hot, dry “hotspot” damage: symptoms start on plants near reflective walls, paved areas, or in wind-sheltered corners where foliage dries fast.
- Premature leaf drop: heavily stippled leaves may yellow, crisp, and fall even if the plant is otherwise watered.
Immediate steps to stop spread

Act fast to keep the infestation from hopping to nearby pots and beds. The goal in the first day is to isolate affected plants, knock down the population, and remove the worst hotspots before mites have time to spread on wind, tools, or your hands.
- Quarantine the plant(s). Move containers at least 3 m (10 ft) away from other plants, or to a separate area. For in-ground plants, create space by temporarily moving nearby potted plants and avoiding brushing against foliage as you work.
- Bag and remove the most damaged growth. Clip off heavily stippled leaves and webbed tips, then seal them in a bag before carrying through the garden. Don’t compost this material unless your compost reliably heats to 55–65°C (131–149°F).
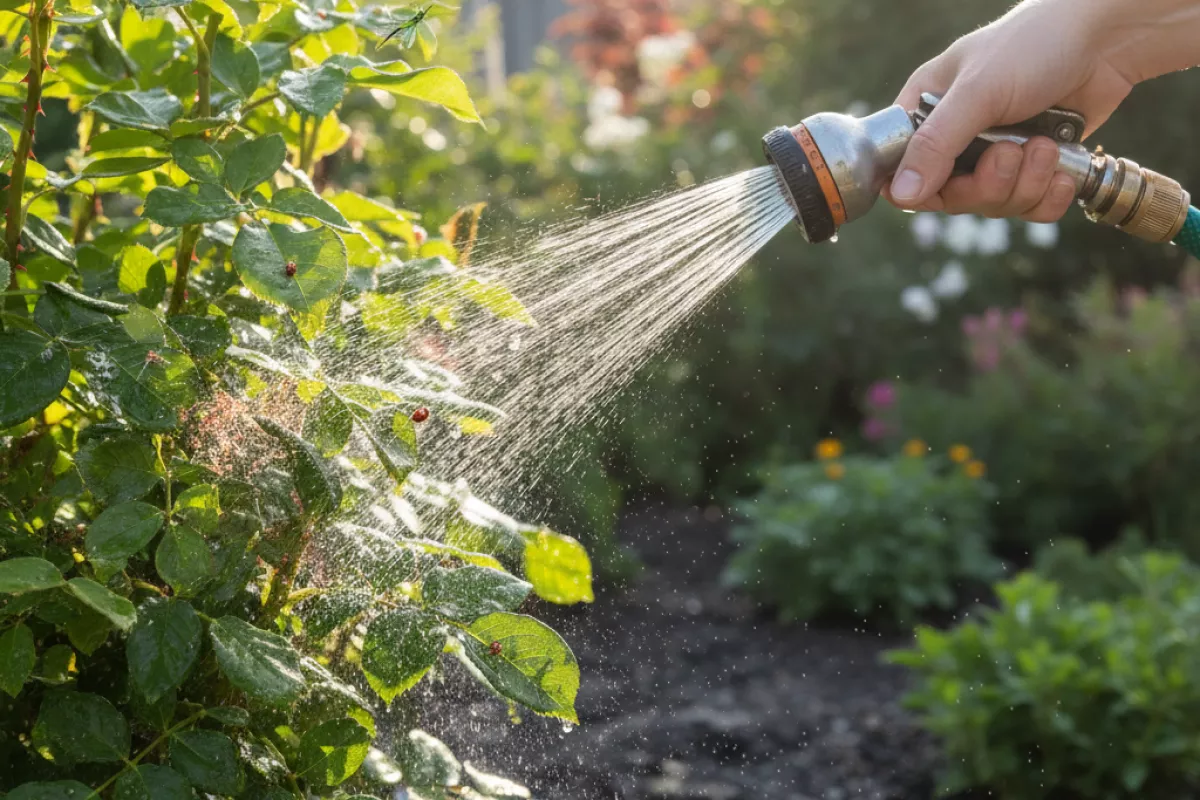
- Blast the undersides with water. Use a firm spray to rinse leaf undersides, stems, and leaf joints where mites cluster. Repeat every 2–3 days for 1–2 weeks; the repeat matters because eggs can hatch after the first wash.
- Stop “plant-to-plant” contact. Space plants so leaves don’t touch, and avoid stacking pots. If you use stakes or trellises, keep them dedicated to the affected plant until it’s under control.
- Clean tools and hands between plants. Wipe pruners with 70% isopropyl alcohol or wash with soap and water, and rinse gloves. This is quick and prevents accidental transfer.
- Hold off on high-nitrogen feeding for now. Soft, lush growth can make the problem worse. If you must fertilize, use a mild, balanced feed at half strength until the outbreak is contained.
- Reduce stress (without overwatering). Water at the soil line to keep the plant steady; drought-stressed plants are easier targets. Aim for even moisture, but don’t keep roots soggy—yellowing tied to root rot symptoms can mimic pest stress if drainage is poor.
| Action | When to do it | Why it helps | Common mistake to avoid |
|---|---|---|---|
| Separate affected plants | Immediately (same day) | Limits spread by wind, contact, and handling | Moving plants through foliage and brushing other plants on the way |
| Prune and bag webbed/damaged leaves | Day 1, then as needed | Removes dense colonies and eggs concentrated in hotspots | Dropping clippings on the ground or composting “cold” material |
| Rinse leaf undersides with water | Every 2–3 days for 1–2 weeks | Physically dislodges mites and disrupts webbing | Only spraying the top of leaves or doing it once and stopping |
| Sanitize tools and gloves | After each plant | Prevents you from being the vector | Using the same pruners across multiple plants without wiping |
If you’re seeing fine webbing, treat that as a sign the population is already high. Combine isolation, pruning, and repeated rinsing before you reach for sprays; these steps alone often cut numbers enough that follow-up treatments work better and are less frequent.
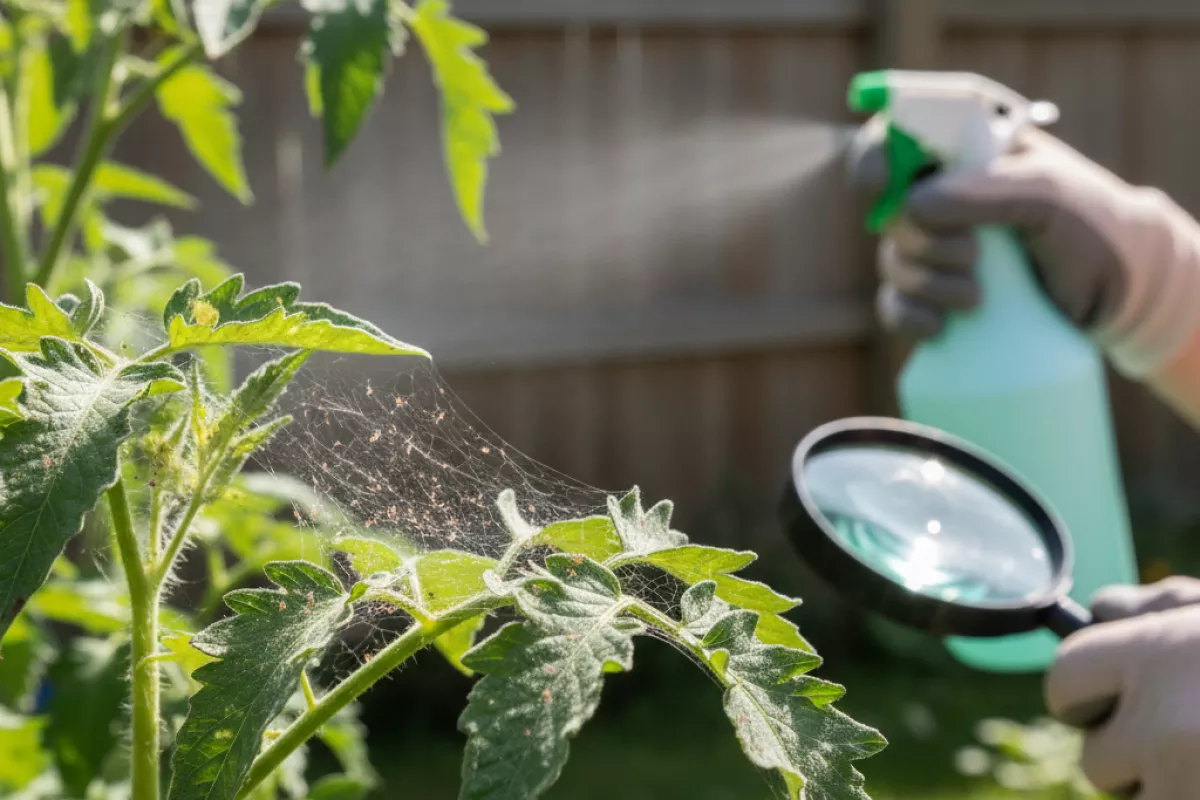
Safe outdoor treatment methods
Start by assuming the problem is manageable without harsh chemicals. Outdoors, wind, sun, and beneficial insects can work in your favor, so the goal is to knock populations back, protect new growth, and avoid harming pollinators and predators that naturally keep mites in check.
- Blast them off with water (fastest first step).
Use a firm spray to hit the undersides of leaves where mites and eggs cluster. Do it early in the day so foliage dries before evening. Repeat every 2–3 days for 1–2 weeks. A nozzle that produces a strong fan spray is usually enough; you don’t need a pressure washer, which can shred leaves.
- Prune the worst hotspots.
Remove heavily stippled, bronzed, or webbed leaves and any severely infested tips. Bag the cuttings and dispose of them rather than composting. This reduces the “core” population so other measures work better.
- Improve plant hydration and reduce dust stress.
Spider mites thrive on drought-stressed plants. Water deeply at the root zone and add mulch to stabilize moisture. Keep dusty leaves clean (a gentle rinse works) because dust can discourage beneficial insects and helps mites get established.
- Use insecticidal soap (contact control).
Soap works by coating soft-bodied pests, so coverage matters. Spray leaf undersides until evenly wet, then reapply in 5–7 days. Treat in the evening or early morning to reduce leaf burn and avoid spraying open flowers when bees are active. If temperatures are above 29°C (85°F), wait for a cooler window.
- Try horticultural oil or neem oil (smothering action).
Oils can suppress mites and eggs when applied thoroughly. Apply at label rates, and avoid using oils within 14 days of a sulfur product. Don’t spray drought-stressed plants, and avoid midday applications. As with soap, repeat after 7–10 days because eggs may hatch after the first treatment.
- Release beneficial predators when conditions fit.
Predatory mites (such as Phytoseiulus or Neoseiulus) can be very effective when infestations are caught early and broad-spectrum sprays aren’t used. They do best with moderate humidity and when you’re not rinsing the plant daily. If you’ve been using soap or oil, pause and let residues dissipate before releasing predators.
- Spot-treat instead of blanket-spraying.
Focus on the most affected plants and the lower/inner canopy where outbreaks start. This protects lady beetles, lacewings, and other helpers that may already be feeding on pests nearby.
Simple rotation plan: water spray every 2–3 days, plus either soap or oil once weekly (not both on the same day). If you’re also dealing with other sap-suckers, review fast control options that work so you don’t mix incompatible treatments. Check leaves with a hand lens and look for moving dots and fresh stippling; if you still see active mites after two weekly treatments, increase coverage, shorten the interval, or switch to the other product type.
Safety notes: Always test any spray on a small section first and wait 24 hours. Some plants (especially delicate ornamentals) can be sensitive. Wear gloves and eye protection, and keep sprays off ponds and waterways.
Protecting beneficial insects
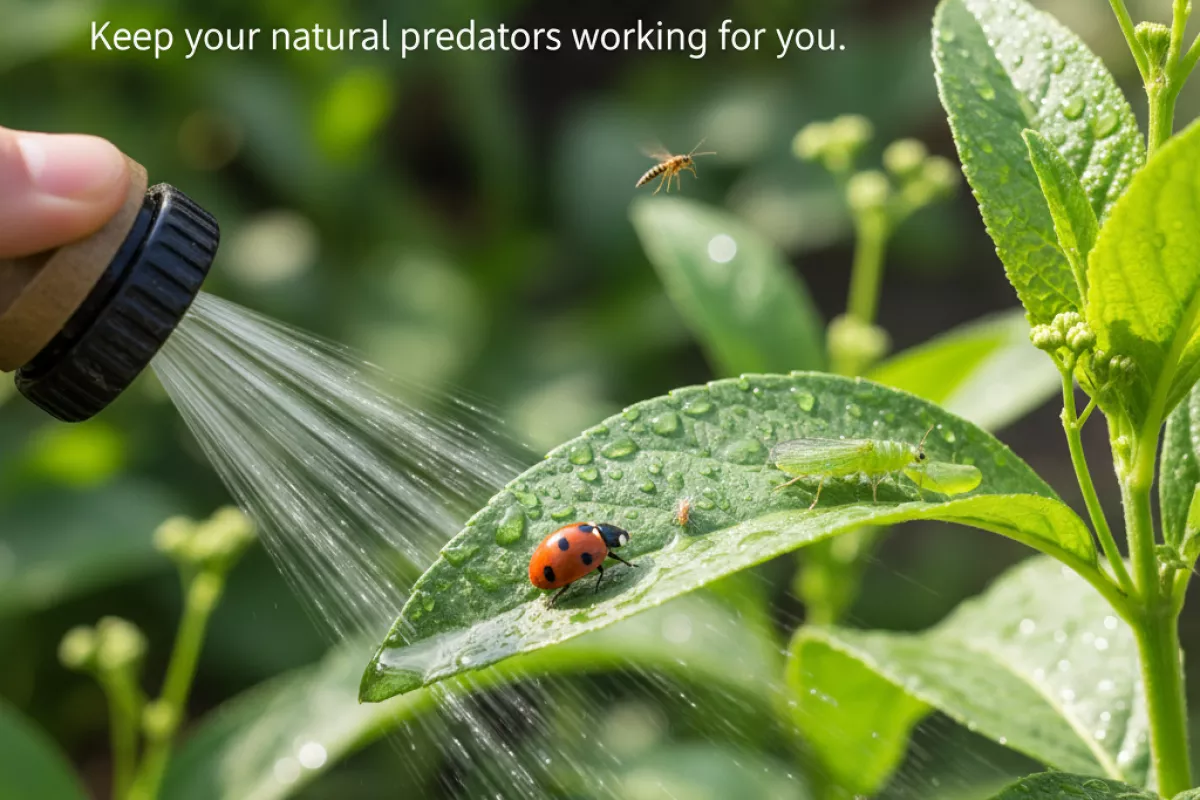
Keep your natural predators working for you by choosing mite controls that don’t wipe out the “good guys” along with the pests. Outdoors, lady beetles, lacewings, predatory mites, minute pirate bugs, and small parasitic wasps can slow outbreaks—if sprays and dusts aren’t knocking them back every time you treat.
- Start with the least disruptive options. A firm water spray to the undersides of leaves, pruning heavily infested tips, and removing dusty debris reduces spider mite pressure without harming allies.
- Avoid broad-spectrum insecticides unless there’s no alternative. Many common products (especially pyrethroids and organophosphates) can trigger flare-ups by killing predators and leaving mites behind to rebound.
- Use “soft” sprays correctly. Insecticidal soap and horticultural oils mainly work by contact. Apply only where needed (especially leaf undersides), and don’t spray when plants are heat- or drought-stressed. Treat in the cooler part of the day, ideally below 29°C (85°F), to reduce plant injury and unnecessary impact on beneficials.
- Time applications to spare pollinators. If you must spray flowering plants, treat at dusk or early morning when bees are less active, and avoid directly wetting open blooms.
- Skip dusty products. Sulfur and some dusts can interfere with predator activity and may stress plants; dusty leaves also favor mites. Rinse foliage when practical.
- Spot-treat instead of blanket-spraying. Target the worst plants or “hot spots” first, then re-check in 3–7 days rather than defaulting to repeated yard-wide applications.
- Leave refuge areas. A small unsprayed patch of mixed plants can act as a reservoir for predators that recolonize treated areas.
| Approach | Typical impact on helpful insects | Notes for outdoor spider mite control |
|---|---|---|
| Water spray + pruning | Very low | Best first step; repeat every 2–3 days for 1–2 weeks if pressure is high. |
| Insecticidal soap | Low to moderate (contact only) | Hit leaf undersides; avoid spraying above 29°C (85°F) and test a small area first. |
| Horticultural oil (summer-weight) | Low to moderate (contact; can affect predators you coat) | Good coverage matters; don’t apply to drought-stressed plants; follow label intervals. |
| Selective miticide (mite-specific product) | Varies by active ingredient | Often less disruptive than broad insecticides, but still check label precautions for beneficials and re-entry timing. |
| Broad-spectrum insecticide | High | Common cause of mite “booms” after treatment; avoid when possible and never use as a routine response. |
After any treatment, check a few leaves with a hand lens and look for predator activity as well as mites. If you’re seeing fewer natural enemies than before, scale back spraying, focus on mechanical control, and improve plant conditions (consistent watering, less dust, and less heat stress) so your outdoor plants are easier for beneficial insects to defend.
Seasonal prevention routine
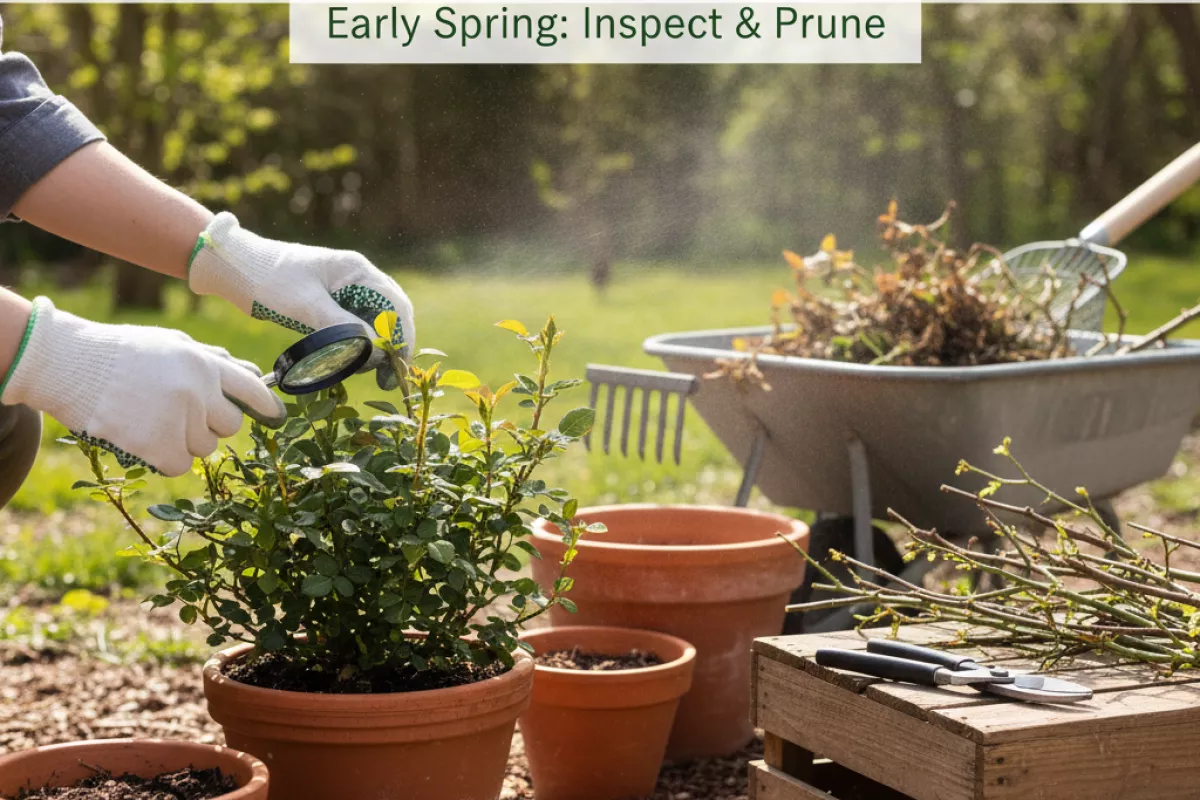
Keep outbreaks from getting started by matching your care to the time of year. The goal is to reduce plant stress, catch early hotspots, and avoid the dry, dusty conditions that let mites multiply fast on outdoor plants.
| Time of year | What to do (and why it helps) |
|---|---|
| Early spring |
|
| Late spring to early summer |
|
| Hot, dry midsummer |
|
| Late summer to fall |
|
Two habits make the biggest difference year-round: regular underside inspections and keeping plants evenly watered. If you catch stippling (tiny pale dots) early, a strong water rinse is often enough to prevent spider mites from becoming a season-long headache.