Dry, Dusty Leaves and Spider Mite Infestation

 Explains why mite damage can mimic dryness: feeding that pulls moisture, the texture shifts it causes, and how to tell it apart from drought stress. Covers visual signs of a hidden infestation, steps to confirm mites, and treatment strategies to help plants recover.
Dry, dusty leaves with fine speckling or webbing often mean your plant is stressed and spider mites are gaining ground. This guide shows how to tell harmless dirt from early infestation, why mites multiply quickly in warm, low-humidity conditions, and what to do next: rinse and wipe foliage, isolate affected plants, raise humidity, and adjust watering and light to prevent a rapid spread.
Why mite damage looks like dryness
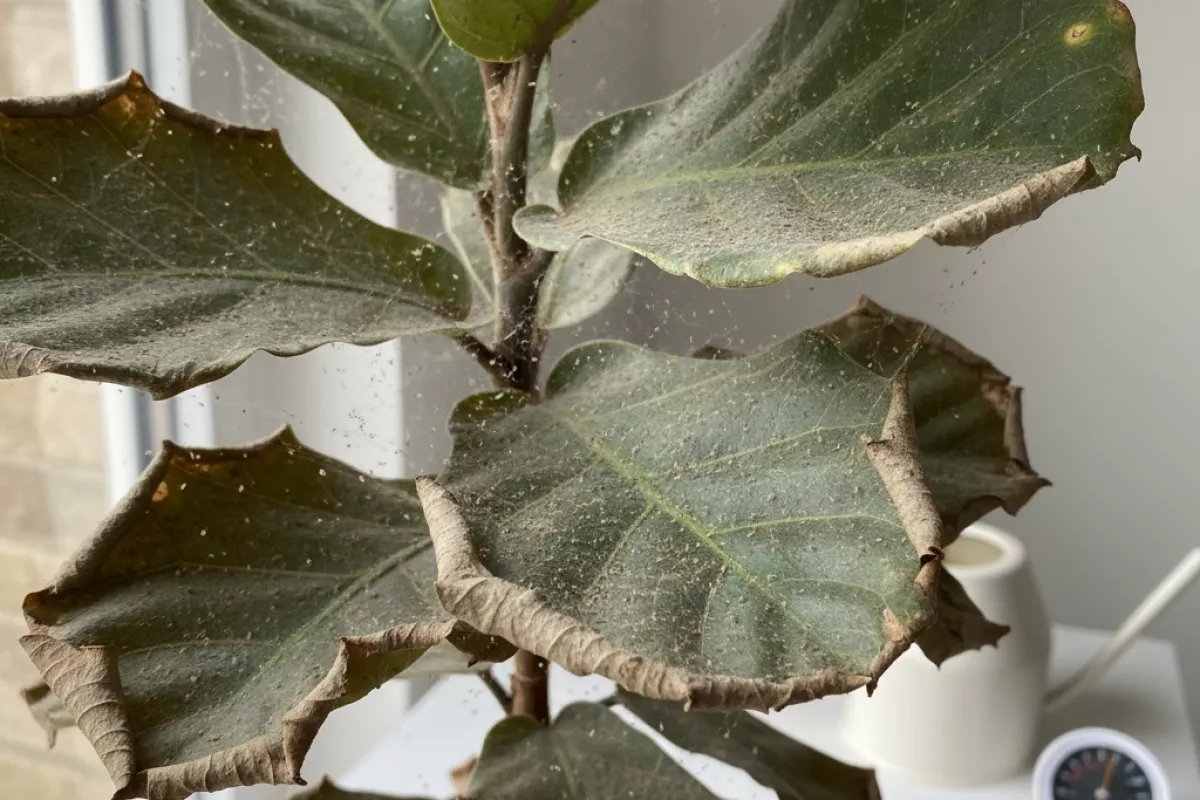
The symptoms can fool you because the plant is effectively being “dehydrated” at the leaf level. Spider mites pierce individual plant cells and suck out the contents, so the leaf loses moisture and chlorophyll in tiny patches. Those micro-injuries add up to a dull, dusty look and crispy texture that resembles low humidity, missed watering, or heat stress.
Another reason it’s confusing: the damage often starts where normal dryness shows up first—leaf edges, tips, and the upper surface that gets the most light. Early on, you may only notice a faint stippling (tiny pale dots) and a slightly faded tone, which is easy to write off as dust or normal aging.
- Cell-by-cell feeding creates “dry” patches: each puncture collapses cells, leaving silvery, tan, or bleached specks that merge into larger dry-looking areas.
- Transpiration gets out of balance: injured tissue can’t regulate water loss well, so leaves can feel papery even when the potting mix is still moist.
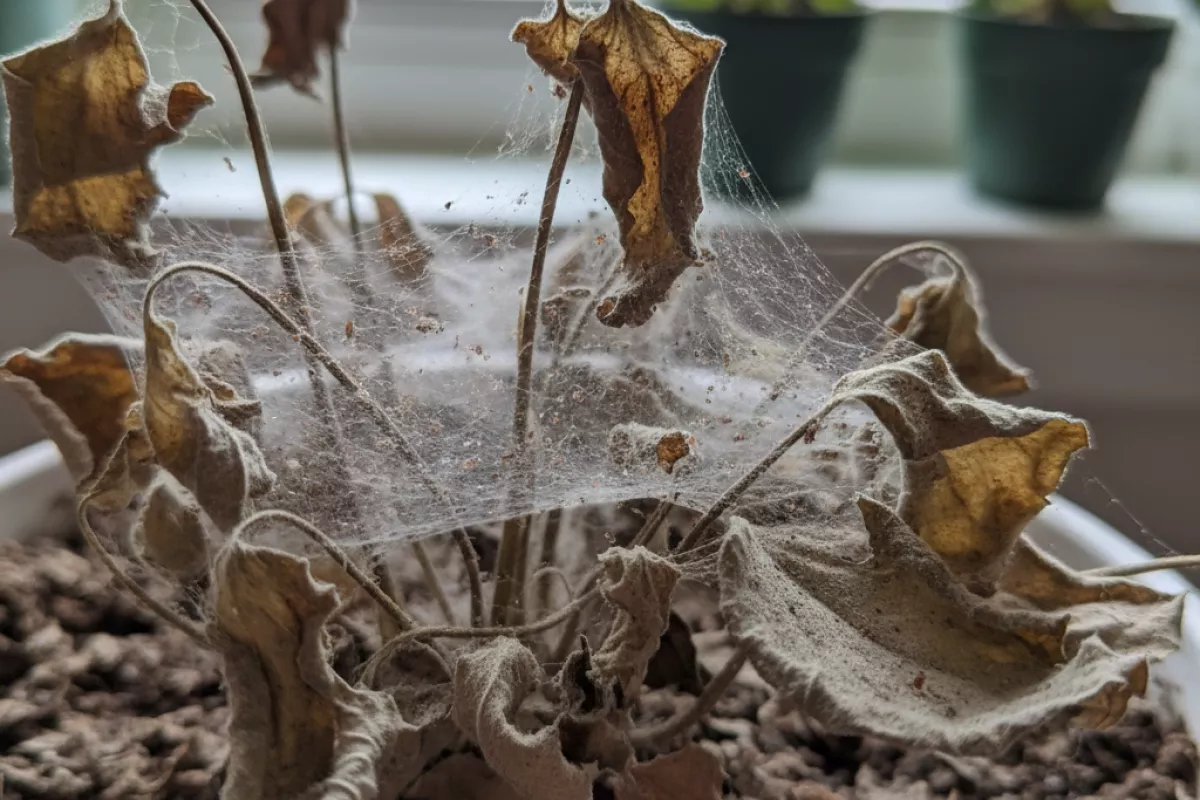
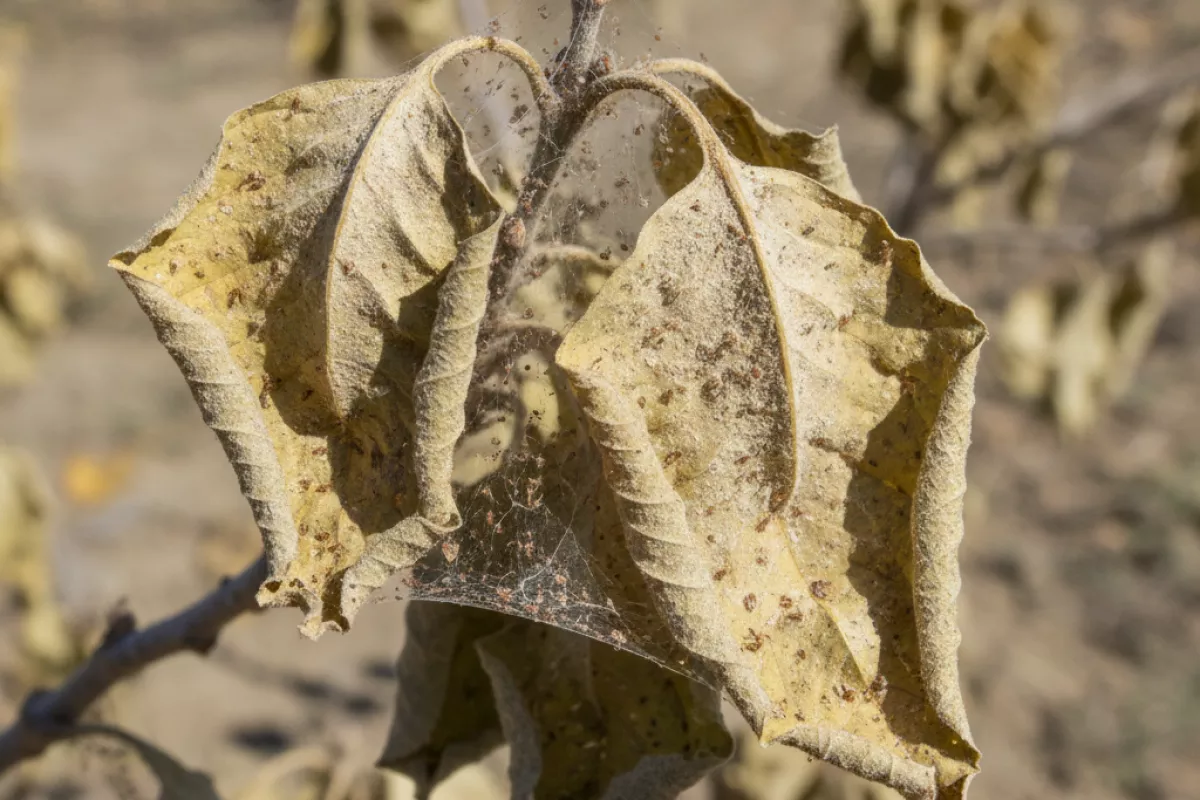
- Webbing traps dust and dulls the surface: fine silk catches household dust and soil particles, making foliage look dirty or powdery rather than visibly “buggy.”
- Damage shows up between waterings: you might water, see no improvement, and assume the air is too dry—because the problem isn’t root uptake, it’s ongoing leaf injury.
- Heat and sun make it worse: warm, bright spots speed up mite reproduction and increase leaf water loss, so the plant appears to be drying out faster than usual.
| What you notice | Why it mimics dryness | Clue it may be mites |
|---|---|---|
| Leaves look dusty or gray-green | Stippling and surface dulling resemble dehydration or dirty foliage | Wipe with a damp cloth: the “dust” doesn’t fully come off, and you may see tiny moving specks |
| Crispy edges and tips | Cell collapse at margins looks like low humidity burn | Damage spreads despite normal watering; edges may show fine speckling before browning |
| Faint yellowing or bronzing | Chlorophyll loss can resemble sun/heat stress | Color change is patchy and peppered with tiny pale dots rather than uniform fading |
| Leaves feel thin, papery, or brittle | Injured tissue can’t hold water well, so it “feels dry” even when hydrated | Newer leaves may distort or stall, and the plant doesn’t perk up after watering |
| Fine strands near veins or leaf joints | Looks like lint or cobwebs, not an insect sign | Webbing is anchored on the plant (undersides, petioles) and increases over days |
If you’re unsure, check the underside of a few leaves in bright light and tap a leaf over white paper. Moving dots or smears (often rusty-red, tan, or dark) are a stronger hint than the “dry” look alone.
How feeding removes plant moisture
Spider mites don’t chew holes in leaves. They pierce individual plant cells with needle-like mouthparts and drink the contents. Each puncture collapses a tiny patch of tissue, and when thousands of cells are drained, the leaf loses its ability to hold water evenly. That’s why foliage can look dusty, dull, or stippled long before it actually turns brown.
As more cells are emptied, the plant responds by closing stomata (the pores that regulate water loss and gas exchange). This can slow down transpiration in the short term, but it also reduces photosynthesis and weakens the leaf’s normal repair and cooling mechanisms. The end result is a leaf that dries out faster and feels papery, even if the potting mix is still moist.
- Cell-by-cell dehydration: Feeding removes fluid from mesophyll cells, lowering internal pressure (turgor). Without turgor, leaves lose firmness and start to curl at the edges.
- Damaged “plumbing” at the surface: Repeated punctures disrupt the waxy cuticle and the outer cell layer, so moisture escapes more easily from stressed areas.
- Patchy water movement: Injured tissue can’t move water and sugars normally, creating dry spots that expand into larger scorched-looking sections.
- Heat and light amplify the effect: In warm, dry air, the water deficit caused by feeding shows up faster, so stippling turns into crisping sooner.
A common giveaway is that the damage looks like fine speckling or a dusty cast rather than clean bite marks. Over time, those specks merge into bronzing, then the leaf may yellow and drop because the plant can’t keep that tissue hydrated and productive.
Texture changes in affected leaves
When spider mites feed, they puncture leaf cells and pull out the contents. That loss of moisture and chlorophyll doesn’t just change color; it changes how the leaf feels and behaves. What starts as a subtle “not quite right” surface can turn into brittle tissue that tears easily.
- Dry, papery feel: Leaves often lose their normal pliability and feel thin, crisp, or parchment-like, especially along the edges and between veins.
- Fine roughness or “sandpaper” texture: The top surface may feel slightly gritty due to widespread cell damage and tiny scar-like spots (stippling) that disrupt a smooth cuticle.
- Loss of turgor (floppiness that doesn’t bounce back): Even when the potting mix is moist, affected leaves may hang limply because damaged cells can’t hold water pressure the way healthy tissue does.
- Curling and puckering: Uneven feeding causes some areas to stop expanding while others keep growing, leading to cupping, twisting, or a quilted look.
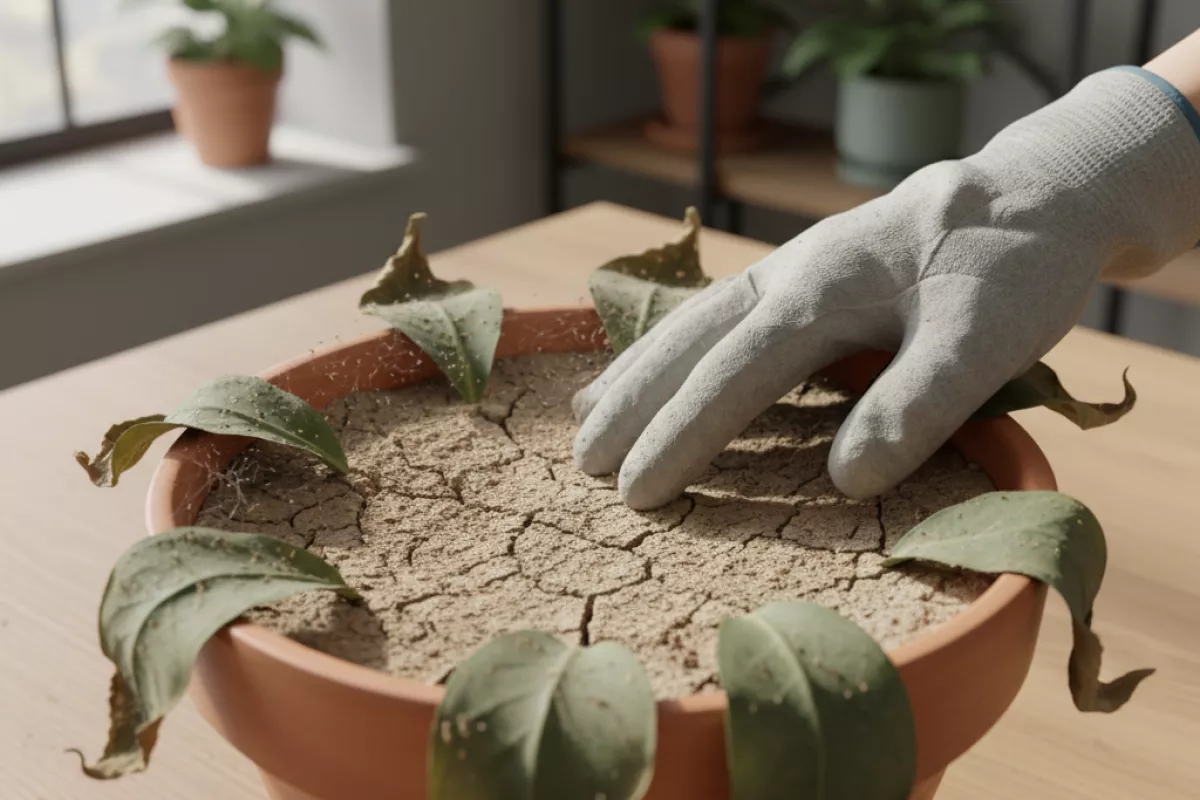
- Brittle margins and cracking: Edges may become fragile first, then develop tiny splits; older leaves can crumble when handled.
- Bronzing with a leathery feel: On some plants, heavy feeding produces a bronzed cast and a tougher, slightly thickened texture as the leaf ages prematurely.
- Sticky or dusty surface changes: Webbing can trap dust, and honeydew-like stickiness is more typical of other pests, but mite webbing plus household dust can make leaves feel dirty and dull.
| What you feel/see | What it usually suggests | Quick check to confirm |
|---|---|---|
| Papery dryness with tiny pale specks | Early to moderate mite feeding (cell contents removed) | Tap a leaf over white paper; look for moving dots and faint webbing near veins |
| Sandpapery top surface, dull finish | Widespread stippling; cuticle disrupted | Inspect the undersides with a hand lens; mites cluster along midrib and leaf folds |
| Cupping, puckering, distorted new growth | Feeding on tender tissue; uneven expansion | Check the newest leaves first; mites often concentrate on fresh growth in dry air |
| Brittle edges, cracking, leaf drop | Advanced damage and dehydration stress | Look for heavier webbing at petioles and leaf junctions; damage won’t “heal” on existing leaves |
A useful clue is how localized the texture shift is. Spider mite damage often shows up in patches that spread outward, while underwatering tends to affect the whole plant more evenly. Also, once a leaf has turned crisp or leathery, it won’t return to a normal feel; improvement shows up as healthier texture on new growth after you get the infestation under control.
Difference between drought stress and mites
Dry air, dusty foliage, and a plant that looks “tired” can come from simple underwatering, but spider mites can create a very similar look. The quickest way to tell is to focus on pattern (whole-plant vs. patchy), leaf surface clues (stippling/webbing), and how fast symptoms change after watering.
| What to check | More typical of drought stress | More typical of spider mites |
|---|---|---|
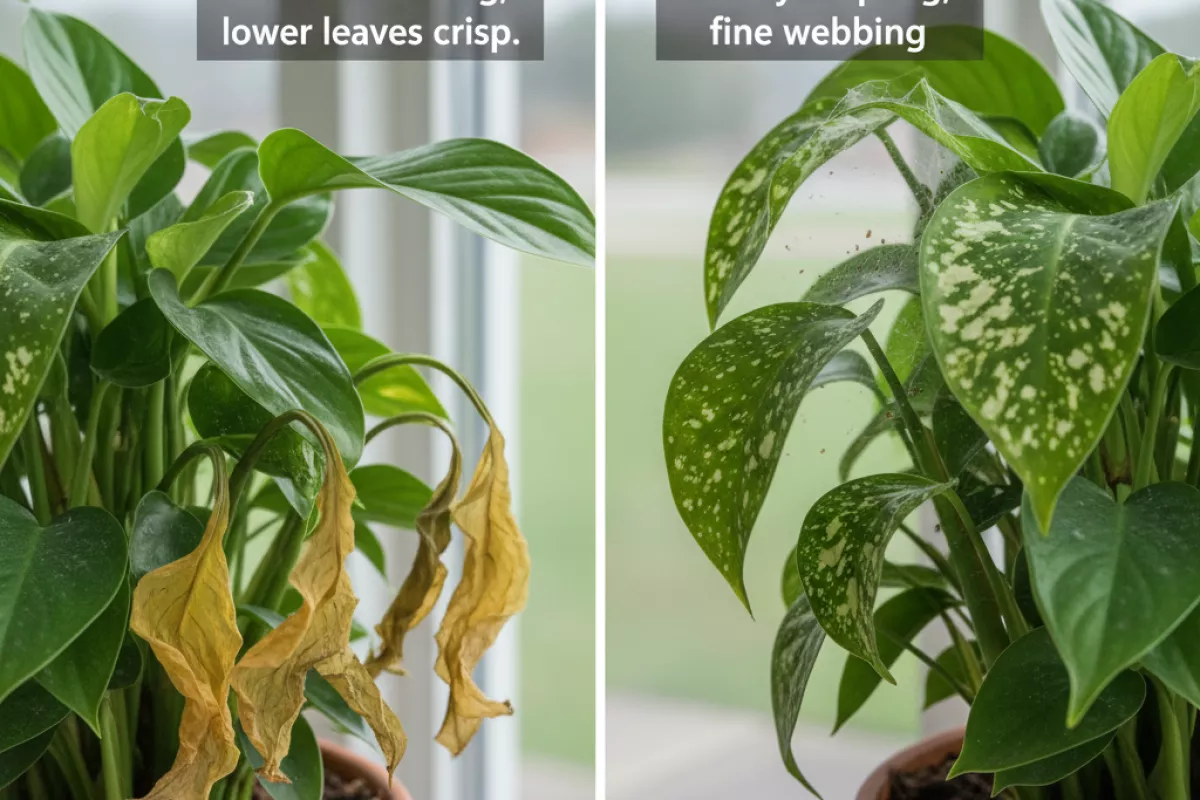
| Where symptoms show up first | Older/lower leaves often droop or crisp first; the whole plant may look uniformly thirsty. | Starts in patches, often on newer growth or leaf undersides; damage can be uneven across the plant. |
| Leaf appearance in bright light | Edges brown and papery; leaf may curl to reduce water loss, usually without fine speckling. | Fine pale “stippling” (tiny dots) that can merge into bronzing; leaves may look dusty even after wiping. |
| Underside of leaves | Usually clean aside from normal dust; no moving specks. | Look for tiny moving dots (often tan/red/green) and shed skins; damage is typically worse underneath. |
| Webbing | None. | Fine silk threads between veins, petioles, or leaf-to-stem junctions, especially when populations are high. |
| Response after watering | Perk-up can happen within hours to 1 day; new growth looks healthier once moisture is consistent. | Watering doesn’t stop new stippling; symptoms continue spreading unless mites are controlled. |
| Soil moisture check | Top 2–5 cm (1–2 in) may be dry and the pot feels light; repeated dry-downs match the timing of decline. | Soil may be adequately moist; plant still looks dull or speckled despite “correct” watering. |
| Simple confirmation test | No pests show up when you tap leaves over white paper. | Tap a leaf over white paper and smear the specks; you may see tiny streaks (crushed mites) and moving dots. |
- If the plant improves noticeably within 24 hours after a deep watering, the main issue is usually moisture-related (though mites can still be present at low levels).
- If you see stippling plus webbing, treat it as a mite problem even if the soil is dry—drought and pests often stack together.
- If only one side or a few leaves look “dusty” and faded, suspect pests first; underwatering tends to affect the plant more evenly.
It’s also common for drought stress to invite spider mites: dry conditions reduce a plant’s resilience and make the environment friendlier to mites. If you’re unsure, inspect the undersides with a flashlight and do the white-paper tap test before changing your watering routine dramatically.
Visual clues of hidden infestation
Early spider mite activity often looks like “dryness” before you ever spot a bug. The first hints are usually subtle changes in texture and color that don’t match normal watering issues, especially when the plant keeps declining even after you correct care.
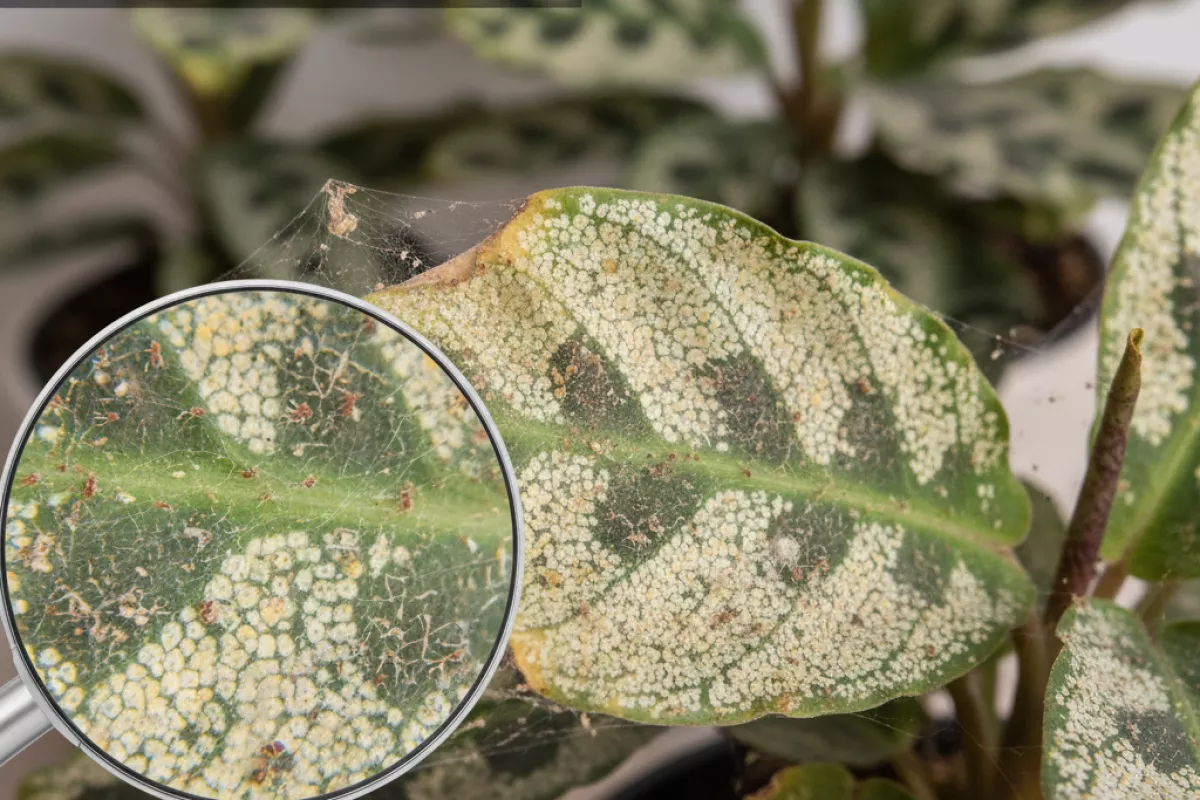
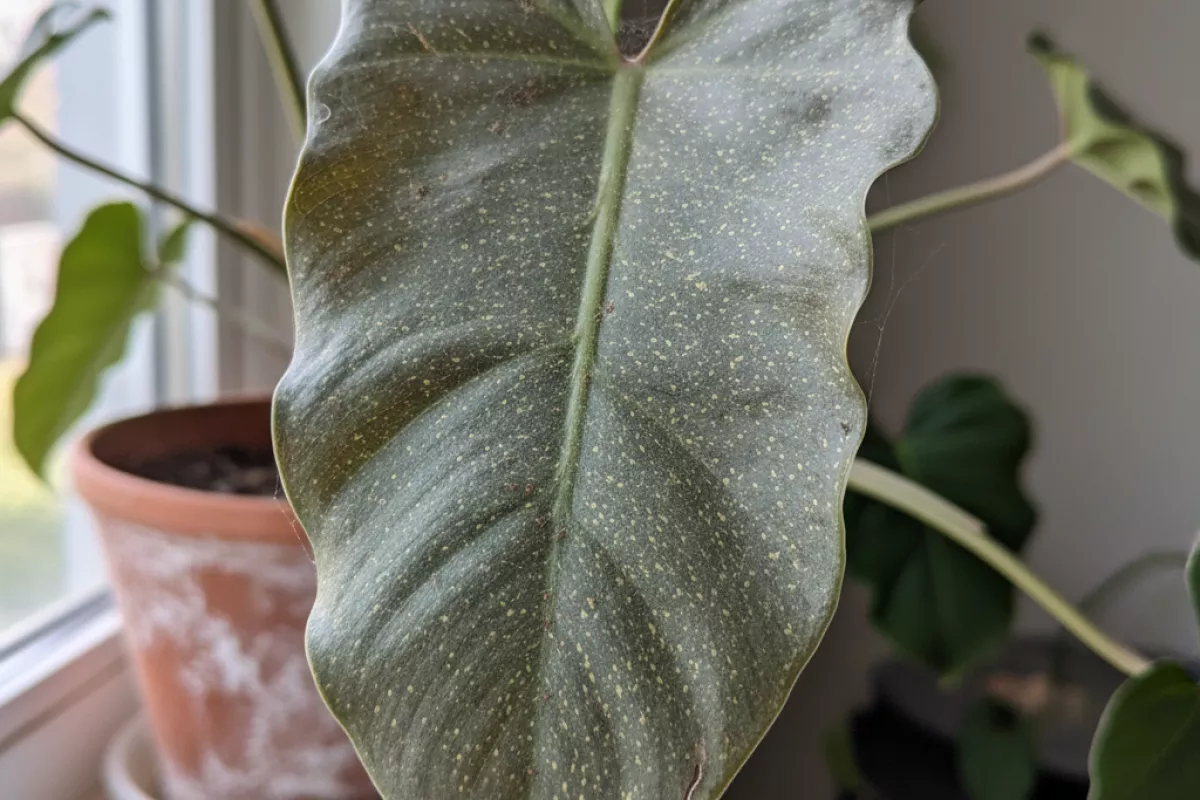
- Fine stippling on leaves: Tiny pale dots (like pinpricks) appear as mites pierce cells and sip sap. From a distance, the leaf can look lightly dusted or faded rather than evenly yellow.
- Bronzing or a dull, gray-green cast: As damage builds, the surface loses its healthy sheen and takes on a tired, matte look. This often shows up first on older leaves but can spread quickly.
- Dry, crispy edges with “paper” texture: Margins curl, crack, or feel brittle even when the potting mix is moist. The dryness tends to look patchy, not uniform across the whole plant.
- Webbing in protected spots: Look along the midrib, where the leaf meets the petiole, and in tight leaf clusters. Webs can be so thin they only show when they catch light at an angle or when you mist and droplets cling to strands.
- Dust that returns fast after wiping: If you gently wipe a leaf clean and it looks “dirty” again within 24–48 hours, that recurring film can be mite residue (shed skins and fine webbing) rather than household dust.
- Uneven yellowing that doesn’t follow veins: Nutrient issues often show patterns (like interveinal chlorosis). Mite feeding tends to create scattered speckling that merges into blotches.
- Leaf drop without obvious rot: Leaves may yellow, dry, and fall while stems stay firm and roots don’t smell sour. This “dry decline” can be a clue that the problem is happening on the leaf surface.
- Distorted new growth: Fresh leaves may emerge smaller, slightly puckered, or misshapen because the plant is struggling to support new tissue under constant feeding pressure.
If you want a quick confirmation without a magnifier, try the white-paper test: hold a sheet under a suspect leaf and tap it sharply. If you see tiny moving specks, that’s a strong sign. A jeweler’s loupe around 10× can make the diagnosis obvious, but even without one, the combination of stippling, recurring “dust,” and webbing in leaf joints is hard to explain by low humidity alone.
Steps to confirm the cause
Start by separating “environment stress” from “pest damage.” Dry air and dusty foliage can make leaves look tired on their own, but they also make spider mites much more likely. A quick check in good light usually tells you which problem is driving what you’re seeing.
-
Rule out simple dehydration first. Feel the top 2–3 cm (1–1.2 in) of potting mix. If it’s dry and the pot feels unusually light, the crisping may be mostly from inconsistent watering. If the mix is evenly moist yet leaves still look stippled or bronzed, look harder for pests.
-
Inspect the underside of leaves with a “white paper test.” Hold a sheet of white paper under a leaf and tap the leaf firmly. If tiny specks fall and begin to crawl, that’s a strong sign of mites. If you only see inert dust that doesn’t move, it’s more likely airborne debris or residue.
-
Look for the classic feeding pattern. Spider mite injury often appears as fine pale stippling (pinpoint dots) that merges into a dull, gray-green or bronze cast. Dry indoor air alone more often causes uniform browning at tips/edges without the peppered look.
-
Check for webbing in sheltered spots. Use a flashlight and look along the midrib, where leaf meets stem, and in tight leaf clusters. Early infestations may have no visible webbing; later stages can show thin, silky strands that catch dust and look like “dirty” threads.
-
Confirm with magnification if you can. A 10× hand lens (or a phone camera zoomed in with bright light) helps you spot tiny oval bodies and eggs, usually clustered on the underside. Dust will look irregular and granular; mites look like distinct moving dots.
-
Compare newer growth vs. older leaves. Mites often start on older, lower, or more sheltered foliage and spread upward. If the newest leaves are affected first, consider heat stress, fertilizer burn, or light intensity changes as co-causes.
-
Assess the room conditions that favor flare-ups. Note whether the plant sits near a heater, vent, or sunny window where air is hot and dry. As a rough guide, many houseplants struggle when humidity stays below about 40% (above about 40% is typically easier on foliage), especially with warm drafts.
-
Track progression over 3–7 days. Take a clear photo of the same leaf area now and again in a week. Rapid spread of stippling and leaf dullness points toward an active pest population; slow change with mainly crispy tips points more toward dryness and dust buildup.
| What you observe | What it usually suggests | How to double-check |
|---|---|---|
| Dust wipes off easily; leaf color underneath looks normal | Mostly surface dust or residue | Wipe one leaf with a damp cloth; compare shine and color to an uncleaned leaf |
| Fine pale stippling that looks “speckled,” especially on leaf undersides | Feeding damage consistent with mites | White paper test; inspect with 10× magnification |
| Thin webbing in leaf joints or along veins | More established infestation | Flashlight check at night or in a dark room; look for moving dots near webbing |
| Crispy brown tips/edges without stippling; soil often dries fast | Low humidity and/or irregular watering | Check moisture at 2–3 cm (1–1.2 in) depth; note proximity to vents/heaters |
| Leaf looks dull and dirty, but no movement on paper and no stippling | Dust plus general stress (light/airflow changes) | Clean a few leaves; monitor for new speckling over 3–7 days |
If you find both dust and crawling specks, treat it as a combined issue: clean the foliage to remove debris and improve photosynthesis, then focus on stopping the mites so the “dry, dusty” look doesn’t come right back.
Treatment strategies for recovery

Start by stabilizing the plant and lowering mite pressure at the same time. Dry, dusty foliage usually means the leaf surface is stressed and respiration is impaired; spider mites take advantage of that weakness. The fastest gains come from improving humidity and leaf cleanliness while using a targeted control method that matches how heavy the infestation is.
- Isolate and inspect: Move the plant away from others to prevent spread. Check the undersides of leaves and along petioles for stippling, fine webbing, and moving dots. Prune off the worst-hit leaves if removal won’t shock the plant.
- Rinse to knock populations down: A firm shower of lukewarm water can remove dust and dislodge many mites and eggs. Aim the spray at leaf undersides. Repeat every 2–3 days for 1–2 weeks, letting the pot drain fully so roots don’t sit in water.
- Raise humidity without waterlogging: Mites thrive in hot, dry air. Use a humidifier or a pebble tray to keep the area around the plant closer to 50–60% relative humidity (mites struggle more there). Keep airflow gentle to reduce stagnant, dusty conditions.
- Clean leaves safely: Wipe leaves with a soft, damp cloth to remove dust that blocks light and shelters pests. Avoid oily “leaf shine” products; they can clog stomata and make recovery slower.
- Use a low-toxicity spray correctly: Insecticidal soap or horticultural oil can work well when coverage is thorough. Spray until the undersides glisten, then reapply on a schedule (often every 5–7 days) to catch newly hatched mites. Test on a small section first and avoid spraying in strong sun or heat to reduce leaf burn.
- Escalate if the problem keeps returning: For persistent outbreaks, consider a miticide labeled for spider mites (not a general insect spray, which often misses mites). Rotate products with different modes of action if multiple treatments are needed, and follow label intervals carefully.
- Consider beneficial predators (best indoors or in stable spaces): Predatory mites can be effective when humidity is moderate and pesticides aren’t being used. They work best after an initial rinse reduces the heaviest populations.
- Support recovery with better growing conditions: Keep light appropriate for the species, and avoid overfertilizing while the plant is stressed. Water when the top 2–3 cm (1–1.2 in) of soil is dry (adjust for plant type), and ensure the pot has drainage so roots can recover.
| Situation | What to do now | How often | Notes to avoid setbacks |
|---|---|---|---|
| Light dust, no webbing | Rinse leaves + wipe undersides | Weekly, then as needed | Keep leaves clean; improve airflow to reduce dust buildup. |
| Early mites (stippling, a few moving dots) | Rinse thoroughly + insecticidal soap or horticultural oil | Rinse every 2–3 days; spray every 5–7 days | Coverage matters most; target leaf undersides and stems. |
| Moderate infestation (more stippling, scattered webbing) | Prune worst leaves + rinse + repeat sprays on schedule | 7–14 days of consistent treatment | Don’t skip intervals; eggs hatch in waves. |
| Severe infestation (heavy webbing, leaf drop) | Hard rinse + isolate + consider a labeled miticide or predators | Follow label; reassess after 10–14 days | General insect sprays may fail; avoid treating in high heat or direct sun. |
Once you see fewer new stipples and no fresh webbing, keep monitoring for another 2–3 weeks. A quick weekly underside check and occasional rinse are usually enough to prevent a rebound, especially if the plant is no longer sitting in overly dry, dusty air.