Sudden Brown Leaf Spots in the Garden Explained

 Covers why garden plants can develop sudden spots, including weather conditions, soil-related triggers, and pest damage that looks similar. Explains how to diagnose outdoor causes, take immediate corrective actions, and use seasonal prevention methods to stop spotting from coming back.
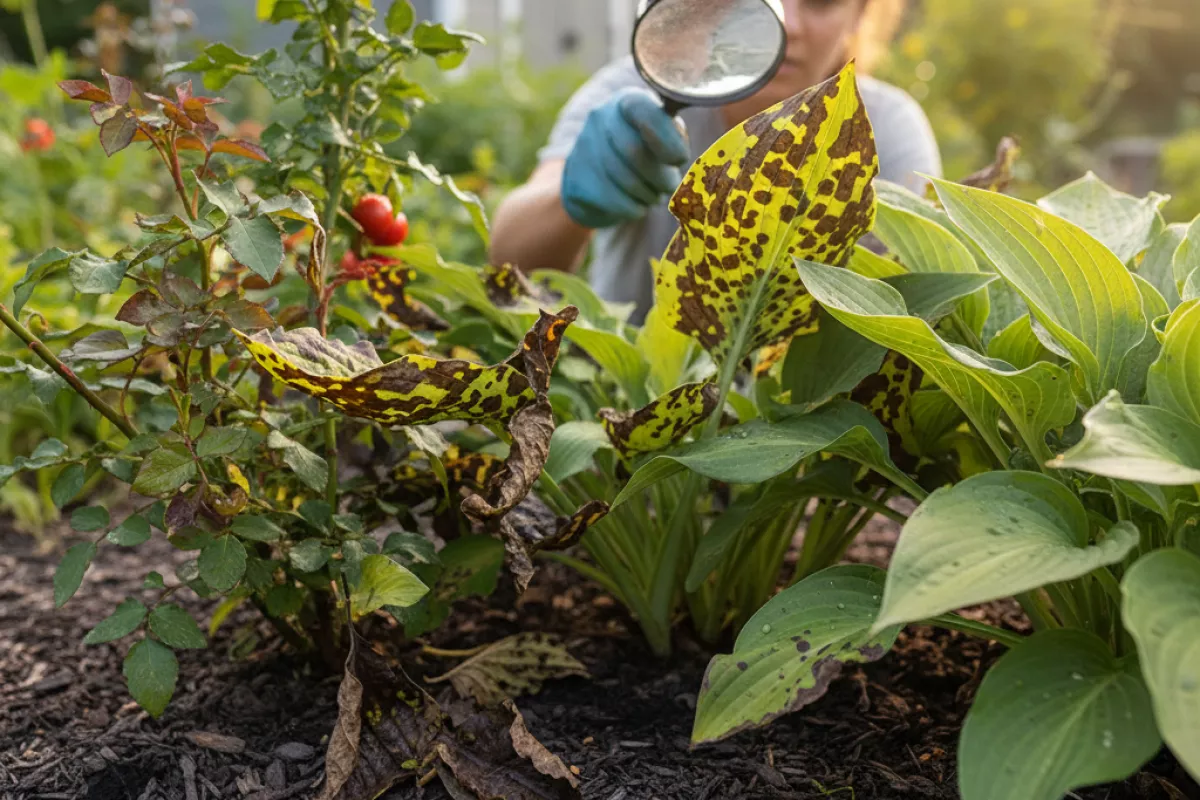
Brown spots that appear on leaves almost overnight can look alarming, but the cause is often manageable once you identify it. This guide covers the most common triggers of sudden spotting, including inconsistent watering, sun scorch, nutrient stress, fungal disease, and pest feeding, with practical steps to act fast, limit spread, and reduce the chance of future flare-ups.
Why garden plants develop sudden spots
New blotches on leaves usually show up when a plant’s tissues are stressed or damaged faster than they can repair themselves. The trigger might be biological (like a pathogen), environmental (sun, cold, wind), chemical (sprays, fertilizer salts), or even mechanical (abrasion). What makes the spots seem “sudden” is that the injury often happens first, then the discolored patch becomes visible a day or two later as cells collapse and dry.
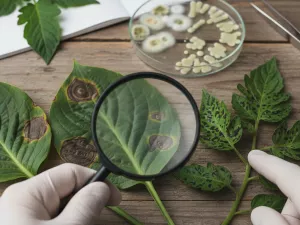
Most spot patterns fall into a few buckets. Looking at where the marks appear (old vs. new leaves, top vs. underside), how they look (rings, halos, water-soaked edges), and how fast they spread helps you narrow the cause before you treat anything.
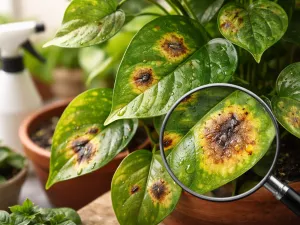
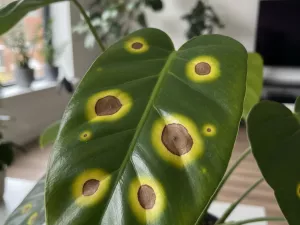
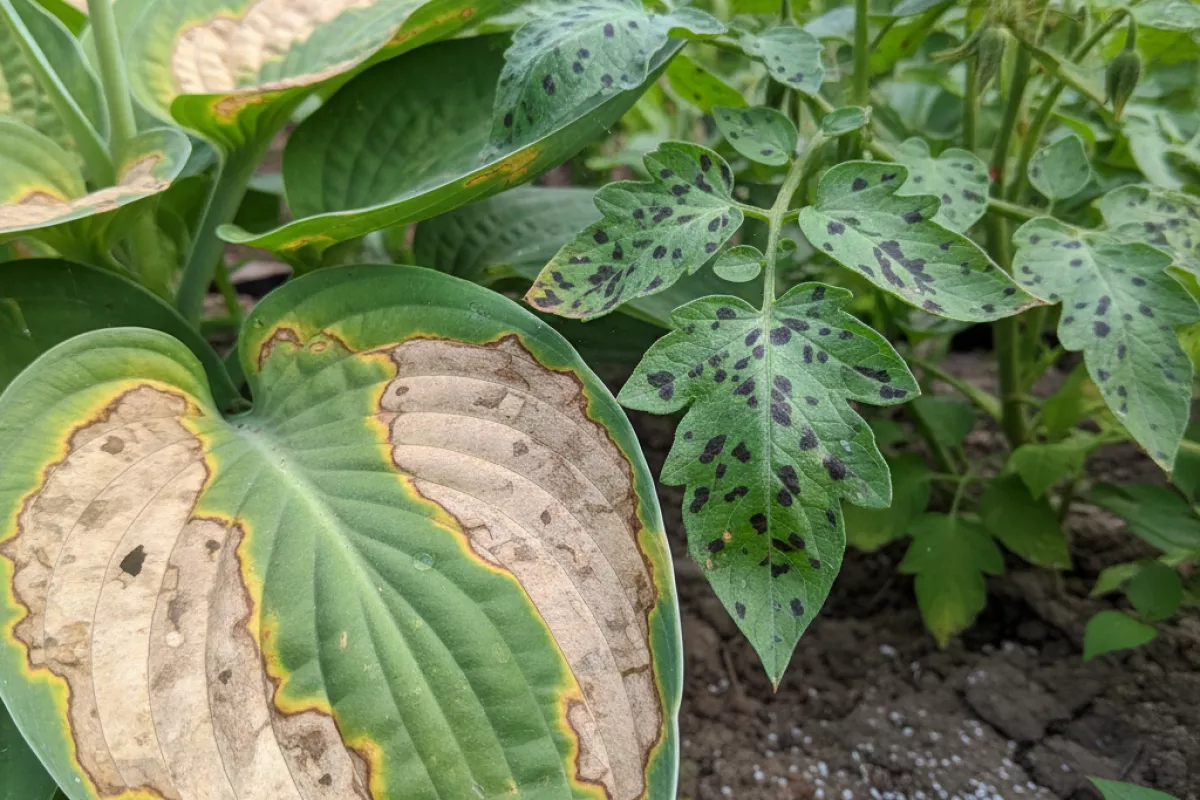
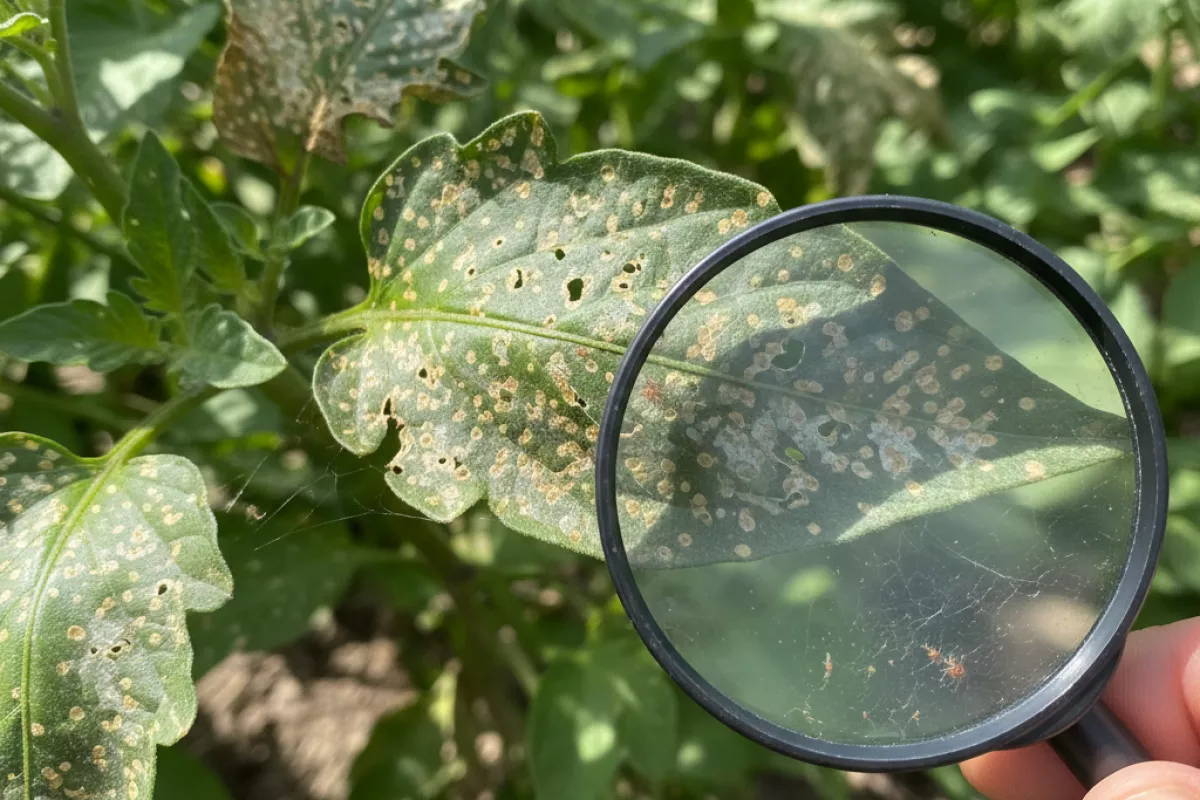
- Fungal and bacterial leaf spot infections: Many start as small dark flecks that expand into round or angular lesions. Yellow halos, tiny black “pepper” dots (spore structures), or a water-soaked look after rain often point to microbes. These problems ramp up when foliage stays wet for long stretches, especially overnight.
- Sudden weather shifts: Cold snaps, hot spells, or rapid swings can injure leaf cells, leaving tan or brown patches that don’t necessarily keep spreading. Frost damage often hits tender new growth first; heat scorch tends to show on the sunniest side of the plant.
- Sunscald after a change in light: Moving a plant from shade to full sun, or pruning that suddenly exposes inner leaves, can cause bleached areas that later turn papery brown. The damage is usually worst on upper, outward-facing leaves.
- Water stress (too dry or too wet): Drought can cause crisp-edged brown areas, while waterlogged roots can lead to blotchy yellowing and secondary spotting as the plant weakens. In both cases, the spots are a symptom of disrupted water flow, not always a direct infection.
- Chemical injury from sprays or fertilizer: Concentrated foliar feeds, herbicide drift, soaps/oils applied in strong sun, or overfertilizing can create scattered burn marks. A clue is a sharp boundary where droplets landed or where spray coverage was uneven.
- Salt buildup and hard-water residue: In containers and raised beds, salts from fertilizer or alkaline irrigation water can accumulate and burn leaf margins or create speckling. This is more common when watering is light and frequent rather than deep and thorough.
- Insect feeding and mites: Some pests cause stippling that merges into bronzed patches; others leave distinct spots where cells were pierced. Check the undersides for fine webbing, cast skins, or tiny moving dots.
- Physical damage: Wind whip, hail, sand abrasion, or leaves rubbing against supports can create irregular brown scars. These marks typically stay localized and don’t develop the expanding rings you see with many diseases.
| What you see on the leaf | Most likely driver | Why it happens | Quick check in the garden |
|---|---|---|---|
| Round spots with a yellow halo; may slowly enlarge | Fungal leaf spot | Fungus colonizes tissue, especially with prolonged leaf wetness | Look for repeated spotting on lower leaves and after rainy periods; check for tiny dark specks in the center |
| Angular spots limited by leaf veins; can look water-soaked | Bacterial leaf spot | Bacteria spread in splashing water and enter through wounds/stomata | Inspect after overhead watering; crush a spot gently—bacterial lesions can appear greasy/wet |
| Bleached patches that turn tan and papery on sun-exposed surfaces | Sunscald | Sudden light/heat overwhelms leaf pigments and cells | Ask what changed: pruning, moving pots, removing shade cloth; damage is worst on the brightest side |
| Crisp brown edges or patches during dry spells; leaves may curl | Drought stress / irregular watering | Water supply can’t meet transpiration demand | Check soil 5–8 cm (2–3 in) down; if dry and dusty, adjust watering depth and frequency |
| Random burn-like specks or blotches where droplets landed | Chemical/spray burn | Concentrated salts or oils damage cells, often intensified by sun | Review what was applied in the last 1–3 days; compare sprayed vs. unsprayed plants nearby |
| Fine pale stippling that turns bronze; tiny dots may move on the underside | Mites or piercing insects | Feeding removes cell contents, leaving many small dead spots | Tap a leaf over white paper; look for crawling specks or webbing along veins |
One caution: it’s easy to misread early symptoms. A plant can start with weather injury and then develop secondary fungal spotting on the weakened tissue. If you’re unsure, focus first on low-risk fixes—improving airflow, watering at the soil line, removing the worst affected leaves, and avoiding new sprays until you’ve identified the pattern.
Weather conditions linked to spotting
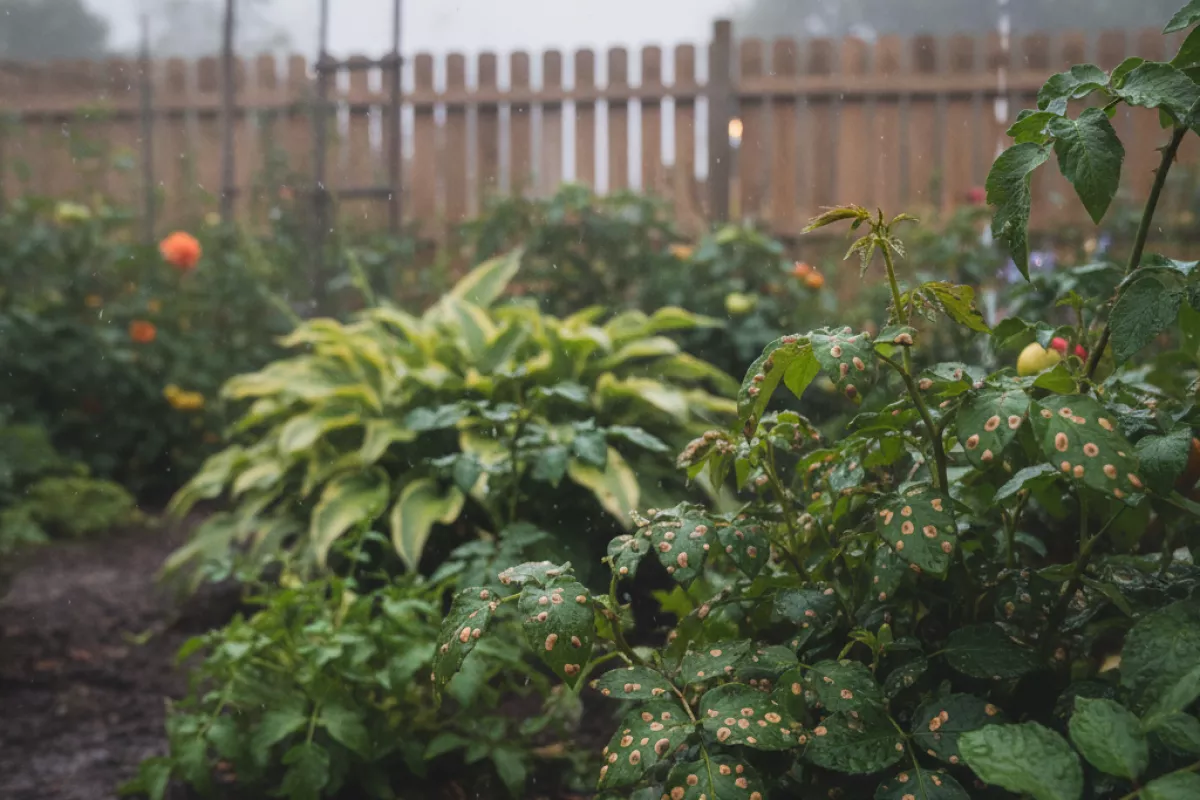
Sudden brown spots often show up right after a weather shift because moisture, temperature, and wind change how long leaves stay wet and how easily spores spread. Many common leaf-spot fungi and bacteria don’t need much time to get established; a few hours of damp foliage can be enough to start new lesions, especially on tender growth.
| Weather pattern | Why spots appear | What you’ll notice in the garden | Practical response |
|---|---|---|---|
| Warm rain followed by mild nights (around 18–24°C (64–75°F)) | Leaf surfaces stay wet longer; fungi germinate and infect quickly. | New specks expand into round or irregular brown patches, sometimes with a yellow halo. | Water early so leaves dry fast; thin crowded plants to improve airflow; remove the worst leaves rather than stripping the whole plant. |
| High humidity with overcast days | Slow drying keeps pores and stomata damp; disease pressure builds even without heavy rain. | Spotting starts low in the canopy where air is still; older leaves decline first. | Open up the canopy, avoid overhead watering, and keep mulch from touching stems and lower foliage. |
| Heat stress then sudden watering or storms (above 30°C (86°F) then rapid cooling) | Stressed leaves are more vulnerable; rapid rehydration can cause tissue damage that looks like disease. | Blotchy brown areas that may look “scorched,” often on exposed leaves; not always fuzzy or ringed. | Deep-water consistently (about 2.5 cm (1 in) per week, adjusted for soil); add shade cloth for sensitive plants during heat spikes. |
| Cool, wet stretches (around 10–16°C (50–61°F)) | Some pathogens thrive in cool moisture; plant metabolism slows, delaying recovery. | Spots develop slowly but keep multiplying; leaves may yellow and drop sooner than expected. | Reduce splash (mulch, drip irrigation), and clean up fallen leaves promptly to cut reinfection. |
| Wind-driven rain or hail | Physical injury creates entry points; wind spreads spores and bacteria across beds. | Jagged tears with brown margins; spotting appears in a “storm direction” pattern on one side of plants. | Prune damaged tissue with clean tools, stake floppy plants, and avoid working in wet foliage to prevent spreading microbes. |
| Big day–night swings (for example 28°C (82°F) days and 12°C (54°F) nights) | Dew forms heavily at night; repeated wet-dry cycles favor many leaf-spot organisms. | Morning wetness on leaves even without irrigation; small spots pop up repeatedly. | Shift watering to morning, increase spacing, and aim irrigation at soil level rather than foliage. |
If you’re trying to decide whether you’re seeing a weather-driven disease flare-up or simple stress damage, look at timing and pattern. Spots that spread after several damp mornings, especially starting on lower leaves, usually point to an infection cycle. Damage that appears immediately after hail, hot sun, or a sharp cold snap is more likely weather injury, though injured leaves can later become infected.
- Fast clue: If leaves stay wet past mid-morning, conditions are favorable for spotting organisms.
- Where it starts: Lower, shaded foliage suggests humidity and splash; upper, sun-exposed leaves suggest scorch or wind burn.
- What to change first: Improve drying time (spacing, pruning, morning watering) before reaching for treatments.
Soil-related triggers to check
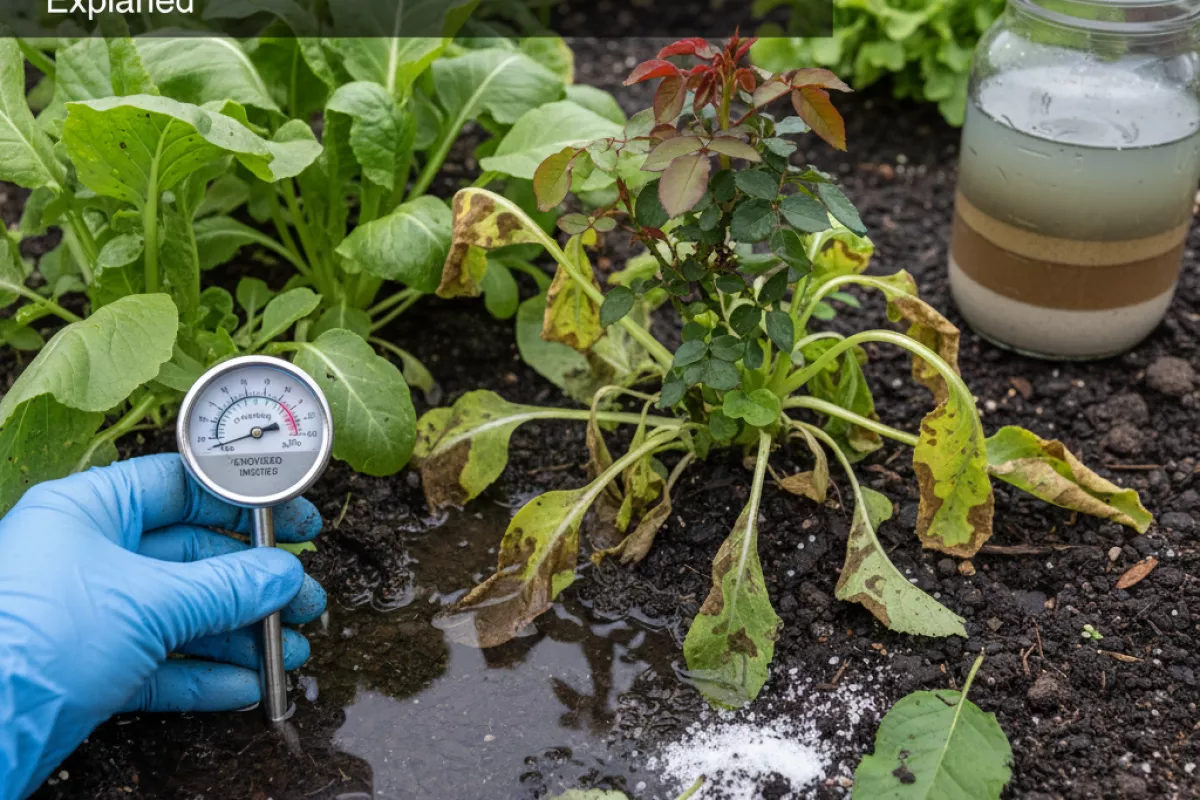
When brown spots show up fast, the root zone is often part of the story. Soil that stays too wet, swings between bone-dry and soggy, or has a salt or nutrient imbalance can stress leaves and make them more vulnerable to spotting. A quick check of moisture, drainage, and recent amendments usually narrows it down.
- Waterlogged soil and poor drainage: Roots deprived of oxygen can’t move water properly, and leaves may develop brown patches along with yellowing or limp growth. Check whether water is still sitting 2.5–5 cm (1–2 in) below the surface a day after watering or rain. If it is, loosen compaction, add organic matter, and consider raising beds 15–30 cm (6–12 in) for persistently heavy sites.
- Hydrophobic or unevenly wet potting mix: In containers, dry peat-based mixes can repel water so the top looks wet while the core stays dry. Symptoms can mimic disease: crisp brown spots and scorched edges. Re-wet by soaking the pot for 10–20 minutes (10–20 min) and then let it drain fully; long term, refresh the mix and avoid letting it dry to the point it shrinks from the pot wall.
- Salt buildup from fertilizer or hard water: Excess salts pull moisture from roots and can create scattered necrotic spots, especially on older leaves. A white crust on soil or pot rims is a clue. For containers, flush with clean water equal to 2–3 times the pot volume (for example, 6–9 L for a 3 L pot [1.6–2.4 gal for a 0.8 gal pot]) and ensure free drainage. In beds, water deeply and less often to move salts below the root zone.
- Overfertilizing or “hot” amendments: Fresh manure, strong synthetic feeds, or heavy composted poultry litter can burn roots and leaf tissue. If spotting started within 24–72 hours (1–3 days) of feeding, suspect this. Pause fertilizing, irrigate to dilute, and resume later at a lower rate once new growth looks normal.
- pH out of range causing nutrient lockout: When pH drifts, plants may show brown speckling from deficiencies (often potassium, magnesium, or manganese depending on the plant). A simple soil test is more reliable than guessing. As a general guide, many garden plants prefer about pH 6.0–7.0; acid-lovers (like blueberries) are different. Adjust gradually; rapid swings can worsen stress.
- Compaction and shallow rooting: Foot traffic and heavy clay can limit roots to the top few centimeters/inches, making plants prone to heat and drought stress that shows as spotting. If a trowel is hard to push in, aerate with a fork and top-dress with 2.5–5 cm (1–2 in) of compost; avoid working soil when it’s wet.
- Mulch problems: Mulch piled against stems can keep crowns wet and invite rot; too-thick mulch can also keep soil cold and soggy. Keep mulch 5–10 cm (2–4 in) away from stems and aim for a layer around 5–7.5 cm (2–3 in) for most beds.
- Contaminated or exhausted potting soil: Reused container mix can harbor pathogens or have depleted structure, leading to inconsistent moisture and stress spotting. If plants repeatedly spot in the same pots, replace the mix, wash containers, and avoid reusing soil from diseased plants.
| What you notice | Likely soil issue | Quick check | Practical fix |
|---|---|---|---|
| Leaves limp, yellowing, brown patches; soil stays wet | Drainage/oxygen shortage | Dig 10 cm (4 in) down; feel for sogginess 24 hours (1 day) after watering | Improve drainage, reduce watering frequency, raise bed 15–30 cm (6–12 in) |
| Crispy spots and edges; plant dries out fast | Dry pockets or hydrophobic mix | Probe moisture at root depth 7.5–10 cm (3–4 in) | Soak container 10–20 minutes (10–20 min), refresh mix, water more evenly |
| White crust on soil/pot; spotting on older leaves | Salt accumulation | Check for crust; note frequent feeding or hard water use | Flush with 2–3× pot volume; in beds, deep watering to leach salts |
| Spots appear 24–72 hours (1–3 days) after fertilizing | Fertilizer burn | Review what and how much you applied | Pause feeding, water to dilute, resume later at lower rate |
| Interveinal yellowing with speckling; growth stalls | pH-related nutrient lockout | Run a soil pH test; compare to plant preference | Adjust pH slowly; use targeted amendments based on results |
If the soil checks out but spotting keeps spreading, look at leaf wetness and airflow next: wet foliage plus stressed roots is a common one-two punch. Also remember that once a leaf area turns brown, it won’t green back up; judge improvement by healthier new growth over the next 7–14 days (1–2 weeks).
Pest damage that resembles spots
Not every “spot” is a disease. Many insects and mites leave tiny punctures, scraped patches, or bleached stippling that turns tan or brown as the tissue dries. The giveaway is that the marks often look more like scattered pinpricks, silvery scuffs, or irregular freckles than neat circles with defined margins.
| Likely culprit | What the “spots” look like | Where to check | Quick confirmation |
|---|---|---|---|
| Spider mites | Fine yellow-to-brown stippling; leaves may bronze; severe cases look dusty | Undersides of leaves, especially in hot, dry weather | Tap a leaf over white paper; moving specks and faint webbing suggest mites |
| Thrips | Silvery streaks or pale patches that later brown; tiny black specks (frass) | New growth, flower buds, leaf folds | Shake foliage over paper; slender, fast-moving insects appear |
| Leafhoppers | “Hopperburn”: pale speckling that becomes brown along edges or tips | Leaf undersides; they jump when disturbed | Watch for quick sideways movement; damage often starts on older leaves |
| Stink bugs and other true bugs | Small, pale puncture marks that turn brown; may see cloudy blotches on fruit | Fruit clusters and tender stems | Look for feeding punctures plus deformed fruit or corky patches |
| Flea beetles | Tiny “shot holes” that can begin as dark specks before tissue drops out | Seedlings and young leaves | Disturb plants; small beetles hop like fleas |
| Scale insects | Yellow specks and weak growth; sticky honeydew may lead to sooty mold | Stems, leaf midribs, leaf undersides | Gently scrape a bump with a fingernail; if it lifts off, suspect scale |
If you’re trying to separate insect feeding from fungal leaf spots, look for patterns. Pest injury is usually more random, often concentrated on the newest or most sheltered growth, and it rarely forms the classic “target” rings. You may also see honeydew (sticky shine), frass (pepper-like dots), webbing, or actual insects during a close inspection.
- Check the underside first. Many culprits feed below the leaf surface, so the top shows spots while the source stays hidden.
- Use a hand lens. A 10× lens (about 10×; roughly 0.4 in viewing field depends on model) makes mites, thrips, and eggs much easier to confirm.
- Do a simple rinse test. Spray with a firm stream for 10–15 seconds per plant; if new “spots” slow down afterward, mites or thrips were likely involved.
- Respond gently first. Remove the worst leaves, reduce plant stress (even watering, less dust), and avoid heavy nitrogen that pushes tender growth pests love.
When the damage is spreading fast, treat the cause rather than the symptom: repeated water sprays, insecticidal soap, or horticultural oil can help for soft-bodied pests, but apply in cooler parts of the day and follow label directions. If leaves have crisp brown patches but you can’t find insects after several checks, revisit other causes like sunscald, fertilizer burn, or disease.
How to diagnose outdoor causes
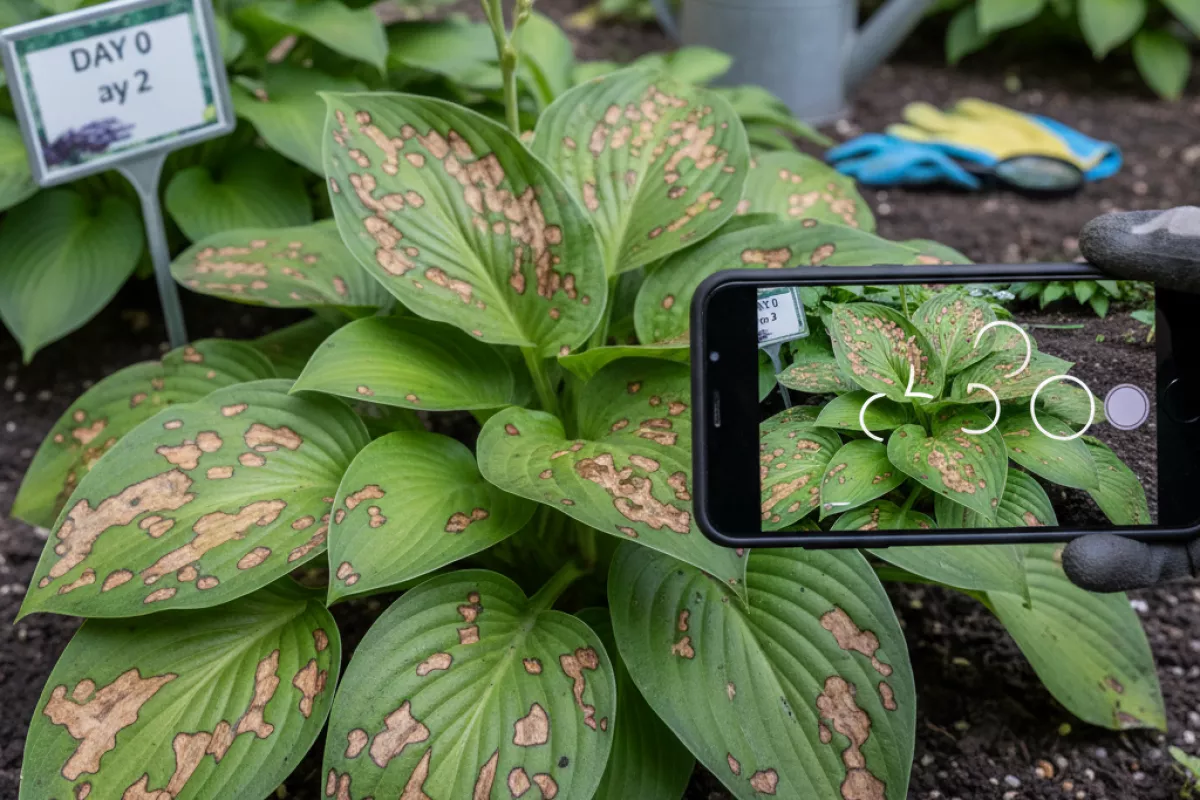
Start by treating brown leaf spots as a clue, not a conclusion. The fastest way to narrow it down is to look at pattern (which plants, which leaves, which side of the plant), then match that pattern to recent weather, watering, and pest activity. A phone photo taken today and again in 48 hours helps you see whether the damage is spreading like a disease or staying put like sunscald or chemical burn.
-
Map where the spots are showing up.
- Only one plant: think localized issues (splashback from soil, a sprinkler hitting that plant, a pet’s favorite corner, a nearby herbicide drift).
- Several plants in one bed: look for irrigation patterns, drainage problems, or a shared pathogen spreading via rain splash.
- Many plants across the yard: suspect weather extremes (heat, hail, late frost), water quality, or a broad spray/feeding issue.
-
Check which leaves are affected first.
- Lower leaves first: common with soil-splashed fungal/bacterial leaf spots and poor airflow; also shows up with overwatering and muddy beds.
- Upper/new growth first: more typical of sunscald, wind burn, or spray injury; also some pests prefer tender growth.
- Only leaf edges or tips: often drought stress, wind desiccation, salt/fertilizer burn, or inconsistent watering.
-
Inspect the spot itself (shape, border, and texture).
- Round spots with a darker halo: often fungal leaf spot; look for multiple “target-like” circles or tiny black dots (spore structures) in the center.
- Angular spots limited by leaf veins: more suggestive of bacterial problems, especially after warm, wet weather.
- Bleached/tan patches that turn papery: sunscald or heat damage, especially after a sudden jump to 30°C (86°F) or higher.
- Silvery streaking, stippling, or tiny specks: feeding damage from thrips, mites, or leafhoppers rather than a pathogen.
-
Look for “spread behavior” over 2–3 days.
- New spots appear daily: points toward an active infection or ongoing pest feeding.
- Existing spots enlarge but no new ones: could be stress injury (sun/chemical) that’s finishing its course.
- No change: older damage, a one-time event (hail, pruning injury), or a problem that has already stopped.
-
Match symptoms to recent outdoor conditions.
- After heavy rain or overhead watering: splash dispersal and long leaf-wetness periods favor leaf spot diseases.
- After a windy, hot day: leaf edges scorch; tender plants can show tan blotches on the sun-facing side.
- After a cold night: frost can cause water-soaked areas that later turn brown; damage often follows low spots where cold air settles.
- After fertilizing or spraying: uneven blotches, speckling, or burnt margins can follow concentrated mixes or spraying in full sun.
-
Rule out pests with a quick, practical check.
- Flip leaves and look along veins and undersides; mites and eggs hide there.
- Tap a stem over white paper; moving dots can indicate mites or thrips.
- Check for sticky residue (honeydew) and sooty mold, which often trails sap-suckers like aphids or whiteflies.
| What you see outdoors | Most likely direction to investigate | Quick confirmation step | First adjustment to try |
|---|---|---|---|
| Spots start on lower leaves; soil splashes visible after rain | Fungal/bacterial leaf spot encouraged by splash and leaf wetness | Look for halos, angular lesions, or tiny dark specks in spots | Water at soil level; add 5 cm (2 in) mulch to reduce splash |
| Tan/bleached patches on the sun-facing side after a heat spike | Sunscald/heat stress | Damage is worst on exposed leaves; shaded leaves look normal | Provide temporary shade cloth; water deeply in the morning |
| Leaf edges brown and crispy; plant wilts midday but recovers вечером | Drought stress or inconsistent watering | Check soil 5–8 cm (2–3 in) down; it’s dry when symptoms appear | Switch to deep watering 2–3 times/week (weather-dependent) |
| Scattered spotting after spraying (soap, oil, fertilizer, herbicide nearby) | Chemical/spray injury or drift | Pattern follows spray direction; newest spots appear within 24–72 hours | Rinse foliage promptly; avoid spraying above 27°C (81°F) |
| Fine stippling or bronzing; tiny moving dots on paper test | Mites/thrips feeding | Inspect undersides with a hand lens; look for webbing or black specks | Blast undersides with water; improve plant vigor and spacing |
| Water-soaked areas after a cold night, later turning brown | Frost/cold injury | Damage aligns with low spots/exposed edges; new growth may be fine | Cover plants on cold nights; avoid pruning until recovery is clear |
If you’re stuck between two possibilities, prioritize the one that’s still active outdoors. For example, improving airflow, reducing overhead watering, and stopping midday sprays are low-risk changes that help whether the culprit is a leaf spot pathogen, heat stress, or mild chemical burn. Once you’ve made one change, wait a few days and watch for new spotting—old marks won’t disappear, but the pattern of fresh damage will tell you if you’re on the right track.
Immediate corrective actions
Act first to stop spread and reduce stress on the plant. Brown spotting can come from fungi, bacteria, sunscald, chemical splash, or watering issues, and the early steps are mostly the same: isolate the problem, remove the worst tissue, and adjust conditions so new growth comes in clean.
- Quarantine and handle plants last. If only one bed or container is affected, avoid brushing against it and then touching healthy plants. Wash hands and rinse tools after working there.
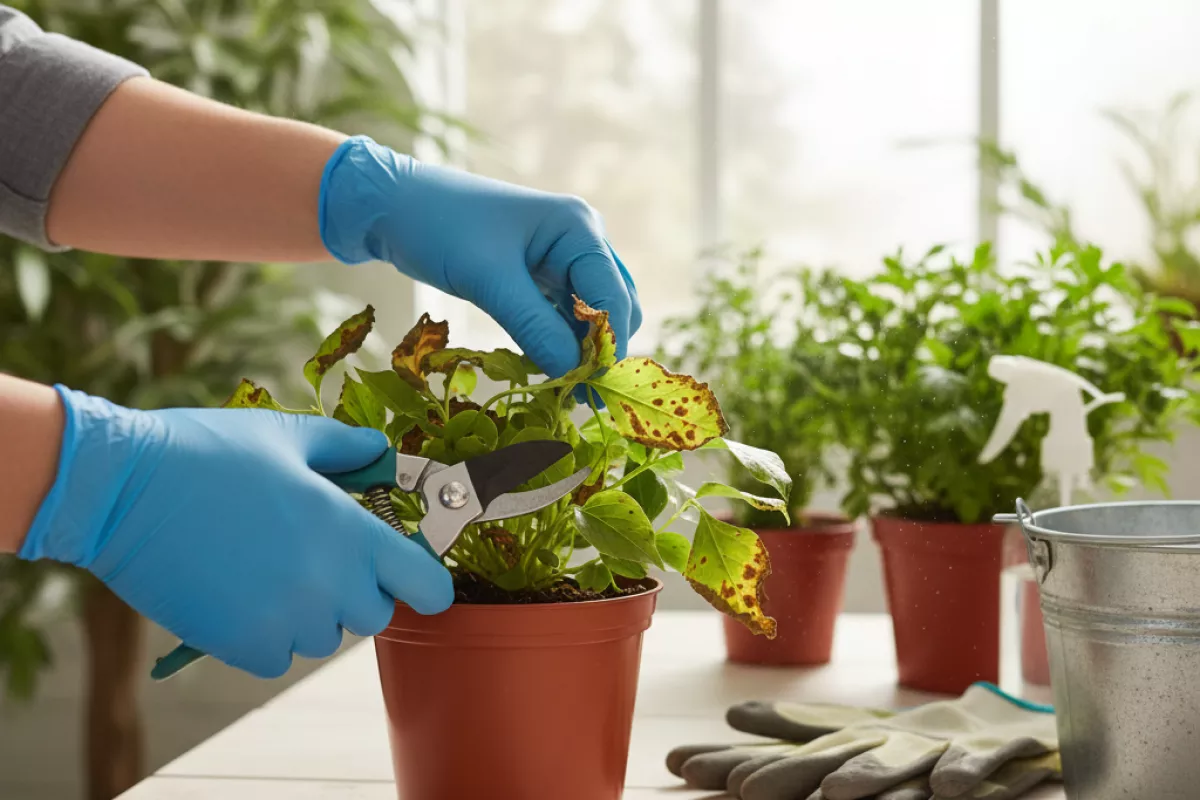
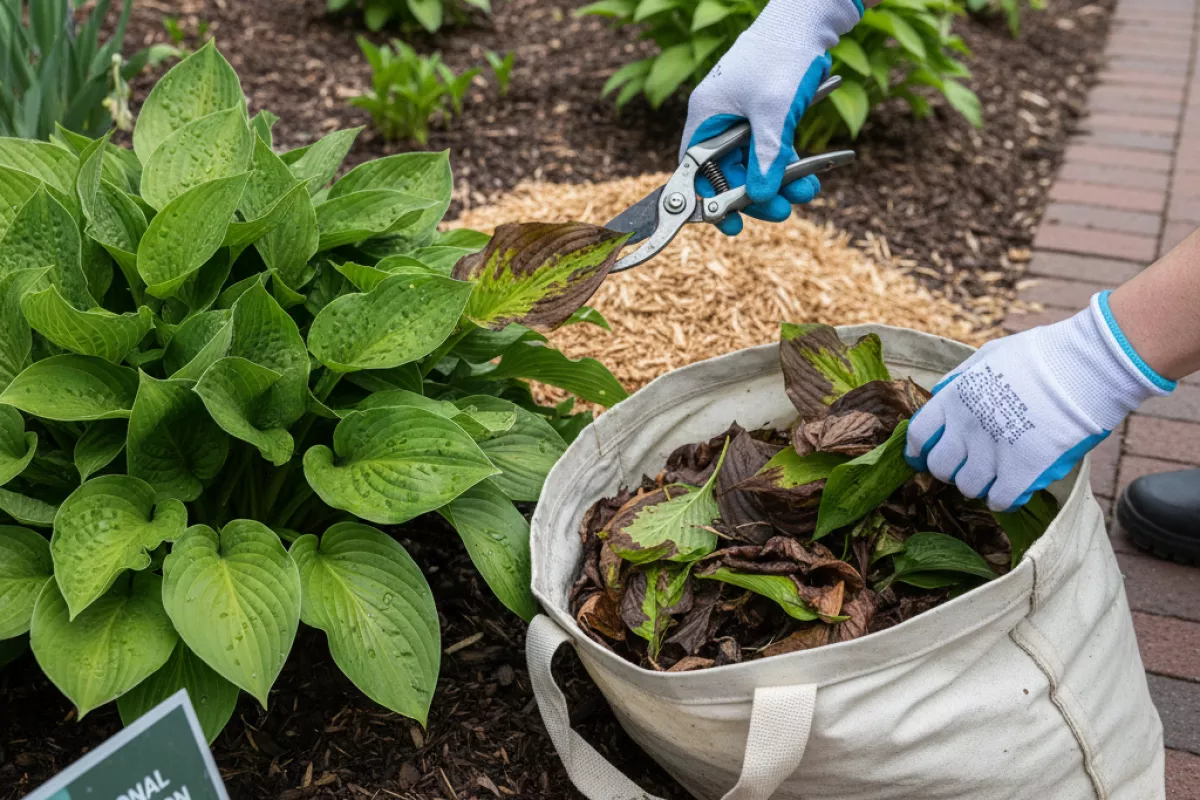
- Remove the most damaged leaves. Snip off heavily spotted foliage (especially if spots are expanding or have yellow halos). Use clean pruners and cut at the petiole base without tearing. Bag the debris; don’t compost it if you suspect disease.
- Dry the canopy, not the roots. Water at soil level and avoid wetting leaves. If you must water overhead, do it early so foliage dries quickly. Aim for deep watering rather than frequent splashes.
- Improve airflow right away. Thin crowded stems, pull nearby weeds, and space pots so leaves don’t touch. Even a small gap of 10–15 cm (4–6 in) between containers can reduce leaf wetness time.
- Check the soil moisture pattern. If the top 2–3 cm (1 in) is staying soggy, let it dry slightly before the next watering and ensure drainage holes aren’t blocked. If it’s bone-dry and hydrophobic, re-wet slowly in stages so water penetrates instead of running off.
- Stop recent inputs that could be burning leaves. Pause foliar feeds, strong fertilizers, soaps, oils, and any new spray until you’re confident they weren’t the trigger. If you sprayed within the last 24 hours, rinse foliage with gentle water to dilute residues.
- Reduce heat and sun shock. If spots appeared suddenly after a hot, bright day, provide temporary shade during peak sun (for example, afternoon cover) and keep the root zone evenly moist. Move containers out of reflected heat from walls or paving.
- Sanitize the “splash zone.” Mulch bare soil to reduce muddy splatter that carries spores onto leaves. A layer around 5–7.5 cm (2–3 in) helps, kept a few centimeters away from stems.
- Decide if a targeted treatment is warranted. If spotting is actively spreading despite the steps above, use a product that matches the likely cause: copper-based sprays may help with some bacterial and fungal issues, while a labeled fungicide may help with common leaf spots. Apply only to labeled plants, follow label rates, and avoid spraying in high heat above 29°C (85°F) or on drought-stressed plants.
If you’re unsure whether it’s disease or stress, watch the newest leaves for 3–5 days. New growth that stays clean after you switch to soil-level watering and improve airflow usually points to an environmental cause; new spots appearing on fresh leaves suggests an infectious problem that may need stricter sanitation and a labeled treatment.
Seasonal prevention methods
Preventing sudden brown spots is mostly about timing: doing the right small tasks before weather swings, irrigation changes, and pest cycles stress plants. A simple seasonal routine reduces leaf wetness, strengthens growth, and lowers the odds that fungi, bacteria, or scorch take hold.
| Season | What to do | Why it helps |
|---|---|---|
| Early spring |
|
Reduces overwintering spores, improves drying time after rain, and limits soil splash that spreads pathogens onto foliage. |
| Late spring to early summer |
|
Most leaf-spot organisms need long periods of moisture; catching the first lesions prevents a fast jump to “sudden” browning. |
| Hot midsummer |
|
Heat and irregular moisture can cause scorch that looks like disease; reducing stress also makes plants less vulnerable to secondary infections. |
| Late summer to fall |
|
Tender late growth is more prone to spotting, and autumn dew can keep leaves wet long enough for outbreaks. |
| Winter (or dormancy) |
|
Limits carryover of pathogens and sets you up with better genetics and layout before problems start. |
If you only change two habits, make them these: water early at soil level and keep foliage from staying wet for long stretches. Most “it happened overnight” brown spotting is really a buildup that becomes visible after a humid spell, a rainstorm, or a sudden heat spike.
- When to intervene: If new spots appear daily for 3–5 days, remove the worst leaves, improve airflow, and adjust watering before considering any sprays.
- How to avoid spreading it: Work in dry plants, not wet ones, and avoid brushing through damp foliage.
- Mulch management: Replace splash-prone bare soil with mulch, but don’t pile it against crowns where moisture lingers.